Showing posts with label Blogger Templates. Show all posts

Sunday, 15 June 2014

Camly - A Responsive Blogger Template

This Article is a Part of BTNT Weekly Special!!!
(Check out the series page to see other Awesome Templates on BTNT Weekly Special!!!)
Camly a Responsive Blogger Theme
This is the Ninth Week of BTNT Weekly Special!!!, Last Week I Published the BTNT Theme Which I used previously on blogtipsntricks.

The Theme I'm going to publish today is Camly - A Responsive Blogger Template, Camly is a 2 column blogger template with Awesome features like Custom opt-in forms (Sidebar, Below Header inside Accordion), Social Sharing buttons and much more.

In this theme, I've added an custom Opt-In Accordion Widget under the header (Just click the plus button under the header to see it in Action). Like other accordion widgets it won't affect the loading time, not even a bit.

Because the script for this accordion widget is just one line (It doesn't need jQuery). ;)

Read more �

Sunday, 8 June 2014

BTNT Theme - A Responsive Blogger Template

This Article is a Part of BTNT Weekly Special!!!
(Check out the series page to see other Awesome Templates on BTNT Weekly Special!!!)
BTNT a Responsive Blogger Theme
I Think just by looking at the title you got what I'm going to publish Today, If you're a regular reader of BTNT then I'm sure you've got what I'm Talking about. :)

Yes, You're right the theme I'm Going to publish today is the same theme which I previously used on Blogtipsntricks.com (BTNT) but it's more advanced than before.

After changing to the new theme many bloggers/readers contacted me by asking about my previous design used on BTNT (Some even offered to pay for the previous theme). I haven't even Imagined this many people like the previous design of blogtipsntricks. Thank you so Much.

So, Today as the 8 theme of BTNT Weekly Special, I'm Glad to share the previous version of BTNT.

For those who don't know about the Previous BTNT Theme, Its a two column blogger template with Awesome features like Custom opt-in forms (Sidebar, After posts, Above the footer), Ad placement, Social Sharing buttons and much more.

To make it short this theme is an all rounder. It has many custom features, SEO Optimized and also loads fast with cool features. I specially designed each and every part of the theme. Hope you also love it. :D

Read more �

Sunday, 1 June 2014

Hola - A Responsive Niche Blog Theme for Blogger

This Article is a Part of BTNT Weekly Special!!!
(Check out the series page to see other Awesome Templates on BTNT Weekly Special!!!)
Hola a Responsive Blogger Theme
This week I've come up with a theme which will Rock on Niche blogs. Just like Linzo this theme is also designed upon a friend's request. After sharing linzo on Facebook one of my friend Aqid Shahzad commented like this...

"Chan Deep waiting for your next blogger template that will be best for niche blogs I mean adsense optimized, responsive and search engine friendly template"

Below is the Screen Shot of Conversation.

Conversation about Niche Blog Theme

According to his Wish, Today I'm Publishing Hola - A Responsive Niche Blog Theme as the 7th theme of this Series, BTNT Weekly Special!!!

Okay, Let me tell you few words about this theme...

Hola is a Theme specially designed for Niche Blogs. So, In this theme I haven't focused on design (As Niche Blogs usually uses simple design.) Instead I focused on Ad placement, Site Loading, SEO and Responsiveness.

Three main Factors about Hola Blogger theme:
  1. It has a three column layout with simple design, So It'll easily blend with ads (Helps to Increase CTR). See the live demo for better understanding.
  2. It's optimized for Structured Data (Google Rich Snippet), Which plays a major role on SERP Appearance and Ranking. Now search engine can understand your site much better. you can check Google Rich Snippet Data Testing Tool to verify ;)
  3. Even After Placing Ads, It still Rocks on page speed(87/100).
Read more �

Sunday, 25 May 2014

Linzo - A Responsive Blogger Template

This Article is a Part of BTNT Weekly Special!!!
(Check out the series page to see other Awesome Templates on BTNT Weekly Special!!!)
Linzo a Responsive Blogger Theme
Last week I published Ozura - A Responsive blogger theme. After Publishing Ozura, I got Nice response through mail from few readers about the post format(Thanks Guys) Among them one asked, "It'd be Awesome if we've a theme with similar post format with light color". So, The Theme I'm going to publish Today, On The sixth week of the BTNT Weekly Special!!! is Linzo - A Responsive blogger Template. According to his wish Linzo has similar post format like Ozura.

Linzo is a 2 Column Box styled Minimal Theme with cool widgets like Custom Opt-In Subscribe Form, Custom Popular Post widget and Share Buttons on post pages, etc. Read more �

Sunday, 18 May 2014

Ozura - A Responsive Blogger Template

This Article is a Part of BTNT Weekly Special!!!
(Check out the series page to see other Awesome Templates on BTNT Weekly Special!!!)
Ozura a Responsive Blogger Theme
After Publishing Siril blogger theme, Today I've come up with another Cool Minimal style Theme. The Blogger Theme I'm going to publish on this fifth week of the BTNT Weekly Special!!! is Ozura - A Responsive blogger Template.

Ozura is a 2 Column Flat style Minimal Theme with cool widgets like Custom Opt-In Subscribe Form, Custom Popular Post widget and Share Buttons on post pages, etc. Read more �

Sunday, 11 May 2014

Wizz - A Responsive Blogger Template

This Article is a Part of BTNT Weekly Special!!!
(Check out the series page to see other Awesome Templates on BTNT Weekly Special!!!)
Wizz a Responsive Blogger Theme
We're successfully entering Fourth week of the BTNT Weekly Special!!! Series. This Time I'm Going to Publish Wizz - A Responsive blogger Template.

Wizz is a 3 Column Elegant looking Theme with a Custom Opt-In Form on the top right side of the sidebar. It has custom features like Two Responsive Navigation Menus, Custom Profile Icon Widget, Etc. Read more �

Sunday, 4 May 2014

Zett - A Responsive Blogger Template

This Article is a Part of BTNT Weekly Special!!!
(Check out the series page to see other Awesome Templates on BTNT Weekly Special!!!)
Zett a Responsive Blogger Theme
This is the Third Week of BTNT Weekly Special!!!, Last Week I Published Ravia - a Responsive blogger Theme.

Today, I'm going to Publish a Flat Style Theme, Zett - A Responsive Blogger Template. Zett is a Elegant looking Theme with a Custom Opt-In Form on the top of the homepage and sidebar in post page, Fast loading, SEO Optimized, Etc. Read more �

Sunday, 27 April 2014

Ravia - A Responsive Blogger Template

This Article is a Part of BTNT Weekly Special!!!
(Check out the series page to see other Awesome Templates on BTNT Weekly Special!!!)
Ravia a Responsive Blogger Theme
Hi Guys, After publishing the Siril blogger theme, Now we are successfully entering the second week of the BTNT Weekly Special!!!

Today, I'm Happy to Introduce a brand new gallery theme, Ravia - A Responsive Blogger Template. Ravia is an Elegant Gallery style blogger template with Custom features like Automatic Feature Post Widget, Cool Popular Post Widget and Inbuilt Social Share buttons, etc.
Read more �

Sunday, 20 April 2014

Siril - A Responsive Blogger Template

This Article is a Part of BTNT Weekly Special!!!
(Check out the series page to see other Awesome Templates on BTNT Weekly Special!!!)
Siril a Responsive Blogger Theme
Hello Guys, As I Announced, From Today onwards I'm Starting this template series. The first template of the BTNT Weekly Special is Siril a responsive blogger template. Siril is a minimal theme with a clean design. Then main advantage of this theme is page speed, It got 90/100 in Google PageSpeed Insights. It has a custom author widget below the main menu which only shows on index pages.
Read more �

Friday, 12 July 2013

Elice - A Responsive Blogger Template

Elice a Free Responsive Blogger Theme
Elice a responsive blogger template, This theme is the first free theme fully designed by me. All the themes Previously published in BTNT are WordPress themes which is converted to blogger Templates. From This theme I've stopped converting other themes to blogger template and publishing it for free (Theme conversion will be made for clients, I haven't made any any changes to services). In future All The free themes from BTNT are fully designed by me. ;) I Hope you like my own designs and give your support to me like you did before.

Elice is a Elegant looking theme with a custom opt-in form on the top of the homepage and sidebar in post page, Fast loading, SEO Optimized and much more...

Read more �

Thursday, 11 April 2013

4 amazing New Improvements to Blogger Template HTML Editor


New Blogger Template HTML Editor


Are you an internet-savvy blogger or web developer who likes to make webpages and templates? Diving into this work, you will find yourself immersed into a whole new world of coding, which geeks will definitely love. Well, for those Blogger 'geeks' out there, here's some good news! Google Blogger has just updated the Blogger Template HTML editor, and added four new features to make your experience even better! Now, whether you're a casual blogger, or a geek who likes tweaking his blog's template every now and then, this is place you now want to be! Check out these latest features now!


The Blogger Template HTML editor lets you edit your website's source code, and tweak it to your liking. If you know HTML, CSS and/or JavaScript, you can fully customize it to your preference. The sky is really the limit if you know what you're doing.


To get to this HTML editor, go to your Blogger dashboard, and open the blog you want to customize the template. From the Blog dashboard, click on the Template option from the left sidebar, and then find the Edit HTML button.


Edit Template HTML


What's new with the Template editor?


The new features are centered more towards user-friendliness (or rather, programmer-friendliness) and aim at boosting productivity. Previously, the Template HTML editor was much like the shapeless, bland HTML editor you get with Blogger posts (not that I'm complaining, it's a good way to keep things fast and simple).


But editing posts is one thing, and editing a template is quite another. One often had to download the code (I know I had to), make changes to it in a more comfortable editor (such as Notepad++), and then upload it again, just for the sake of keeping track of things more easily. Now I am no expert, but testing out your website or blog this way is one hell of a job. And unless you wanted to spend the whole day just making your posts look more presentable, you needed a better solution.....


.....which, by the way, has finally arrived! Blogger has made the template HTML editor much more comfortable to use by adding the following features.


  • Line numbering - Now, you can see line numbers on each line, making it much much more easier to spot errors and keep track of your code.

  • Syntax highlighting - Much like in advanced code editors, you can now see syntax highlighting. The editor will actually color code different objects in your source to make it much more readable.


line numbering and syntax highlighting


  • Auto-indentation - I love code editors that auto-indent code for me so that I won't have to press all those extra Tabs and Spacebars. But more than that, this feature helps you keep your code organized, and you can easily keep track of what belongs where. For example, you can easily figure out what's inside your div tag, or what have you included in a list etc. You can see auto-indentation coming into action while you're writing some code. Blogger template editor will automatically put in the spaces for you. You can also use the Format Template option to clean up the indentation of your entire template.

  • Code folding - I love this option too. Once I'm done with a particular piece of code, such as a div tag, I can simply fold the code, and not have to look at that large chunk of code again. You can see this from the image below. If you follow to where the arrow is pointing, you will see a small, grey arrow (?) next to line number 13. And if you look at the line number below, you will see 582, which means that the editor just saved me from having to scroll down through 569 lines of code!


Code folding and auto-indentation


  • Jump to widget - Now, you have a quicker way of jumping to particular section of code in your template - code that belongs to a widget. Just click on the Jump To Widget button at the top of the editor, and you can see a list of all widgets you can jump to. Clicking on any will take you to the respective section in code.


Jump to widget


Like these new features? Tell us what you think about them in the comments section below. And as always, feel free to ask questions. Peace :)


Thursday, 21 March 2013

Balance a Free Responsive Blogger Theme

Balance a Free Responsive Blogger Theme
Hi buddy's, It's been a While since we publish a new Blogger theme. After Publishing Minimum a Responsive Blogger template we didn't publish any new theme. OK, Lets come to the point. Now We are happy to publish another WordPress converted Blogger theme, Balance A responsive blogger template.

Like Minimum theme, Balance is also a WordPress Child theme Which is Designed by studio press. This theme is a Responsive theme with grid layout, Clean And Elegant look. It's also has a opt-in subscribe widget in homepage and a opt-in sidebar subscribe widget in post page. You can also see a live demo of the theme using the link below. ;)
Read more �

Monday, 7 January 2013

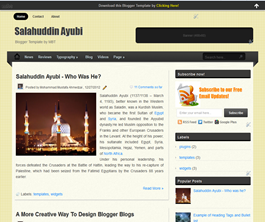
Template Customization - Salahuddin Ayubi

Salahuddin Ayubi Blogger Template


Template:

Salahuddin Ayubi

Layout:

Two Columns

Size: 32.0 KB
Compatibility: IE9+, All
License:  Creative Commons Attribution-NonCommercial


Demo      Download

Template Description:

I have already discussed in detail the important features for SEO, Social Media and Plugins. To read about why this template is so different please read the following article:

Easy Customization

Lets begin with important things that you would need to change the look of your template and edit important sections.

Note: You may not share or red-distribute the codes shared below without consulting us. All resources below are protected by DMCA and are sole property of STC Network.

1. Subscription box

subscription box

Copy and Paste The following code inside HTML/JavaScript widget for the subscribe box:

<style>

    #salahuddin-ayubi {

        border: 0;

        margin-bottom: 10px;

        margin: 0 auto;

            width:300px;

    }


    #email-news-subscribe .email-box{

        padding: 5px 5px;

        font-family: "Arial","Helvetica",sans-serif;

       height:38px;}

    #email-news-subscribe .email-box input.email{

        background:#FFFFFF;

        border: 1px solid #dedede;

        color: #999;

        padding: 7px 10px 8px 10px;

        -moz-border-radius: 3px;

        -webkit-border-radius: 3px;

        -o-border-radius: 3px;

        -ms-border-radius: 3px;

        -khtml-border-radius: 3px;

        border-radius: 3px;

        border-image: initial;

        font-family: "Arial","Helvetica",sans-serif;} 

    #email-news-subscribe .email-box input.email:focus{color:#333} 


#email-news-subscribe .email-box input.subscribe{

        background: -moz-linear-gradient(center top,#666 0,#333 100%);

        background: -webkit-gradient(linear,left top,left bottom,color-stop(0,#666),color-stop(1,#333));


        font-family: "Arial","Helvetica",sans-serif;

        border-radius:3px;

        -moz-border-radius:3px;

        -webkit-border-radius:3px;

        border:1px solid #333;

        color:white;


        padding:7px 14px;

        margin-left:3px;

        font-weight:bold;

        font-size:12px;

        cursor:pointer;

        border-image: initial;}


    #email-news-subscribe .email-box input.subscribe:hover{


        background-image:-moz-linear-gradient(top,#333,#666);

        background-image:-webkit-gradient(linear,left top,left bottom,from(#333),to(#666));

        filter:progid:DXImageTransform.Microsoft.Gradient(startColorStr=#ffffff,endColorStr=#ebebeb);

        outline:0;-moz-box-shadow:0 0 3px #999;

        -webkit-box-shadow:0 0 3px #999;

        box-shadow:0 0 3px #999


        -pie-background:linear-gradient(270deg,#ffda4d,#ff9b00);

        border-radius:3px;

        -moz-border-radius:3px;

        -webkit-border-radius:3px;

        border:1px solid #333;

        color:#FFFFFF;

     } 


    #other-social-bar {

        padding: 0px;

        overflow: hidden;

           height:37px;

         margin-top:-8px;

    }

    #other-social-bar ul {list-style: none outside none; padding-left: 4px;}


    #other-social-bar .other-follow {

        float: left;

        overflow: hidden;

        padding:5px;

        width: 270px;}

    #other-social-bar .other-follow ul {

        list-style: none outside none;

        padding-left: 4px;}

    #other-social-bar .other-follow li {


        display:inline;

        border:0;

      }


    #other-social-bar .other-follow li a {

        font-size: 12px;

        color:#666;

        font-weight: bold; font-family:arial;

        display:inline;

        }

    #other-social-bar .other-follow li.my-rss {

        background: url('https://blogger.googleusercontent.com/img/b/R29vZ2xl/AVvXsEiwleEzr7nHFE7hoQvQ-xpgMSn8Gnpan6bOQSt1vKp9FpVmXWAo_k_V4KWmXCUPMycCpj545wk0yU3sPj5muPbNk68Ym6EHQjR8WcdNN9ogdNrIV0tppCWqPEWsBKNRG3nTO7jZZwtqzek/s400/rss-16x16.png') no-repeat transparent;

        line-height: 1;

        padding: 0px 3px 1px 20px;

        width: 60px;

        margin-bottom:0px;

            margin-left:5px;}


    #other-social-bar .other-follow li.my-rss a, #other-social-bar .other-follow li.my-twitter a, #other-social-bar .other-follow li.my-gplus a{

    text-decoration:none;

    }

    #other-social-bar .other-follow li.my-rss a:hover, #other-social-bar .other-follow li.my-twitter a:hover, #other-social-bar .other-follow li.my-gplus a:hover{

    text-decoration:underline;

    }

    #other-social-bar .other-follow li.my-twitter {

        background: url('https://blogger.googleusercontent.com/img/b/R29vZ2xl/AVvXsEhY274Lg49DJw07_2PwSUl3wsnUbs598jk91K6yUFidcHQmb50HuyzxdGDy1guw9UYTcuwZVpbVTaAcJNnIphSXDIDxPvc6dGLabNnnwt0hEBqbBw5Wvt9xfq1Wpq4BP9r981lv3CGrty0/s400/twitter%2527.png') no-repeat transparent;

        line-height: 1;

        padding: 0px 3px 1px 20px;

        width: 60px;

        margin-bottom:0px;}

    #other-social-bar .other-follow li.my-gplus {

        background: url(https://blogger.googleusercontent.com/img/b/R29vZ2xl/AVvXsEiVNaGm_E_A3RgQoz7KpiR3REEqUURJ0kL0Tu9tewgOE2OczsLTM9xBKspNl6Cp7p-qruaWVPKva-ayFSeFP-KjbWkuWXTI7-FsMHy2w4iZwyYCk_lLsYjqyVLQRdq989uzFdhFBonAUWY/s400/gplus-16x16.png) no-repeat transparent;

        line-height: 1;

        width: 60px;

        padding: 0px 3px 1px 20px;

        margin-bottom:0px;}


.emailicon {

    background: url("https://blogger.googleusercontent.com/img/b/R29vZ2xl/AVvXsEhuLXDAVbzcNSElt4UUBpj1M_J72yokAN4Z8kZer7vDPrf54yGP-L0iLZBnBCpGUGz9YydDHJ6j1MINL3YT-WW_8QvpGltcMRwwwNMlLVpHrj2TAyJhcaUGzG0S0eHB9Xhp8t3qqPNxbPgA/s400/MBT-RSS-FEED.gif") no-repeat scroll 0px 2px transparent;

     padding: 0px 20px 0px 95px;

    min-height:100px;

    margin: 0px;

    width: 183px;

    line-height: 20px;

    vertical-align: middle;

    font-size: 14px;

    color: rgb(51, 51, 51);

}


.emailicon p {

color:#FF8604;

font-size: 20px;

font-weight: normal;

font-family:  impact; 

padding:40 0px 10px 0px;

margin:0;

padding-top: 20px;

line-height: 25px;

text-shadow: 0px 1px 0px #fff, 0px 2px 0px #C6C6C6;

}

    </style>

    <!--[if IE]>

    <style>

    #email-news-subscribe .email-box input.subscribe{

        background: #333;

        }

    </style>

    <![endif]-->


<div id="salahuddin-ayubi" >


<div class="emailicon"><p>Subscribe to our Free Email Updates! </p></div>

<div id="email-news-subscribe">

<div class="email-box"> <form action="http://feedburner.google.com/fb/a/mailverify" method="post" target="popupwindow" onsubmit="window.openundefined'http://feedburner.google.com/fb/a/mailverify?uri=tntbystc', 'popupwindow', 'scrollbars=yes,width=550,height=520');return true">

<input gtbfieldid="10" class="email" type="text" style="width: 160px; font-size: 12px;" id="email" name="email"value="Enter your email here..." onblur="if (this.value == &#39;&#39;) {this.value = &#39;Enter your email here...&#39;;}" onfocus="if (this.value == &#39;Enter your email here...&#39;) {this.value = &#39;&#39;;}" type="text" />


<input type="hidden" value="tntbystc" name="uri" /> <input type="hidden" name="loc" value="en_US" /> <input class="subscribe" name="commit" type="submit" value="Subscribe" /> </form> </div> </div>

<div id="other-social-bar">

<ul class="other-follow">

<li class="my-rss"> <a rel="nofollow" title="RSS" href="http://feeds.feedburner.com/tntbystc" target="_blank">RSS Feed</a> </li>

<li class="my-twitter"> <a rel="nofollow" title="twitter" rel="author" href="http://twitter.com/mybloggertricks"  target="_blank">Twitter</a> </li>

<li class="my-gplus"> <a rel="nofollow" title="Google Plus" rel="author" href=https://plus.google.com/1111214334130358474387 target="_blank">Google Plus</a> </li>

</ul>

</div>

</div>

  • Replace tntbystc with your Feedburner title

  • Replace the bolded sections with your twitter and Google+ username details

Note: There is also an Email icon in the sharing widget that appears at the bottom of post. To replace its link with your feedburner Email Subscription link kindly find and replace this: (You will find this link inside your template)

http://feedburner.google.com/fb/a/mailverify?uri=TntByStc

2. Top Menu

Pagelist menu

These tabs can easily be adjusted in two ways. 1. either from layout section  2. or from Pages window.

To drag, add, delete or update the tabs, simply go to Blogger > Pages

From here you can add, delete pages and you can also drag the tabs to shift their locations.


3. Main Menu
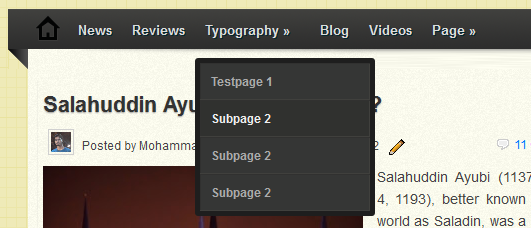
Main MenuTo edit links simply search for the following code inside your template:

<div id='botmenu'>


Just below it you will see a list of li tags where you can insert URL and title for your tabs. To create a sub menu transform your code in the following way:

From this:

<li><a href='TAB URL'>TAB TITLE</a></li>


To this:

<li><a href='TAB URL'>TAB TITLE</a>

<span class='sf-sub-indicator'/>

<ul class='sub-menu' style='display: none; visibility: hidden;'>


    <li><a href='Subpage url'>Subpage 1</a></li>

    <li><a href='Subpage url'>Subpage 2</a></li>

    <li><a href='Subpage url'>Subpage 3</a></li>

    <li><a href='Subpage url'>Subpage 4</a></li>


</ul>

</li>

I added Jquery easing effect and transition on mouse hover along with smooth drop down effect. All these effects would work only if you add the yellow highlighted codes.

4. Footer Menu

Footer Menu

To edit the menu at the bottom, simply find this code inside your template:

<ul id='footer-navigation'>

<li><a href='#'>Home</a></li>

<li><a href='#'>Typography</a></li>

<li><a href='#'>Sitemap</a></li>

<li><a href='#'>Services</a></li>

<li><a href='#'>Contact</a></li>

</ul>


Now editing the links would of course be a piece of cake for you all.

5. Blogger Notification Bar

attention grabber

To update the announcement text inside the sticky top bar, find this code:

<body>

You will then see the following code jst below the bode tag:

<div class='openbloggernotification' id='bloggernotificationWrap' style='display: block; margin-top: 0px;'><div id='bloggernotification'>

Download this Blogger Template by  <a class='link' href='http://www.mybloggertricks.com' target='_blank'>Clicking Here!</a>

<span id='closebloggernotification'/></div><span id='openbloggernotification' style='top: -6px;'><span/></span></div>

You may replace the bolded text with any message you wish to display to your readers.

6. Author Image

To replace the author image appearing just below post title and also at the bottom of post. Please find and replace the following image link with yours.

https://lh4.googleusercontent.com/-f8qSqNLtpBU/AAAAAAAAAAI/AAAAAAAAGQY/Sl371AuVYfM/s250-c-k/photo.jpg

Note: Your image can be of any size but make sure it is at most 30 X 30 in size.

7. Author Info

author box

To edit the title and author description kindly find this code:

<div id='about-author'>

You can then edit the details below it.

8. Archive Calendar

To add the archive widget kindly add an archive widget like your normally do from the layout section and then give it the following settings:
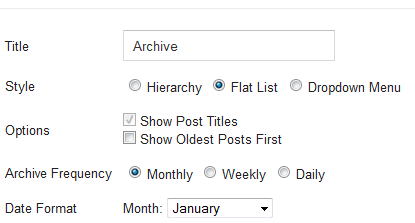
archive calendar settings


9. Multi Tabs

Jquery multi tabs

You can add widgets to the multi tab easily from the layout section but you will manually need to edit its titles from the template section. After you have added your widgets kindly edit their titles by finding this code:

<ul class='MBT-tabs MBT-tabs-widget-MBT-id'>

<li><a href='#widget-MBT-id1'>Latest Posts</a></li>

<li><a href='#widget-MBT-id2'>Video</a></li>

<li><a href='#widget-MBT-id3'>Recent Comments</a></li>

</ul>


You may now set these titles to your preferred widget titles.

10. About Author

To add your picture and some info about your self at the footer, you may paste the following code inside the HTML/Javascript widget in order to make the widget look as perfect as it looks in the demo:

<!--[if !IE]> -->

<style>

#profilemohammad{

border:2px solid #888; margin:2px 5px 0px 0px; padding:2px;

}

#profilemohammad:hover {

border:2px solid #ccc;

cursor:pointer;

}


.opacity  {

opacity: 0.5;

margin-left: 50px;

-moz-transition: all 0.5s ease-out; 

-o-transition: all 0.5s ease-out; 

-webkit-transition: all 0.5s ease-out; 

-ms-transition: all 0.5s ease-out; 

transition: all 0.5s ease-out;

-moz-transform: rotate(7deg); 

-o-transform: rotate(7deg); 

-webkit-transform: rotate(7deg); 

-ms-transform: rotate(7deg); 

transform: rotate(7deg); 

filter: progid:DXImageTransform.Microsoft.Matrix(

                    M11=0.9961946980917455, M12=-0.08715574274765817, M21=0.08715574274765817, M22=0.9961946980917455, sizingMethod='auto expand');

zoom: 1; 

}

.opacity:hover  {

opacity: 1;

margin-left: 0px;

-moz-transform: rotate(0deg); 

-o-transform: rotate(0deg); 

-webkit-transform: rotate(0deg); 

-ms-transform: rotate(0deg); 

transform: rotate(0deg); 

filter: progid:DXImageTransform.Microsoft.Matrix(

                    M11=1, M12=0, M21=0, M22=1, sizingMethod='auto expand');

zoom: 1;

-moz-box-shadow: 1px 1px 4px #000;

-webkit-box-shadow: 1px 1px 4px #000;

box-shadow: 1px 1px 4px #000;

}


</style>

   <![endif]-->


<style>

#profilemohammad{

border:2px solid #888; margin:2px 5px 0px 0px; padding:2px;

}

#profilemohammad:hover {

border:2px solid #ccc;

cursor:pointer;

}

.opacity  {

opacity: 0.5;

-moz-transition: all 0.5s ease-out; 

-o-transition: all 0.5s ease-out; 

-webkit-transition: all 0.5s ease-out; 

-ms-transition: all 0.5s ease-out; 

transition: all 0.5s ease-out;

zoom: 1; 

}

.opacity:hover  {

opacity: 1;

zoom: 1;

-moz-box-shadow: 1px 1px 4px #000;

-webkit-box-shadow: 1px 1px 4px #000;

box-shadow: 1px 1px 4px #000;

}

</style>


<img class="opacity" id="profilemohammad" src="https://blogger.googleusercontent.com/img/b/R29vZ2xl/AVvXsEhYJjaszW9RrvPUiCLmM7p0dhlZTv8QobCEXPyNurmI65-Usglpbam3n8qH93rTRBR7hiAVRCxTW84GXD2IANpq264loUn9cSbUu6X3Sz6cUZWe5sipYLOHBUEzYp6YJf49m_DFGJejy5wp/s1600/mohammadmustafa.jpg" align="left"/>

Hi! I am Mohammad, a certified SEO Consultant, Pro Blogger, Computer Engineer and an addicted Web Developer.

<a style="color:#888;" href="http://www.mybloggertricks.com/2008/06/something-about-me.html">Read More..</a>  <br/> </![endif]-->


  • Replace the yellow highlighted image link with your photo link

  • Replace the info text with anything you wish to write about yourself, your blog and your profession.

  • Replace the Read More link with the url of your About Page.

You May Read: Design a Professional Looking About us page

11. 468 X 60 Ad Banner

To Add your banner inside the Top right header section, Please paste the following code inside the Ad widget by going to layout:

<a href='#' target='_blank'><img width="468px" height="60px" alt='banner' src='https://blogger.googleusercontent.com/img/b/R29vZ2xl/AVvXsEgsY3JP6uww0b5SjHfE6GdP-ugXHpQ3NWj5-Tm4I7nxayu-E04COU4jHdNM5OzaWyhWKu6mmQxZpuSxNhBBluK3BuIGhjAIcwIY3RtfuCqTsc2EYeEMgRbc_rPRX4fY84wMxUcQetsWtV6h/s400/header-banner.png'/></a>

Replace the above image link with the image link of your banner and replace the # sign with Banner Link.

Anything left?

I just hope I have covered the details of almost every part. If you got yourself into any trouble just do not panic, bring a cup of coffee on your table and start posting your queries on this page. Technical queries will always be discussed here. We hope you find this little effort useful. My personal suggestion is that if you are really serious about SEO and blogging then Salahuddin Ayubi and coming new MBT designs are what you must try out. Care less about Fancy colors and animations and value more the core structure and SEO value of a template. Coming MBT designs are the best when compared to several designs available online that offer just design value and are unfortunately poorly coded inside that badly impacts search value. Yes truth hurts!

Another good news is arriving so stay tuned! Peace and blessings buddies! :)

Minimum a Responsive Blogger template

Minimum Theme Thumb
After The Releasing the Sensational A Responsive blogger template. I'm happy to release another free responsive blogger template. Minimum is a Wordpress Child Theme Published By StudioPress. This theme has a custom home page layout and post page layout I designed this theme to make the quality of blogger template equal to wordpress. This Theme has many Awesome features like Custom Social Profile, Opt-in Subscribe form, Custom button, threaded comment system and much more. ok Let see the demo for Better Understanding. ;)
Read more �

Tuesday, 13 November 2012

Copyblogger-V2 a Responsive Blogger Template

Copyblogger-V2 a Responsive Blogger Template
Copyblogger-v2 a Responsive Blogger Template. This is a Updated version of the Copyblogger Blogger template. It is a Responsive blogger template with a clean minimal look and has inbuilt features such as Multiple Author Info widget, Threaded comments system, Search Box, Custom follow by email widget, etc... It is a SEO friendly theme, fast loading, low errors in W3c Validation and can be viewed in any resolution(Any size window Or devices). I hope you like the new version of this template.
Read more �

Friday, 2 December 2011

Download Copyblogger Free Blogger Template!!!

Most of the bloggers know about the Copy blogger. Now they upgraded their theme and they decided to share their previous theme as a Genesis Child design to all Genesis community at no charge,but this will be only used by the wordpress users who has Genesis Framework. So,I decided to convert the Copy blogger's child theme to a blogger template and this was my first template.I hope you all enjoy this template. You can preview and download it for free by using the links below.
Read more �