Showing posts with label Google. Show all posts

Saturday, 28 March 2015

10 Interesting History Facts Of Google!


If you have been using internet for over a decade, you would surely agree
that since all this time, Google has had been the best source of help when it
comes to searching anything in the online world. You will, However be shocked to
find some of the very interesting facts about the renowned search engine and
people affiliated to it.


Here are 10 interesting History Facts of Google that you might not ever come
across!


10. Google�s Family


It was Larry Page�s brother Carl who helped them start an e-Group and a
dotcom company that was gained for over half a billion dollars by Yahoo by the
year 2000.


9. Original Name Of The Website


The original name for Google was Backrub and which was given to this website
due to the algorithm of the ranked pages was based on the number of back linked
pages the site had and supported.


8. Copyrights


The copyrights system of Google is very interesting because the patents that
have been filed with Google are referred to the patent that has been owned by
Dow Jones which is very much same to the Google copyrights.


7. Stanford


PageRank is the name of Google algorithm which has been given to it after
Larry Page. The patents for this are held by Stanford and are given 1.8mm shares
which were sold for 336 million dollars in the year 2005.


6. User Generated Data
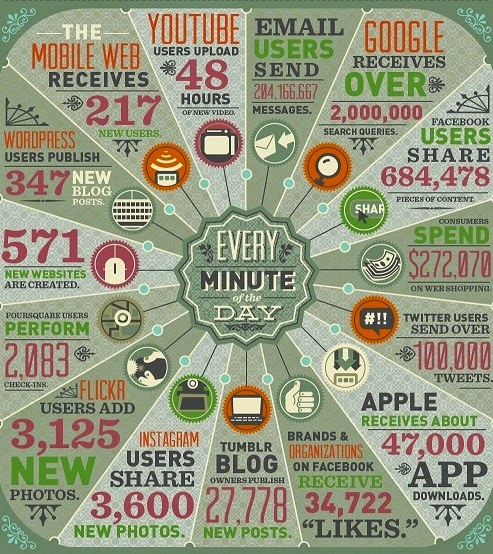


According to some of the studies Google uses about 20 petabytes of user
generated data every day. (Petabytes are estimated at 10 to the 15th power. So 1
petabyte is approximately 1,000,000,000,000,000 bytes). It uses enormous totals
of calculation to index the Web, process search results, serve up ads etc.


5. Opening Shares


Google was publicized in 2004 and its opening shares were about 85 dollars
per share and during their IPO they raised it to about $2,718,281,828.


4. Largest Search Engine


During 2000, Google became the largest search engine of the world and users
have spent about 200 billion minutes over it until now.


3. Politics


Larry Page and Sergey Brin are the two richest guys in the country to not
make any political contributions but have spent more on lobbying than Yahoo and
Facebook combined.


2. The First Google Employee


The number one employee of Google was Craig Silverstein and he is still
working at the company as the director of technology with a total net worth of
about 950 million dollars according to different websites.


1. April Fool Tradition


Google�s practice of April Fool�s jokes initiated in April 2000 when Google
proclaimed the �MentalPlex,� or Google�s aptitude to read a person�s mind as he
envisages the search results he wants.


So these were some interesting facts that you might not know about Google.


All for now,


Share your views


Friday, 20 February 2015

Google Labelled Your Site As Hacked? Here's How To Fix It


Website hacked!

Is your website being falsely labelled in search results as a 'hacked' website even though there's nothing wrong with it? There isn't cause for concern, because it might not be something 'hidden' that you apparently can't detect. Google is reportedly working on a new hacked page classifier, and as a result, a number of websites are getting incorrectly marked as 'hacked' in search results.

This was acknowledged by Google's John Mueller on Google+.


We're slowly rolling out a new hacked page classifier and noticed a small number of misclassifications. We're sorry for any trouble this may have caused -- we are working on addressing the issues.


Obviously, this is a very serious problem, because nobody in their right mind would visit a hacked or malicious website intentionally, right? So if your website has been effected, here's what you do.


How to tell when your website is effected?


First, do a quick search for your site and see if a line of blue text appears underneath the title tag reading �This site may be hacked.� If you don�t see that line, you�re good. If you do see that line, and you�re certain your site is not hacked, here�s what you can do to fix it.


Fixing the problem


All you have to do is, fill out a Google docs form for misclassification of your website. The link is given below.


One you fill it out, someone at Google will review it and remove the label if your site is in fact safe. It is not clear how long you�d have to wait before Google removes the label on your site, but hopefully they are quick about it.


Mueller recommends getting someone who is experienced in working with hacked sites to double-check whether or not your site is really hacked, because that�s a whole other issue you�ll need to deal with.


If you have any further questions, please feel free to create a new thread in our help forum, and we'll try to help you our over there. Leave your responses in the comments section below.

Wednesday, 11 February 2015

How To Get Extra 2GB Of Free Google Drive Storage?


Google Drive is one of the most popular cloud services today, used by millions around the world. Every Google account holder has his own free cloud space, which integrates so well with other Google products. From simple file sharing to hosting a website, there's a lot you can do with Google Drive. Google is now giving away an extra 2GB of free space, which I am sure many of you will find welcome.


Remember: This is a limited time offer. You can retain the extra 2GB forever, but only if you claim it before 17th February!


Google decided to celebrate Safer Internet Day in style by giving everyone a free upgrade on their Google Drive storage. There's a small price to pay - a couple minutes of your time to review your account settings.


How to get the free storage?


In order to get the free storage, you need to complete a quick security check on your account (link is given below).

=


=

After login, you will be prompted to start the security checkup.


Start security checkup


Next, you will be taken through your recent account activity. This includes login events for your Google account, device accesses, apps authorized to use your Google Account credentials, and so on. Once all is said and done, you will see a confirmation screen.


Complete security checkup


Google says the checkup will take around 2 minutes, but it took me less than 30 seconds. It�s a 3-step process that asks you to verify your password recovery information, as well as review your recent login activity and app permissions.


Once you see the three check marks, you can close the window or continue to your account settings. you're essentially done and are eligible for a free 2GB worth of space.


You�ll have until February 17th to complete the security checkup. The additional gigabytes will be added to your account around the end of the month.


If you want to keep on top of your account security you can revisit the security checkup again at any point to ensure there has been no suspicious activity.


Enjoy your free, extra space (:

Friday, 6 February 2015

Google To Show Tweets In Search Results Pages


Twitter firehose deal with Google


Twitter has just confirmed today that it has signed a Firehose deal with Google, which will bring Twitter news to non-Twitter/logged out users. For the benefit of both the companies, this deal will make Twitter's feeds directly accessible to Google, meaning that Google can now display tweets in its Search Results pages in real-time.


Google had a pretty similar deal with Twitter years ago, but that was dropped in 2011. Google previously had to crawl Twitter for new information - pretty much like it crawls every other website.


However, the new deal once again gives Google immediate access to Twitter's live data stream, which means that the slow crawling process can be done away with, and tweets can be made visible in SERPs in real-time.


The changes will incrementally start taking place within the next few months.


Back in 2009, Google was able to index tweets automatically. But that deal sort of fell away as the then CEO wanted to have control over the network's content. Now though, things have changed. Twitter is very focused now on bringing more traffic to its content and possibly monetizing that to greater effect. So this new Google deal will give Twitter just what it needs - more eyeballs for its content. According to CEO Dick Costolo;


�We've got the opportunity now to drive and aggregate eyeballs to logged-out experiences that we plan to deliver on the front page of Twitter,� he continued, �and that�s why it makes a lot more sense now.�


This can also be seen as an expansion strategy. Twitter is obviously set on targeting logged-out or non-Twitter users with this update. This would serve to bring new users over to the network,  and is exactly the type of attitude the company needs right now as it�s growth in terms of both daily active users and stock price has fallen flat as of late.


So what does Google stand to gain in all this?


This deal is being described as a win-win for both companies. In addition to potentially accelerating Twitter�s growth, it�s also good for Google because the ability to index real-time tweets is valuable for searchers.


Of course, this deal also stands to greatly benefit businesses and publishers as well, as their search engine visibility and social media audience will be amplified. Hence, a new arena for Bloggers and content markets to explore (:

Thursday, 29 January 2015

Google Supports Locale-Aware Content Based Location


Internationalized websites

Google has always been telling webmasters to treat its crawlers - GoogleBot in other words - just as you would treat any user accessing your website from the United States. By default, Googlebot requests pages without setting an Accept-Language HTTP request header and uses US IP addresses. As a result, not all content variants of locale-adaptive pages may be indexed completely.


This is now going to change because Google may crawl your site from IP addresses outside of the US and also may crawl your site with language settings outside of English-US.


Google has announced that they now support locale-aware crawling by Googlebot - this is a huge change for internationalized sites.


What does this mean?


Some sites that offer internationalized content do so without sending the user to a special URL. Google has always preferred you set up specific URLs or ccTLDs for content tailored to different countries or languages, but many sites just dynamically serve content on their .com based on the IP address origin or their browser language configurations.


Google is now going to support the sites that dynamically serve internationalized content based on IP or language. They will do this based on two methods:


  • Geo-distributed crawling where Googlebot would start to use IP addresses that appear to be coming from outside the USA, in addition to the current IP addresses that appear to be from the USA that Googlebot currently uses.

  • Language-dependent crawling where Googlebot would start to crawl with an Accept-Language HTTP header in the request.


As these new crawling configurations are enabled automatically for pages Google detects to be locale-adaptive, you may notice changes in how the content on your site is crawled and displayed in Google search results without you altering your server settings.


These new configurations do not alter Google's recommendation to use separate URLs with rel=alternate hreflang annotations for each locale. Google still supports and recommends using separate URLs as they are still the best way for users to interact and share your content, and also to maximize indexing and better ranking of all variants of your content.

Sunday, 18 January 2015

New Upcoming Event Listing in Google Knowledge Graph


Google Knowledge Graph


The Knowledge Graph is Google's way of keeping you within the confines of its search pages, so you won't have to navigate away. This feature has done wonders for Google users, and remains one of the reasons why most people still use Google. The Knowledge Graph has come a long way from a simple arithmetic calculator to the complex information panel it is now. In addition to the previous music artists' event schedules, Google has now added more dimensions to the array.


It started last year when Google started showing music artists' event schedule in its Knowledge Graph pane on the left. Here's a screenshot from the update back then;


Music Artist Schedules


This feature has now been expanded;


Ticket links for events


For artists: if you mark up ticketing links along with the events on your official website, Google will now show an expanded answer card for your events in Google search, including the on-sale date, availability, and a direct link to your preferred ticketing site.


As before, you may write the event markup directly into your site�s HTML, or simply install an event widget that builds in the markup for you automatically�like Bandsintown or BandPage.


Delegated Event Listings


What if you can�t add markup or an event widget to your official website - for example, if your website doesn�t list your events at all? Now you can use delegation markup to tell Google to source your events from a page of your choice on another website. Just add the following markup to your home page, making sure to customize the values in bold:


<script type="application/ld+json">


{"@context" : "http://schema.org",


 "@type" : "MusicGroup",


 "name" : "Your Band or Performer Name",


 "url" : "http://your-official-website.com",


 "event" : "http://other-event-site.com/your-event-listing-page/"


}


</script>


The marked-up events found on the other event site's page will then be eligible for Google events features. Examples of sites you can point to in the �event� field include bandpage.com, bandsintown.com, and ticketmaster.com etc.


Comedian Events


Google wants to feature comedian events in its Knowledge Graph too.. Just add ComedyEvent markup to your official website. Or, if another site like laughstub.com has your complete event listings, use delegation markup on your home page to point Google their way.


Venue Events


Google is also starting to show venue event listings in Google Search. Concert venues, theaters, libraries, fairgrounds, and so on: make your upcoming events eligible for display across Google by adding Event markup to your official website.


As with artist events, you have a choice of writing the event markup directly into your site�s HTML, or using a widget or plugin that builds in the markup for you. Also, if all your events are ticketed by a primary ticketer whose website provides markup, you don�t have to do anything! Google will read the ticketer�s markup and apply it toward your venue�s event listings.


If you're an artist, comedian, or event organizer, then add the markups on your site and help new fans discover your events, and play to a packed house! All the best :)

Thursday, 13 June 2013

Connect Twitter To Feedburner Directly without using App!


FeedBurner-Twitter Integration


A few years ago, Google FeedBurner had a Socialize option that let people share their blog posts (RSS) directly on Twitter. But this service was depreciated, and people started using third-party apps such as twitterfeed instead. While these apps work fine, they leave you somewhat dependant upon them. Now though, it seems Google is throwing a new line out for Bloggers who'd like to share their RSS feeds to Twitter directly, because the Socialize option is coming back! This indeed marks another step forward for Google/Twitter Integration. Now, you can share your blog posts (RSS feeds) to Twitter without any third-party apps!


Remove third-party apps from Twitter


First of all, to avoid any redundancy, you have to first remove any auto-scheduling apps for Twitter. To do this, log into your Twitter account, and click on the gear icon on the top-right corner. Then click Settings. Now, from the left sidebar, click on the Apps tab.


Here, you will see all the Apps that you're using with your Twitter account. Next to each app is a Revoke Access button, which essentially deletes the app. Delete any scheduling apps you're using to auto-share your blog posts to Twitter, such as twitterfeed.


Revoke access to twitterfeed


Share updates using Socialize


Sharing your updates on Twitter is now easier than ever. To use Socialize, follow these steps;


  • Log into your FeedBurner account, and select the feed you want to share on Twitter.

  • Click on the Publicize tab

  • Click on Socialize from the left sidebar


Socialize


  • Click on Add a Twitter Account 

  • Authorize the app for your Twitter account, and you're all done!


Now, whenever you publish a new blog post, your FeedBurner will be automatically updated, and once that happens, the update will be immediately echoed on your Twitter account.


Got any questions? Feel free to ask in the comments below. Also tell us how you're sharing your blog updates on social medias like Twitter and Facebook. Cheers :)

Friday, 7 June 2013

Make your Sites Google Friendly using Structured Data!


Structured Data


Have you ever wondered why or how the search results from sites like CNET or Google Play/iTunes look so different from search results for your own website? That happens because Google 'understands' these sites better than yours. This is not to say that your site doesn't meet the 'quality criteria', so to speak. Rather, it merely means that Google can identify and understand the structure of such sites, and can provide a precise yet comprehensive and accurate overview for them. You can do that too by structuring the data/content on your website, so that search engines know exactly what your site is about. Based on your structured data, Google can show appropriate information on Google Now or Knowledge Graph.


Imagine a review website where users write product reviews. This site should naturally be structurally different than a news blog, or a portfolio website, or a product brochure/showcase website, or a wiki. You wouldn't them all to be treated the same way in search results now, would you? Structured Data will help Google provide searchers with accurate and interactive information they can easily relate to. This will not only help your website's CTR by a large degree, it will also build up your 'SEO-optimization points', meaning that search engines will be more hospitable for your website.


To help you participate in structured data features, Google has just recently released two news tools, the Data Highlighter, and the Structured Data Markup Helper tool.


Data Highlighter


The Data Highlighter basically helps identify what sort of content you have on your site, and teaches Google the pattern of structured data about events on your website. You can now tell Google whether your site is among the following types listed.


  • Local Business

  • Products

  • Articles

  • Software Applications

  • Movies

  • TV Programs

  • Restaurants


By using the Data Highlighter, you won't have to modify the HTML of your existing page. Start by logging into Google Webmaster Tools, and then from the left sidebar, go to Optimization >> Data Highlighter. Then click on the button on the right that says Start Highlighting.


You will then be asked to enter a URL, and then choose its type from among the seven listed above. You can also choose to tag just that page, or other pages with the same consistent formatting too. The latter would be a good option for a blog, for example.


After this, you will see an overview of that page, and you will have to tag each part of the page with your mouse. You can, for example, specify the author, the publishing date, and the average rating for an article. Tagging options vary depending upon what option you chose (i.e. Article, Product etc).


The process will take a few minutes, at the end of which the content will be 'highlighted' automatically. 


Structured Data Markup Helper


As an alternative to the Data Highlighter where you let Google do the work for you, you can use the Structured Data Markup Helper tool to edit your HTML, and optimize your site using the markup generated by Google (for advanced users). 


It works in much the same way as Data Highlighter. You first have to tag various page elements with your mouse. Then, this tool will generate sample HTML code for you with microdata markup included. You can use this code as a reference for implementing structured data directly into your site's source code.


Using these tools, you can really stand out from the competition. You can tell Google exactly what your website is about, and we think these tools are a huge step forwards. What do you think about it? Leave your responses in the comments section below. And if you have questions, feel free to ask. Cheers :)

Thursday, 6 June 2013

How To show your Organization Logo On Google Search Results?


Organizational logos


To any company, organization, or corporation, a logo is a basic building block without which the building cannot hold. It helps with the instant public recognition of a brand, which is why a new start-up company isn't considered complete unless it has an official logo. The use of logos dates as far back as 2300 B.C, and the practice still remains with most businesses today. Make that "all businesses", because I can't think of any brand that does not have a logo. Companies need people to recognize them. Have you ever thought of associating an official logo with your brand? You might already have a logo, but how do you officially associate a logo with your official website, so that even search engines know what your logo is? Fortunately, schema.org markup for organizational logos allows you to do just that, and Google has very recently released support for it!


Using this markup, you can officially link your website to your logo icon, which will automatically get associated with your brand. Google will understand that this is your logo icon, and will use this information in search results.


Specifying a logo for your site


Suppose you have a website (www.yoursite.com). To associate a logo, you have to keep an image of that logo in a safe and secure place online, a place where you or others won't bother it. Ideally, it should be in the same place where you keep your website files (web hosting server). But you can put it in another accessible place as well, such as another server. But make sure you don't move the file around, so as not to change its URI.


You can use a multitude of web formats for your image files, such as .jpg, .bmp, .ico, .png etc. But .png is recommended, since it offers high quality with lossless compression (formats like .jpg are lossy - their quality deteriorates).


To point this logo image to Google's algorithms, you can use the following markup using visible on-page elements on their homepage.


<div itemscope itemtype="http://schema.org/Organization"> <a itemprop="url" href="http://www.example.com/">Home</a> <img itemprop="logo" src="http://www.example.com/logo.png" /></div>


Where www.yoursite.com is the URL of your site's homepage, and www.yoursite.com/logo.png is the direct URI of your logo image.


Why use logos?


Google's algorithms will automatically associate the image with your homepage, and this information will be used in search results - the logo image will be given preference over others in the Knowledge Graph, for example. It also helps with your authority, and in the future, we can expect more applications for this feature.


With this feature, you can also set up a single logo for multiple websites under the same brand/company. And since your logo has precedence, it will replace your Google Plus profile picture in search results. We at MBT aren't using this markup, because we're fine with our Google Plus profile picture. However, we will do it once we set up a company website for our network.


Got any questions? Feel free to ask in the comments section below. And stay tuned for more updates on how Google works. Cheers :)

Saturday, 27 April 2013

Replace Threaded comments with Google+ Comments in blogger


Google Plus commenting system

You might be familiar with the latest commenting system Google has introduced that integrates Google+ comments with Blogger blogs. This new commenting system is a major improvement over the default Blogger system, and it supports threaded comments. It also looks a lot better. We earlier shared a tutorial on how to enable this new Google Plus commenting system for Blogger blogs. But some people still have problems implementing it on custom templates. For them, we have compiled this short tutorial on how to effectively implement and use this new improved commenting system.


Switching to Google Plus comments


To enable Google Plus comments for your Blogger blog, you will first have to connect your account to your Google+ account. To do this, just follow these steps.


  • Log into your Blogger dashboard, and choose a blog you want to connect

  • Click on the Google+ button from the left sidebar

  • Click on the Get Started button on the top-left side to connect your account. This will not appear if your account is already linked.

  • Follow the simple instructions to connect your blog.

  • Once connected, you will see an option Use Google+ comments on this blog. Checking this will enable the new Google Plus commenting system.


This will turn your Google Plus comments on for default templates. But it won't work for custom templates. For that, you will have to tweak your template source code and make some edits as instructed in the section below.


Displaying Google comments on custom templates


There are two ways to do this. You could either use the easy way, which is the Revert to default option, or you could do it the geek way, which is via the HTML editor.


The easy way


Custom templates have customized widgets that usually override the default settings. And that is why this commenting system might not work with custom templates. However, if you were to somehow remove those overrides, the commenting system would display on your blog without a hitch.


To do that, you can revert your Blog Widget to defaults in your template HTML editor via the following steps.


  • From inside your blog's dashboard, click on Template from the left sidebar.

  • Click on Edit HTML


(Before moving on, we'd suggest you backup your template, just in case anything goes wrong)


  • Click on the Revert Widget templates to defaults button

  • Now, Be careful to select Blog1 Widget from the list. Do not select any other, as it will reset other widgets to default as well.


This will solve the problem most of the times, but there's a big problem. You will lose the customization in your Blog Widget. So if you want to preserve the look of your current widget, then I'd suggest you use the alternative geek's way.


The geek's way


This isn't as geeky as it sounds. All you have to do is replace a couple lines of code with another. From inside your HTML editor, press Ctrl + F and search for "threaded_comments". You will see a chunk of code as shown below.


<b:if cond='data:blog.pageType == & quot;static_page&quot;'>
   <b:if cond='data:post.showThreadedComments'>
      <b:include data='post' name='threaded_comments'/>
      <b:else/>
      <b:include data='post' name='comments'/>
   </b:if>

</b:if>
<b:if cond='data:blog.pageType == & quot;item&quot;'>
   <b:if cond='data:post.showThreadedComments'>
      <b:include data='post' name='threaded_comments'/>
      <b:else/>
      <b:include data='post' name='comments'/>
   </b:if>

</b:if>


Carefully look at the bolded code, and then replace them with the following line of code.


<b:include data='post' name='comment_picker'/>


If you want to display comment count, you can simply modify the above line of code


<b:include data='post' name='comment_picker'/>


Still not working? Please feel free to mention your queries in the comments below. And please try to be as relevant as possible. Thank you :)

Tuesday, 23 April 2013

Create Open Source Projects with Google Summer of Code Program


Google Summer of Code 2013


Are you a university student with IT-related majors, and looking for some real hands-on development experience this summer? Then the Google Summer of Code program is just for you! Google once again is providing students with the opportunity to showcase their skills and work with Google to achieve greater heights. This time around, Google is providing students with a platform to work on Open Source projects sponsored by Google, and overseen by mentor organizations. This is nothing short of an internship, as you will gain real-world industry development experience that applies to your field, plus you will get recognition from Google, and a nice pay-check!


The Google Summer of Code 2013 Program


It's all about coding! The Google Summer of Code is an annual program that has been going on for 8 years now. More than 6,000 Students have worked on projects mentored by over 400 organizations. Students will get to work on actual open source software projects over the summer. These projects will be overseen by mentor organizations, who will guide the students and address technical issues.


Eligibility - There is an age restriction of 18+ for participating in this program. The students must also be enrolled in a college or university. Although preferable, students don't need to be majoring in Computer Science. It depends on the projects you are going for. And project fields also include computational biology and mining engineering etc.


How does it work out?


Big open source projects (like Linux, Mozilla etc) first choose administrators to represent their company as mentors. These mentors then submit a proposal to Google. If that proposal gets accepted, they get an account with the Google Summer of Code program 2013 (Students don't need to worry about this part).


Students then submit proposals for working on specific projects with mentors. The mentors will then choose from among the applicants, and the students can begin coding once they are oriented. Students have to hand in evaluations showing their progress as requested by mentor organizations, and they will pass or fail after evaluation is done by the mentor organization. Failed students are automatically dropped out of the program.


Benefits for students


Being a university student, you should know pretty well how useful these extra-curricular activities can be. Since you'll be looking for a job soon, you will get some real hands-on experience on how things are done out there in the industry. Besides, a project such as this, especially one sponsored and recognized by Google could do wonders for your resume, and would help you out immensely with job opportunities.


Besides, there's a nice payout! Approved and accepted projects will get $5,500 per student, $500 of which will go to their mentor organization. $500 are paid out after the acceptance of the proposal, and $2,250 are paid after the mid-evaluation and final-evaluation each! Real nice way to fill up your pockets this summer, if you ask me!


How to apply?


To apply to this program, visit the Google Summer of Code 2013 website, and register as student. Registrations for organizations have already been completed. Student registration deadline is till May 3rd (12 00 PDT). So hurry! There are a limited number of slots available!


Once registered, you can browse through 177 organizations to work with. Submit your proposal to the mentor of your choice (max proposal limit is 5), and wait for acceptance.


For full details, please visit the GSOC 2013 website. You will find all the instructions available there, along with guidelines on how to submit a proposal. Give it your best shot, because your selection will be made based on your proposal! If you have further questions, please feel free to ask me. Also refer to this FAQ for answers to your questions. All the best :)

Saturday, 20 April 2013

How to use Google+ comments on Blogger?


Google+ comments on Blogger

Keeping the conversation going has to be one of the biggest challenges bloggers face nowadays. Readers now want more than just information - they need answers! And you, as a blogger, are responsible for answering them, and defending your content. Readers will talk about your content on a multitude of platforms, such as your blog's comments, or on social media such as Google+. So keeping track of all those conversations can be a tedious and indeed a daunting task, which is why Google has now decided to help out its Blogger users by integrating Google Plus comments into Blogger blogs (finally :P).


Google is slowly building upon Google Plus, improving its functionality little by little. Up until now, it had only integrated Google+ share button in Blogger, so you could share to Google Plus right from your Blogger dashboard. Considering that, this comments integration is a big one, and can serve multiple purposes at once.


Track conversations easily


The aim of this new functionality is to provide a means for better conversation tracking. Comments on Google+ and Blogger are now integrated. So you will see two types of comments - direct comments, and comments from Google+. Suppose you or someone has shared your blog post to their G+ profile, and people are commenting on it. Those comments are nicely integrated to appear in your blogger blog. This helps you keep track of conversations really easily, and also helps readers get to know more about what other people think about your blog.


Check out an example of this functionality in action in the image below.


Privacy concerns


Google Plus has decided not to make the same mistake as Facebook, so this new integration doesn't come without its privacy settings. People who comment on a Google Plus post, or on a blog through a Google+ ID, they have the option of sharing their comments with specific circles. So readers can essentially control the people they want their comments to be visible to.


Expand your reach!


Another great +1 of this new integration is that, you can grow your reach. Just like content shared on Facebook or G+ gains reach beyond your fan-base, so do the comments that users make about your blog post. These comments appear in the news-feed of people in the shared circle, i.e. the people who are actually beyond your reach. In this way, you could build a whole new audience and increase traffic to your blog by just taking advantage of this integration.


Integrating Google Plus comments with blogger blogs


Google has made this integration really easy. Just sign into your Blogger dashboard, and follow the following steps.


  • Find and click on the Google Plus tab in your blog's dashboard

  • Click on Enable Google+ Comments.


Keep in mind that you will need to upgrade to Google Plus before you can use this functionality. Also, comments already made on your blog posts will continue to work with this new widget.


There's another very important thing to keep in mind as well. This trick won't work with custom Blogger Templates, nor some latest Blogger templates. For that, you will have to add a certain piece of code. Mohammad will share a post on adding this functionality to custom templates as soon as his exams are over, so stay tuned! And if you have questions in the meantime, please shoot them our way! Cheers :)

Wednesday, 17 April 2013

How to use "x-default hreflang" for international landing pages?


Multilingual sites


Delivering your blog's or website's content in a multitude of languages can make your web entity accessible to a wider range of audience. Indeed, this is one of the many strategies webmasters employ to increase their website traffic. They can simply configure their homepages to point towards specialized content tailored for different users' different language requirement. but now, there's a new and more SEO friendly way of doing this. Webmasters can now specify such specialized homepages using a new rel-alternate-hreflang annotation that Google only just introduced, and is compatible not only with Google, but other search engines as well such as Yandex.


There are two basic ways of delivering multi-lingual content; either through redirecting users to another page with the corresponding language setting, or dynamically changing your page's content to match the preferences of the users (and based on other things as well like their geographic location etc). But whatever way you deliver the content, this markup will still work perfectly.


'Rel-Alternate-Hreflang'


Take this site as an example. Suppose we were to serve our content in four different languages, English, Spanish, French, and German. The respective URLs would look something like this.


  • http://www.mybloggertricks.com/en/

  • http://www.mybloggertricks.com/sp/

  • http://www.mybloggertricks.com/fr/

  • http://www.mybloggertricks.com/gr/

  • and so on.....


If we were to add this annotation to our site, the best approach would be to use <link /> tags in the head of our HTML documents. Here's the syntax for this annotation.


<link href="http://www.mybloggertricks.com/en/" rel="alternate" hreflang="en" />
(for English content)


The 'x-default hreflang' attribute


You can use the "x-default" value in the hreflang attribute to indicate that a page indicated by the href attribute doesn't have any specific language preferences, and is the default page for any type of audience. This should be used when the link points to the homepage, and not to any language-specific page. For example;


<link href="http://www.mybloggertricks.com/" rel="alternate" hreflang="x-default" />


As mentioned earlier, it doesn't matter whether you change the content of your website dynamically to accommodate different languages, or redirect users to specific pages. This annotation will still work. If you have problems with using this annotations, please feel free to ask us in the comments below. Also share your feedback on the selection of topics at our blog =D

Tuesday, 16 April 2013

Become a Google Student Ambassador for your College today!


Google Student Ambassador Program


Are you a fun guy who's always looking for something new to explore? If you're a college/university student eager to look into new opportunities, then here's something you might like. Would you be interested in becoming a Google representative for your college? Google has a program called Google Student Ambassador Program that will empower students, and offer them new opportunities for grooming their skills.


What you get?


Under this program, you will get the opportunity of enhancing your personal development, leadership, and communication skills. And there's more! A certificate from Google, and an entry in your resume for being a Google Student Ambassador would prove invaluable when you're out there, looking for a job.


Besides, there's the swag of working under Google's name!


Google Ambassadors get to learn about innovative Google products and programs. They will be kept updated with the latest happenings, and what's currently going on at Google. And this is a big +1 for Google enthusiasts like myself.


These Ambassadors serve to help Google better understand university cultures. Their responsibility is to plan and host fun events on their campus, and they will serve as campus contacts for Google teams. In this way, these ambassadors will get a chance to get to know people at Google, get tips and advice, and more. Connections like these can be invaluable.


Who can apply?


The applicants can be from any major, and not necessarily from IT or technology-related fields. The only requirement is that, you should be social, and ready to take up social responsibilities like these. They should also be involved in their college communities. That, and the fact that they should be enthusiastic about Google and technology, because otherwise, what's the point?


How to apply?


To apply, you must fill this registration form. But along with the registration form, you need to have the following;


  • Certified proof of enrollment in your university for the year 2013

  • Recommendation letters from 1-2 professors, lecturers, or former Google Ambassadors

  • A short video of at most 1-minute length about yourself or your plans as a Google Ambassador. Make this unique and original. Surprise Google!


Hurry up, and grab this opportunity before the registration expires! The length of this program will be one academic year, but the things you learn will stay with you forever. It's a one-in-a-lifetime opportunity, and you wouldn't want to miss it! Good luck :)

Thursday, 11 April 2013

4 amazing New Improvements to Blogger Template HTML Editor


New Blogger Template HTML Editor


Are you an internet-savvy blogger or web developer who likes to make webpages and templates? Diving into this work, you will find yourself immersed into a whole new world of coding, which geeks will definitely love. Well, for those Blogger 'geeks' out there, here's some good news! Google Blogger has just updated the Blogger Template HTML editor, and added four new features to make your experience even better! Now, whether you're a casual blogger, or a geek who likes tweaking his blog's template every now and then, this is place you now want to be! Check out these latest features now!


The Blogger Template HTML editor lets you edit your website's source code, and tweak it to your liking. If you know HTML, CSS and/or JavaScript, you can fully customize it to your preference. The sky is really the limit if you know what you're doing.


To get to this HTML editor, go to your Blogger dashboard, and open the blog you want to customize the template. From the Blog dashboard, click on the Template option from the left sidebar, and then find the Edit HTML button.


Edit Template HTML


What's new with the Template editor?


The new features are centered more towards user-friendliness (or rather, programmer-friendliness) and aim at boosting productivity. Previously, the Template HTML editor was much like the shapeless, bland HTML editor you get with Blogger posts (not that I'm complaining, it's a good way to keep things fast and simple).


But editing posts is one thing, and editing a template is quite another. One often had to download the code (I know I had to), make changes to it in a more comfortable editor (such as Notepad++), and then upload it again, just for the sake of keeping track of things more easily. Now I am no expert, but testing out your website or blog this way is one hell of a job. And unless you wanted to spend the whole day just making your posts look more presentable, you needed a better solution.....


.....which, by the way, has finally arrived! Blogger has made the template HTML editor much more comfortable to use by adding the following features.


  • Line numbering - Now, you can see line numbers on each line, making it much much more easier to spot errors and keep track of your code.

  • Syntax highlighting - Much like in advanced code editors, you can now see syntax highlighting. The editor will actually color code different objects in your source to make it much more readable.


line numbering and syntax highlighting


  • Auto-indentation - I love code editors that auto-indent code for me so that I won't have to press all those extra Tabs and Spacebars. But more than that, this feature helps you keep your code organized, and you can easily keep track of what belongs where. For example, you can easily figure out what's inside your div tag, or what have you included in a list etc. You can see auto-indentation coming into action while you're writing some code. Blogger template editor will automatically put in the spaces for you. You can also use the Format Template option to clean up the indentation of your entire template.

  • Code folding - I love this option too. Once I'm done with a particular piece of code, such as a div tag, I can simply fold the code, and not have to look at that large chunk of code again. You can see this from the image below. If you follow to where the arrow is pointing, you will see a small, grey arrow (?) next to line number 13. And if you look at the line number below, you will see 582, which means that the editor just saved me from having to scroll down through 569 lines of code!


Code folding and auto-indentation


  • Jump to widget - Now, you have a quicker way of jumping to particular section of code in your template - code that belongs to a widget. Just click on the Jump To Widget button at the top of the editor, and you can see a list of all widgets you can jump to. Clicking on any will take you to the respective section in code.


Jump to widget


Like these new features? Tell us what you think about them in the comments section below. And as always, feel free to ask questions. Peace :)


Saturday, 6 April 2013

Why Google Search is Faster than your own computer?


How is Google so fast?

Have you ever wondered how come Google is as fast as it is? When you enter a search query in Google Search, you see the time taken to return your results, and that time isn't even measured in seconds, but rather, milliseconds. How can it be so fast? Searching for a file on your computer or a local area network can take minutes. Surely, the internet can not be faster than your own computer's storage? That's a really good question which I am sure some of us have pondered over at one time or another. So what actually is going on?


How Search Engines work?


To understand the answer to the question, you must first get a very basic idea of how search engines actually work. At its core, a search engine consists of a crawler and an indexer (let's leave the headache ranking pages for now, shall we?)


The crawler's job is to crawl the web, and I mean literally! It crawls from one page to another through hyperlinks. That is why if you build a new website, building links to it from other sites is a quicker way of getting it noticed than submitting it to Google's index. The crawler reaches into every accessible corner of a website (if it is linked from another page).


Once the crawler has found a page, it is the indexer's job to index the page's content. Indexing means processing and parsing the data on the page, and then saving it in a statistical, more meaningful form, something which the search engine can understand easily. This data is saved on the search provider's web server.


So once a crawler finds a page, the indexer processes it and stores it on a server. The search engine now has nothing more to do with the page in question, unless it wants to re-crawl and re-index that page (in case of updates. Google indexes webpages every second or every day, depending upon the ranking of the website). Now, when a user requests a query, the search engine doesn't actually search the web. It has already done that! It simply searches from the index found on its own servers, and returns relevant results.


What else?


So how is it still faster than your local hard drive? Well, Google isn't the best search engine for no reason! It employs some really efficient algorithms and data structures that help in the quick retrieval of data. Google also has huge 'farm' servers that have index data stored in them. And the computational powers of these machines is immense, nothing like your ordinary desktop microprocessor. So when all these factors add up, you really get a solution that's faster than your Personal Computer's hard drive.


There is a way to speed up search for your hard drive too. Applying the same principle of indexing, we can find files and content much quicker. Windows XP, 7 and 8 have built-in drive managers that give you the option to defragment or index your hard drives. This will optimize your hard drives, and make search much quicker. Windows 7 and onwards has tried to implement this by default too, which is why you can write anything in the search menu search bar, and see results displaying instantaneously. This has been achieved via the Windows Search Index. Hence, indexing is the key to speeding up search results.


Did you enjoy this post? Please share your opinions in the comments below. And if in doubt, feel free to ask us questions. Cheers :)

Wednesday, 3 April 2013

Brand New Google Analytics Features for better Real Time Reporting


Real time reporting

Monitoring analytics is integral for the success of any website. Businesses use this data to improve upon their products. And if you're a website owner, you might be using some analytics program to monitor your progress. Some analytics programs such as Google Analytics also give you the real-time reporting. This data can be invaluable to optimization efforts, since it can give you insights into how well your users are interacting with your website instantaneously. It lets you respond to immediate changes that are a result of time and are temporary, such as trending and viral topics, limited-time traffic (holiday traffic etc), and so on. If you're looking for an effective real-time reporting solution, look no further than Google Analytics, because it just got better with 4 latest improvements to its real-time reporting!


Real-time events


Real-time event reporting will let you see the top events as they occur, which you can then filter as well based on event categories. Furthermore, you can see whether particular segments of your visitors trigger different events.


Click on the Real-time section in Google Analytics, and then click on Events to get this feature. You can click on any event category to see Event actions and labels for that category. You can also add filters, which will then be saved. And you can use these filters to see events that a particular segment of visitors trigger, for example, events triggered by traffic coming from social media etc.


Breakdown of real-time traffic by user agent


Google Analytics will now show your traffic broken down based on user agents. In the right now section, you can see your current traffic, and its breakdown based on whether the users are using Mobile, Desktop, or Tablet devices. Clicking on any segment will display detailed analytics.


Realtime vs overall data


You can view your overall pageviews and compare them with segments of visitors in real time. For example, you can compare your total traffic with your mobile traffic after a particular post on social media to see how well do social media users who are on mobile devices pick up your content.


Shortcuts


Last, but not least, you can now set up shortcuts for your real-time segment filters. Once you look at your data through a particular filter, you can save it, so you won't have to create that filter again and again. And you can easily access all your shortcuts from the navigation menu on the left side.


Like these new features? Do share your experiences and opinions with us in the comments section below. And if in confusion, feel free to ask. Peace :)

Tuesday, 2 April 2013

Upgrade To Mobile App Analytics with Google Analytics


Mobile App Analytics


Measuring the success of a mobile app is crucial for any mobile app developer. If you are an Android or iOS app developer, you must be using some kind of analytics program to help you determine how your apps are received. Have you considered using Google's Mobile App Analytics for that purpose?  You might already be familiar with Google Analytics, or at least you may have an idea of the vast repository of features it brings to the competition. With the Mobile App Analytics, you can get all the rich functionality you get with Google Analytics. And now, Google has upgraded the Mobile App Analytics, so you get even more features now!


What's new?


The Mobile App Analytics has been redesigned especially for app developers and marketers who need to access information about their app. The Android and iOS analytics SDKs have been rebuilt from scratch to be more lightweight and efficient, and provide a good experience to developers, while keeping it easy to understand and use.


Change history


When you have multiple users for an analytics account, it can become confusing when people are making changes to that account, changes such as account info, profiles, properties, filters etc. You can't seem to figure out who changed what. Google has now included a new feature, the Change History. This feature will show you a summary of all such important changes made to your account over the past 6 months - plenty of time to track activity.


Multi-currency support


Now, you can track transaction metrics such as total revenue, shipping/handling costs, tax etc in multiple currencies within a single interface. Google has added this support in eCommerce for a multitude of currencies. And you can convert all those currencies into one currency of your preference. This makes things really easy for brands with a diverse international fan base, since everything can be managed from one place.


Tag Assistant


This is a Google Chrome extension designed by engineers at Google. It aims at simplifying the task of troubleshooting tag installs, and helps find problems. Tag Assistant will highlight warnings and errors, and will give you useful suggestions on Google's most widely adopted tags such as Google Analytics, Google Tag Manager, and so on. This extension will alert you of tags installed on a page you are currently on, and will also tell you whether there are any problems with the implementation of those tags.


Are you excited about these latest features? Leave your interesting responses in the comments section below :)

Sunday, 31 March 2013

Now Access the Webmasters Academy in Over 40 Languages


Webmaster Academy


When you really want to achieve something, then the limit of your knowledge no longer becomes a hindrance. This has held true for a lot of webmasters, who are self-taught, and rely on their ambition to learn and implement new things that they consider useful. But whether you are a beginner, or a seasoned veteran, there's always room for some improvement - for learning something new. That is why Google set up a Webmaster's Academy to teach everyone from a total newbie to an advanced user on how to better understand Google, and how to perform better in search results. This Academy was set up last year, but was only available in the English language up until now. Now though, thanks to Google, the Webmaster Academy has gone international, with support for more than 40 languages!


The purpose of establishing this Academy was to educate and guide webmasters into creating websites that perform well in search results. For any blogger, this can serve as the ultimate guide or a complete roadmap that webmasters and bloggers can follow towards success, since the ultimate goal is getting the best performance in search results. So if you haven't still heard of the Webmaster Academy, then you should start off with it immediately.


What it has to offer?


The Webmaster Academy is a fully-fledged academy in the sense that it covers a huge scope of topics, vertically as well as horizontally.


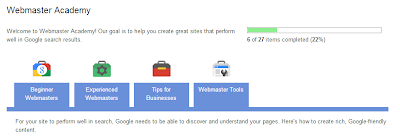
Webmaster Academy


There are various sections in the interface for different type of users. These include Beginners, Advanced users, and Small business owners. Each section has a checklist where you can place a check-box next to each resource that you complete, and you will see your overall progress at the top. These steps are organized in a logical pattern, so you can move from one to the next in a sequential manner.


Once you're done with one section, you can move on to the next. It's a really well organized resource that you can master within no time at all. And now, it is available in a wider ranger of languages. Google says that the Academy is available in over 20 languages, but that number is actually 43, including English.


So what do you want to learn today? Head over to the Webmaster Academy, and start your training as a webmaster from Google itself! You'll be the master of your game in no time at all! All the best :)