Thursday, 13 October 2011

Create Automatic Menu From Blogger Pages

Last week we shared a tutorial on how to create a navigation menu from blogger labels and today we will use the official Pages Widget to create an automatically updated Tabs menu. If you have already created pages then they will all appear on this menu. Whenever you create a new page, the page will be added automatically to the link list in order. Such Menu is useful for displaying links to pages such as Contact, About and home. This is again a first time shared tutorial by MBT which converts Pages Widget into a Menu. I hope you like it. Lets first see a demo,

menu from blogger  pages widget


Live Demo

Create Pages

For this menu to work you will first need to create pages if you have not created one as yet. You will need to create two pages. One for your contact form and another for your About info. Give the pages any title you like but About and Contact is recommended.

  1. Go To Blogger > Edit Posts > Edit Pages
  2. Click Create New Page
  3. Now give your page a title and add some info inside it.
  4. Publish it.
  5. Done!
  6. Repeat this process twice for creating two pages.

Add Pages To Menu

Now we need to create a tabs menu that will display all page links at the top of your blog just above header. To do this follow these simple steps:

  1. Go to Blogger > Design > Edit HTML
  2. Backup your template
  3. Search for this,


]]></b:skin>


    4.   Paste the following code just above it,

/*-----MBT Page Menu-----*/
#PageList1 {
background:#333;
height: 41px;
margin: 3px auto;
padding: 0;
width: 100%;
}

.PageList1 ul {
    float: left;
    list-style: none;
    margin: 0;
    padding: 0;
}
.PageList li a {
color: #FFFFFF;
font: bold 12px arial;
padding: 12px 14px;
text-shadow: 0 1px 0 #000000;
text-transform: none;
}
.crosscol .PageList li, .footer .PageList li {
background: none repeat scroll 0 0 transparent;
float: left;
list-style: none outside none;
margin: 0;
padding: 12px 0;
}
.PageList li.selected a {
background: none repeat scroll 0 0 #000000;
color: #FFFFFF;
font-weight: bold;
text-decoration: none;
}
.PageList li a:hover {
background: none repeat scroll 0 0 #000000;
color: #FFFFFF;
font-weight: bold;
text-decoration: none;
}


    5.    Next search for this code,


<div id='header-wrapper'>


    6.    Just above it paste the following code,


<div id='crosscol-wrapper' style='text-align:center'>
        <b:section class='crosscol' id='crosscol1'>
<b:widget id='PageList1' locked='false' title='Pages' type='PageList'/>
</b:section> </div>


     7.   Save your template

     8.    You are all done!

Visit your blogs to see this amazing new automatic Tabs Navigation menu just at the top of your blog. More color themes and variations will be introduced in coming days so stay tune and make blogger a better place. Peace and blessings pals. :)

You can check the following menus too:

Wednesday, 12 October 2011

How To Restore a Deleted Blog in Blogger?


delete-blogger-blogSometimes we take decisions without giving a second thought and this leads us to trouble and we regret on what we did and wish to undo what you did in hurry. Blogger provides all users to import, export or to permanently delete their BlogSpot blogs. Suppose you deleted a blog and seconds later you realized that the deleted blog contained some important information inside posts and widgets. How to undo what you did or how to restore your blog and get it back? Fortunately Google provides a 90 days restoration option. Deleted blogs can be restored within 90 days after which they are removed forever from your blogger account. The post today will share how to restore your blog before the three months temporary limit is exceeded.


How to delete a blog?


  1. Go To blogger


  2. Click the Settings link under the chosen blog


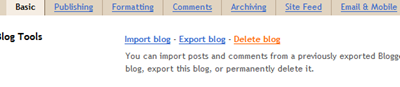
  3. While in Basic page you will see an option of Blog Tools. This tool gives you three options. You can either import, export or delete a blog.


  4. First choose the Export blog option so that you may keep a backup copy of your blog incase you needed it. Specify a location and save the xml file.


  5. After you have exported the blog now you can Choose to Delete blog


delete blog


     5.   You will be asked again if you wish to delete your blog and made assured if you wish to export your blog before deleting. Do export your blog if you have not already done.


Choose Delete This Blog and you are all done!


delete this blog


Restore a deleted Blog


Now when you have deleted your blog. May be you paid a second thought and decided to retrieve/restore your blog. Don't worry we can surely do that if you have not exceeded the 90 days limit. Do this:


  1. Go to your blogger Dashboard


  2. Below all your blogs you will find a link that says "Show all". Blogger hides the deleted blogs on your dashboard in order to reappear them simply click the "Show all" link.


  3. Then you will be able to see your deleted blog


image


     4.    Click Undelete this blog


undelete this blog


      5.   Your blog will be restored in seconds! :)


Things you Must do while Deleting a Blog


1) Backup all your widget codes


You should do this mainly for HTML/JavaScript widgets. Because these widgets contain important codes.


2) Export all your posts.


If in case you didn't restored your blog within 90 days then it will be permanently deleted so it is better that you keep the backup in your hard drive. You can then import your blog whenever you wish using the same method as described above.


Hope this little help proves useful for most of you. Happy day! :>

Tuesday, 11 October 2011

Did Google Terminate PageRank?

pagerankThe sudden disappearance of PageRank on Plugins, add-ons and extensions have given rise to a new debate of whether Google PageRank is now dead/ended or no more exists. A PageRank is a website authority rank with 0 being the least and 10 being the highest. It tells about how much the site is trusted by other web owners. Its authority is judged by the number of backlinks a website receives. PageRank has become so much popular amongst webmasters that people started buying links and selling links the very next year it was introduced. A PageRank increase do also encourages the author to write more and generate more quality content. However these days many add-ons such as searchstatus and seoquake along with Google Toolbar (Update: It does show PR now) stopped showing PR for a page and instead show 0 or N/A or Private. There are some misconceptions which must be cleared.


Why is PageRank Ended?

It is not! This has been confirmed by Dave Naylor. The servers where PageRank databases were stored has now been changed to a different address. Each server has a unique URL which is used by developers to fetch the PageRank data. PageRank visible on Google Toolbar was often debated for showing out-dated rank from the actual Google PR calculation for a website SERP rank. This can be one reason why this sudden change arise. May be Google is better enhancing this feature by providing users with more accurate and up to date Rank record.

What would happen if PageRank Service Ends?

I don't think it is logical to even think this way. PageRank though being violated by link sellers and some SEO agencies still holds a lot of reputation in the eyes of web masters. It is one reason which motivates bloggers to work harder and produce more quality content. It is responsible for creating an environment of competition amongst Publishers and thus responsible for improving content quality.

In case if it really ends which can be a dream come true for people with low PR than this would become a blessing in favor of Alexa and MozRank. Sponsors will value Alexa Rank more and would buy spots at higher prices on blogs with rich Alexa Rank. MozRank is again a similar ranking algorithm maintained by SEOMOZ. It is also based on backlinks and the result rating it produces differs a little from that of Google PR tool.

SEOQuake PageRank Fix

In order to enable seoquake to show the correct Pagerank then kindly follow these easy steps,

1. Go to SEOQuake Preferences

seo1

2.  Select Google PageRank then click Edit

seo2

Replace the code that you see inside that box with the following one

[NAME]=Google pagerank
[TITLE]=PR
[URL_R]=http://toolbarqueries.google.com/tbr?client=navclient-auto&ch={gchecksum}&features=Rank&q=info:{url|encode}
[REGEXP]=Rank_.*?:.*?:(\d+)

3.  Now to make things more clean kindly clear your Firefox Cache and then Restart Firefox

4. Bingo you are all done!

How to Check PageRank?

Some tools still work and displays correct PR for a site. I would recommend that you use PageRank Checker Tool Simply submit Site URL and see the correct PR for a page. You can also select a PR badge to show on your blog.

I will keep you updated with all news related to this hot topic. For the time being you can enjoy reading the following posts:

Subscription Box: Add an Attractive One Below Posts

rss formAlhamdulillah I am back to work and today we are going to make a high quality RSS subscription box with no images or complex scripts. Alerting your visitors to subscribe at the bottom of your posts often help in increasing the number of your blog subscribers. The more readers you get the faster your blog grow. Providing visitors with easy and clean options to subscribe and bookmark should always be your first priority. I managed to design a simple box using CSS3 gradient and text shadow effect to create a container with RSS form inside it. The widget will stick to the bottom of your post and will let your visitors to submit their email addresses and subscribe to your FEED updates. Surely the best way to draw attention!



Live Demo

Add it to Blogger

  1. Go to Blogger > Design > Edit HTML
  2. Backup your template
  3. Check the "Expand Widget Template" box
  4. Search for this,

<data:post.body/>

    5.   Just below it paste this code,

<style>
#mbt-sub-box{background: -webkit-gradient(linear, left top, left bottom, from(#333), to(#1a2638));;border:1px
solid #1A2638;border-radius:10px; margin-bottom:10px;padding:10px;text-align:center;background: -moz-linear-gradient(top, #333, #1a2638)}

#mbt-sub-box h1{margin-top:5px; color:#FFF;font-family:georgia;font-size:25px;margin-bottom:5px;padding:0;text-shadow:0 2px 3px #000;line-height:35px}

#mbt-sub-box input{background: -moz-linear-gradient(center top , #FFFFFF, #EFEFEF) repeat scroll 0 0 transparent;border:medium none;border-radius:10px 10px 10px 10px;font-size:14px;padding:10px;text-shadow:1px 1px 0 #FFF;width:280px; color:#666; font-family:georgia; margin-bottom:5px;}

#mbt-sub-box .submit{background: -webkit-gradient(linear, left top, left bottom, from(#369a18), to(#205f0d));background: -moz-linear-gradient(center top , #369A18, #205F0D) repeat scroll 0 0 transparent;color:#FFF;cursor:pointer;font-weight:bold;margin-left:20px;text-shadow:0 1px 2px #000;width:120px; font-family:georgia; margin-left:5px;}

#mbt-sub-box .submit:hover{background: -moz-linear-gradient(center top , #46B725, #205F0D) repeat scroll 0 0 transparent}

#mbt-sub-box .submit:active{background: -moz-linear-gradient(center top , #46B725, #205F0D) repeat scroll 0 0 transparent}
</style>


<b:if cond='data:blog.pageType == &quot;item&quot;'>
<div id='mbt-sub-box'><h1>Subscribe To Get FREE Tutorials!</h1><form action='http://feedburner.google.com/fb/a/mailverify' method='post' onsubmit='window.open(&apos;http://feedburner.google.com/fb/a/mailverify?uri=tntbystc&apos;, &apos;popupwindow&apos;, &apos;scrollbars=yes,width=550,height=520&apos;);return true' target='popupwindow'><center> <input name='email' onblur='if (this.value == &quot;&quot;) {this.value = &quot;Enter Your Email Address...&quot;;}' onfocus='if (this.value == &quot;Enter Your Email Address...&quot;) {this.value = &quot;&quot;}' size='30' type='text' value='Enter Your Email Address...'/> <input name='uri' type='hidden' value='tntbystc'/> <input name='loc' type='hidden' value='en_US'/> <input class='submit' type='submit' value='Subscribe'/></center></form></div>
</b:if>


Now make these changes,

  • Edit the highlighted yellow text to anything you like. It will appear at the top of the input box.
  • Now replace http://feedburner.google.com/fb/a/mailverify?uri=tntbystc with your Feedburner Email Feed link. You can get it by visiting your feedburner account then navigate to Publicize and then to Email Subscriptions.
  • Replace tntbystc with your feed title. It appear at the end of your feed link. In my case it is http://feedburner.google.com/fb/a/mailverify?uri=tntbystc

       6.    Save your template and you are all set!

Visit your blogs to see the new eye-catching change. I am sure this will greatly increase the number of your blog subscribers. My coming posts will share different color variations of the same widget. I hope you find it help. :)

Sunday, 9 October 2011

ProBrains - All Karachi IT Competition

probrains, All Karachi IT CompetitionI wasn't able to blog due to engagement in several activities for the past few days. On 1st Oct,  I was invited to become a member of the organizing committee for Karachi University's first time held IT Competition named  "ProBrains - The Battle Of Minds". This event was organized by Umaer Basha Institute of Information and Technology (UBIT, KU) in Karachi Pakistan. The competition included 8 interesting and exciting categories namely Speed Programming, Mobile application, Gaming Mania, Web development (My Favorite), Network security, IT Quiz, Animation and software exhibition.  Main event sponsors included TPS and Tradekey. The winning prize was up to $3500. It was surely all fun!

 

ProBrains Objective and Event Details

Our purpose behind this event was to bring all IT institutes on one single platform and bring them face to face with Software houses and IT Professionals. Since the event was first time hosted therefore some problems were faced in attracting sponsors. All Labs were set up with advance computers and network facility. I was curious to see the condition of systems set up for Gaming competition because it demanded high graphic cards and fast processors. Amazingly the Counter-Strike and Need For Speed  experience was no less than a 3D Adventure Tour. Speed Programming on the other hand was the most popular category of the event with over 50 Teams.

As a small representative I  succeeded in gathering 80 students from (NED UET) and they all played well. Fortunately we brought back 4 Prizes which included Mobile application and software exhibition.

If you remember the tech Talk I had in Fast university, then it is obvious that most of  the Sponsors already knew me. While walking down the stairs I was stopped by Saqib Mansoor (TPS Senior Manager of Human Resources) and he asked me "Hey boy How is blogging going on?" I smiled back and said " Awesome Sir!"  During the event I met many people and shared my future plans of promoting blogging in the country and asked them for their help and support. Their response was positive and many offered to arrange a meeting with Jehan Ara, President of the Pakistan Software Houses Association (PASHA). I am sure she would be kind enough to help us with this little cause of publicizing blogging amongst young generation so that Students may start developing an entrepreneur mind right from today because the social engagement in blogosphere is an excellent way to learn about E-Marketing from an early age.

Results Summary

Mobile Application and Software Exhibition:

NED
Networking & IT-Quiz: KU
Speed Programming and Short animation : FAST-NU
Web Designing: MAJU
Gaming UIT

Snapshots

This was a first time held IT event by UBIT KU and with all those limited resources that they had I was highly amazed at the response and do whole heartedly congratulate the team especially Umair Ahmed, Sabih and Mubashir for making it possible. Though the city has several  hugely funded IT competitions organized by different institutions but ProBrains has now become just a new player in the field.

Here are some glimpses of the event:

probrains labs

ubit ku

ubit ku

probrains sponsors

speed programming

gaming

project exhibition

This guy is from third year computer science and he is surely a darling! Chota volunteer

web designing

counter strike winners UIT

speed programming winners

vp probrains

programming lab

gaming lab

examiners

mohammad MBT Author

mohammad on probrains

That was all and it is one of the few reasons why I wasn't able to post frequently. I am also suffering from some health issues and I hope I will recover soon. Apologies for keeping you awaited for so long. There is a lot we have to learn. Take good care of yourselves and your loved ones. Peace pals!

Monday, 3 October 2011

GOOGLE WALLET TAKES OVER!

google-walletTired of picking up things one by one, putting them all in your trolley , going to the cash counter and wait for your turn? Are you? If you are, then its time you should get Google Wallet! Its a mobile payment app that has been launched by Google and it turns your phone into a digital wallet. How? Lets have a look:-

It makes your life really easy! Now when you go to a supermarket, this will help you pay your bill. You just have to catch your desired stuff, scan the products' bar code with the help of the your phone's barcode reader software and you're done!

Because its now Google Wallet that's going to pay for your stuff. You don't have to pull out the cash from your wallet. No credit card, no cash! All you need is your smartphone .. and when your phone does the barcode reading, you hear a beep signifying that the transaction has been just in seconds. 
This tap-and-pay process is quite simple. These tap-and-pay payments can be made at shops where  MasterCard PayPass Network is acceptable, and its probably acceptable at 140,000 locations in US Not only this, but let me add to it that Google includes a PayPass finder inside the app. Very soon, companies like Visa, American Express and Discover will be in the line too as they have licensed their NFC technologies to Google.

"In the future, our goal is to make it possible for you to add all of your payment cards to Google Wallet, so you can say goodbye to even the biggest traditional wallets," said Osama Bedier, vice president of payments at Google.

Now lets add a bit brief discussion about NFC technologies. NFC: Near Field Communication and it allows data exchange, wireless connections between two devices. In other words, it is a short-range wireless technology that makes secure transactions possible.

GOOGLE WALLET PRIVACY?

Most of the people out there worry about 'Google knowing what we are buying' .That's absolutely not the case. If you go back to the history, you just get the date and the amount of transaction. So yeah, relax! Google wont poke in, for now at least!  :P

GOOGLE WALLET SECURITY?

What if you've lost your phone or its stolen? Well, in this case you are given a 4-digit pin code while you set up an account on Google Wallet, so your account's completely safe as if a wrong pin code has been entered five times, the Wallet will be wiped clean.


Guest Post by Amna Masood khawaja. Regular MBT contributor

Top 5 Tips To Increase Your Blog Traffic

These following steps are so much easy to do and its all are free off cost by which you can generate daily thousands of visitors on your website or blog.
There are some blog tips and tricks, please read it very carefully and apply it on your blog.
Read more �