Friday, 24 June 2016

Blogger Recent Posts Slider Widget - [FlexSlider]

Blogger Recent Posts Slider WidgetToday we will create a dynamic Recent Posts Slider using Blogger JSON Feed. We will display recent posts of your blog inside FlexSlider which is a free slider plugin provided by woothemes. The slider  gives a feeling of a tab widget where you can switch from one slide to another using the tab buttons or navigational controls. WordPress users have already integrated recent posts inside flexslider but this is the first time blogspot users will be able to display automated list of recent posts inside a slider.

Today's recent posts slider is coded using the same logic with which we coded our last JSON widget except for few design differences. Please check the last widget also:

Also read our json series to learn how to code these gadgets yourself!

Unique Features of Blogger Recent Posts Slider

Today's recent posts widget has some unique features introduced first time online :

  1. Author Avatar - Unique!
  2. Displays recent posts inside Dynamic Slider or as a Dynamic Flat list. - Unique!
  3. Displays recent posts from a specific category/label.
    1. Slider with two animations: Slide & Fade
    2. Clickable Comments Count
    3. Custom Date Format in ribbon fashion - Unique!
    4. Clickable Animated Featured Thumbnails - Unique!
    5. Option to increase or decrease thumbnail Resolution - Unique!
    6. Support for Third-party Images and YouTube thumbnails - Unique!
    7. Title Length is adjustable

    Add Recent Posts Slider Widget in Blogger

    Follow these easy steps to add recent posts slider to your blogspot blog:

    1. Go To Blogger > Template
    2. Backup your template
    3. Click "Edit HTML"
    4. Just below <head> tag paste the following JS and CSS source links:

      <script src='http://ajax.googleapis.com/ajax/libs/jquery/1/jquery.min.js' type='text/javascript'></script>
      <link href='http://fortawesome.github.io/Font-Awesome/assets/font-awesome/css/font-awesome.css' rel='stylesheet'/>
      <link href='http://fonts.googleapis.com/css?family=Oswald' rel='stylesheet' type='text/css'/>
      <link href='https://cdnjs.cloudflare.com/ajax/libs/flexslider/2.6.1/flexslider.min.css' rel='stylesheet' type='text/css'/>
      <script src='https://cdnjs.cloudflare.com/ajax/libs/flexslider/2.6.1/jquery.flexslider.min.js' type='text/javascript'></script>

      Note: Do not add JQuery, FontAwesome or Oswald links in the code above to your template if you are already using them on your site.

    5. Next search ]]></b:skin> and just above it paste the following code:

      <style>

      /*######### Recent Posts Slider Stylesheet #############*/

      .mbtslides-title{font-family:oswald; font-weight:normal;font-size:18px!important; border-bottom:2px solid rgb(144, 241, 40); color:#242729; width:300px;}.flexslider{ width:300px;  margin:0px; border:0;}
      .flexslider .slides {list-style-type:none; margin:0px auto 10px auto;padding:0px;} .flexslider li {color:#666; font-family:helvetica; font-size:12px; overflow:hidden; position:relative; padding-top: 10px; line-height: 1.6em;} .flexslider .flex-control-nav{list-style:none outside none;position:absolute;top:-45px;right:5px;text-align:right;height:10px}
      .flexslider .flex-control-nav li{display:inline-block;margin:0 2px}
      .flexslider .flex-control-nav a{text-indent:9999px;display:block;width:10px;cursor:pointer;height:10px;background-color:#000;border:1px solid #000;border-radius:0!important}
      .flexslider .flex-control-nav a.flex-active{background-color:rgb(132, 219, 6);border:1px solid rgb(144, 241, 40)} .flexslider .flex-div{margin:0px auto 20px auto; display:block; border-bottom:1px solid #eee; padding-bottom:20px!important; position:relative;} .flexslider li a { color:#0080ff; text-decoration:none; } .flexslider i{color:#999; padding-right:5px; } .flexslider .iline{line-height:2em; margin-top:3px;} .flexslider .icontent{line-height:1.5em; margin-top:5px;} .flexslider div span{margin:0 5px 0 0; display:inline-block;font-weight: normal; } .flexslider .mbttitle {font-family:oswald; font-size:13px; color:#666; font-weight:normal; text-decoration:none;} .flexslider .mbttitle:hover, .flexslider .itotal a:hover  {color:#333; text-decoration:none;}
      .flexslider .iedit a{text-decoration:none; color:#999; cursor:pointer}
      .flexslider .iedit:before, .flexslider .iauthor:before, .flexslider .itag:before, .flexslider .icomments:before, .flexslider .idate:before, .flexslider .itotal span:before{font-family:fontAwesome; position:relative; padding-right:8px; color:#999;} .flexslider .iauthorpic{width: 17px!important;height: 17px!important;border-radius: 50%; float: none; display: inline-block!important; margin:0px 0px 0px 0px; padding-right:3px; position:relative; top:3px;}
      .flexslider .iFeatured{overflow:hidden;position:relative;float:left;margin:0 5px 10px 0;padding:0;} .flexslider .iFeatured a {background: none; padding:0px; display: block;border:1px solid #eee;} .flexslider .iFeatured img{width:110px!important;height:65px!important;-moz-transition:all .3s;-webkit-transition:all .3s;transition:all .3s; border-radius: 2px;} .flexslider .iFeatured:hover img{ opacity:1;   -moz-transform:scale(1.4);-webkit-transform:scale(1.4);transform:scale(1.4)} .flexslider .icomments a{color:#0080ff; font-family: arial;font-size:12px;} .flexslider .icomments a:hover{text-decoration:underline} .flexslider .icomments:before {content:'\f086'; padding:0px 3px 0px 7px; color:#84DB06;} .flexslider .idate {position: absolute;left: 0px;top: -7px; background: rgb(132, 219, 6);color: #fff;padding: 3px 4px;font-family: oswald;font-size: 11px;border: 1px solid rgb(144, 241, 40);} .flexslider .idate div{width:18px; line-height:1.6em; text-align:center;}
      .flexslider .idate:after {content: ' ';position: absolute;z-index:-9999px;width: 0;height: 0;left: 25px;top: -1px;border-width: 4px 6px;border-style: solid;border-color: transparent transparent rgb(125, 208, 4)  rgb(125, 208, 4);}

      </style>

      Make these changes

      • To change the green color theme of the slider simply replace the green highlighted color codes with color of your choice. The color can be in rgb or #hexadecimal, both work. Use our  Color Code Generator.
    6. Save your template.
    7. Now go to Blogger > Layout
    8. Select "Add a Gadget"
    9. Choose "HTML/JavaScript" gadget
    10. Keep the title field empty and then paste the following code inside it:

      <script type="text/javascript">
        $(window).load(function() {
          $('.flexslider').flexslider({
         animation: "slide",
              directionNav: false,
             touch: true, 
             slideshowSpeed: 2500,
            pauseOnHover: true,
           animationSpeed: 700,
          });
        });
      </script>
      <h2 class="mbtslides-title">Recent Posts Slider</h2>
      <div class="flexslider">
      <ul class="slides">

      <script type="text/javascript">
      //################### Defaults
      var ListBlogLink = "http://mybloggertricks.com";
      var ListCount = 6;
      var ListLabel = "SEO";
      var TitleCount = 66;
      var ImageSize = 150;
      //################### Function Start
      function mbtslider(json) {
      for (var i = 0; i < ListCount; i++)

      //################### Variables Declared
      var listing= ListImage = ListUrl = ListTitle = ListImage = ListContent = ListConten = ListAuthor = ListTag = ListDate = ListUpdate = ListComments = thumbUrl = TotalPosts = sk = AuthorPic= ListMonth = Y = D = M = m = YY = DD = MM = mm = TT =  "";

      //################### Category
      if (json.feed.entry[i].category != null)
      {
      for (var k = 0; k < json.feed.entry[i].category.length; k++) {
      ListTag += "<a href='"+ListBlogLink+"/search/label/"+json.feed.entry[i].category[k].term+"'>"+json.feed.entry[i].category[k].term+"</a>";
      if(k < json.feed.entry[i].category.length-1)
      { ListTag += " ";}
      }
      }

      //################### URL
      for (var j = 0; j < json.feed.entry[i].link.length; j++) {
            if (json.feed.entry[i].link[j].rel == 'alternate') {
              break;
            }
          }
      ListUrl= "'" + json.feed.entry[i].link[j].href + "'";

      //################### Info
      TotalPosts = json.feed.openSearch$totalResults.$t;
      if (json.feed.entry[i].title!= null)
      {
      ListTitle= json.feed.entry[i].title.$t.substr(0, TitleCount);
      }
      if (json.feed.entry[i].thr$total)
      {
      ListComments= "<a href='"+json.feed.entry[i].link[j].href+"#comment-form'>"+json.feed.entry[i].thr$total.$t+"</a>";
      }
      ListAuthor= json.feed.entry[i].author[0].name.$t.split(" ");
      ListAuthor=ListAuthor.slice(0, 1).join(" ");

      AuthorPic = json.feed.entry[i].author[0].gd$image.src;

      //################### Date Format

      ListMonth= ["Jan", "Feb", "Mar", "Apr", "May", "Jun", "Jul", "Aug", "Sep", "Oct", "Nov", "Dec"];

      ListDate= json.feed.entry[i].published.$t.substring(0,10);

                               Y = ListDate.substring(0, 4);
                              m = ListDate.substring(5, 7);
                               D = ListDate.substring(8, 10);
                               M = ListMonth[parseInt(m - 1)];                       

      ListUpdate= json.feed.entry[i].updated.$t.substring(0, 16);

                               YY = ListUpdate.substring(0, 4);
                              mm = ListUpdate.substring(5, 7);
                               DD = ListUpdate.substring(8, 10);
                               TT = ListUpdate.substring(11, 16);
                               MM = ListMonth[parseInt(mm - 1)];   

      //################### Thumbnail Check
      // YouTube scan

      if (json.feed.entry[i].content.$t.match(/youtube\.com.*(\?v=|\/embed\/)(.{11})/) != null)
      {

          var youtube_id = json.feed.entry[i].content.$t.match(/youtube\.com.*(\?v=|\/embed\/)(.{11})/).pop();
         
          if (youtube_id.length == 11) {
              var ListImage = "'//img.youtube.com/vi/"+youtube_id+"/0.jpg'";
              }
      }

      else if (json.feed.entry[i].media$thumbnail)
      {
      thumbUrl = json.feed.entry[i].media$thumbnail.url;
      sk= thumbUrl.replace("/s72-c/","/s"+ImageSize+"/");
      ListImage= "'" + sk.replace("?imgmax=800","") + "'";
      }

      else if (json.feed.entry[i].content.$t.match(/src=(.+?[\.jpg|\.gif|\.png]")/) != null)
      {
      // Support For 3rd Party Images
      ListImage =  json.feed.entry[i].content.$t.match(/src=(.+?[\.jpg|\.gif|\.png]")/)[1];
      }

      else
      {
      ListImage= "'https://blogger.googleusercontent.com/img/b/R29vZ2xl/AVvXsEi8Xls_A_gbqigYi5YM8CxeGHF_OswaM4V8CRMpbl70LPgcOTzGh7OTONcWx3u_WQe3E3RzCPYnacLuxJ6wq9vHr6z_CwFtDUIjZXPXAM1L2p1hqDVHWR7gJBE70Hk8SW6Wrvt1aEeoveM/s200/Icon.png'";
      }

      //###################  Printing List
      var listing = "<div class='flex-div'><div class='iFeatured'><a  href="
      + ListUrl+
        "><img src="
      +ListImage+
      "/></a></div><a class='mbttitle' href="
      +ListUrl+
      "target='_blank'>"
      +ListTitle+
      "</a><div class='iline'><span class='iauthor'><img class='iauthorpic' src='"+AuthorPic+"'/>"
      +ListAuthor+
      "</span><span class='icomments'>"
      +ListComments +
      "</span> <span class='idate'><div>"
      + D +
      "</div><div> "
      + M +
      "</div></span></div></div>";
      if (i == 0)
      document.write('<li>');
      if (i < ListCount/2)
      document.write(listing);
      if (i == ListCount/2)
      document.write('</li><li>');
      if (i >= ListCount/2)
      document.write(listing);
      if (i == ListCount)
      document.write('</li>');
      } }

      <!-- #### Invoking the Callback Function #### -->

      document.write("<script src='"+ListBlogLink+"/feeds/posts/default/-/"+ListLabel+"?alt=json-in-script&callback=mbtslider'></"+"script>");
      </script>
      </ul></div>

      The following control options will help you modify the widget:

      • animation: Select your animation type, "fade" or "slide"
      • slideshowSpeed: You can set the speed of the slideshow cycling, in milliseconds
      • animationSpeed: You can also set the speed of animations, in milliseconds
      • pauseOnHover: Pause the slideshow when hovering over slider, then resume when no longer hovering
      • You can edit the widget title by editing: Recent Posts Slider
      • If you don't want to use the title then delete the yellow highlighted code.
      • ListBlogLink : Insert your Blog link here
      • ListCount : Decide how many posts do you wish to display. Choose even integer only like 2,4,6,8,10 etc.
      • ListLabel : Insert your blog label/category here. Remember that labels are case sensitive. Therefore type it exactly as it is shown in your browser address bar. If your label is "blogging tips" and if you type it as "Blogging Tips" then it wont work. You must make sure that all letters are written in correct cases.
      • TitleCount : Choose how many characters to display in post title.
      • ImageSize : You can control the resolution or aspect ratio of thumbnails by editing ImageSize = 150; where the value 150 means that you want your images to be within 150 x 150 pixels in size. Keep this value close to the thumbnail size to ensure website load time is not effected a lot. Since our thumbnail images have a width of about 110px, therefore I have kept the resolution as 150, slightly higher to display images in slightly good quality.
      • If you want to show recent posts published on your blog but don't wish to display posts from a specific label then simply remove /-/"+ListLabel+" from the code above.
    11. Click Save and you are all done!

    Display Dynamic Slider or Just a Flat List!

    Fortunately I have setup the logic such that you can choose whether to display your posts inside animated FlexSlider or display them as simple flat list similar to my earlier recent posts widget. In other words you can choose to enable or disable the FlexSlider.

    How to enable or disable the flex slider?

    The logic is extremely simple.

    If you want to display and enable FlexSlider then insert even integer value next to ListCount , such as 2,4,6,8,10,12 etc. The JavaScript logic above will divide your inserted value into two sections and will display posts in each slide accordingly.

    Output will be such:

    Recent Posts Slider Widget For Blogger

    For displaying a dynamic Flat list or in other words to disable FlexSlider insert odd integer value next to, such as 1,3,5,7,9,11 etc.

    Output will be such:

    Recent Posts Slider Gadget For Blogspot blogs

    Wasn't that easy? =)

    Let me know if you have any questions or if you need any assistance. I hope this new widget will take your blogspot blog to the next level and help you spice up your blog with one more unique widget which was formerly found only on wordpress blogs. Why Should Wordpress folks have all the fun! =)

    Tuesday, 14 June 2016

    Recent Posts Gadget With Avatar, Animated Thumbnails & Labels

    Recent Posts Gadget For  BloggerBlogger Recent Posts Gadget with label support is the backbone behind fancy templates being designed these days. We have covered a detailed full series on how these widgets are coded using Blogger JSON Feeds. Today I will share the most advanced Recent Posts gadget for blogspot blogs unlike shared before. It is not only rich in features but also well optimized, responsive and loads lightening fast. It is a two-in-one gadget that can be used to either display latest posts of your blog or latest posts from a specific label. The logic it uses can also be modified to display Random Posts and Related Posts. All these gadgets will be shared this month inshAllah. These gadgets can be completely customized using CSS and its features can be switched on/off using simple Boolean logic.

    If you wish to add animation to this widget please read:

    We have covered a comprehensive series on how to use Blogger JSON feed to extract data from your blog feeds and parse the JSON data in JavaScript. If you really wish to code these gadgets yourself, you must read this series where we have covered all A-Z steps of blogger gadget development.

    We have already shared an advanced recent posts label widget with featured thumbnails earlier. We will use the same logic to code something more useful and productive. Since most of you requested that the comment and labels links should be clickable. Fortunately all your requests have been fulfilled in this new label gadget.

    Today's recent posts widget has some unique features introduced first time online :

    1. Author Avatar - Unique!
    2. Clickable Labels - Unique!
    3. Displays recent posts
    4. Displays recent posts from a specific category/label.
    5. Clickable Comments Count
    6. Custom Date Format - Unique!
    7. Clickable Animated Featured Thumbnails - Unique!
    8. Option to increase or decrease thumbnail Resolution - Unique!
    9. Support for Third-party Images and YouTube thumbnails - Unique!
    10. Title Length is adjustable
    11. Summary Snippet Length is adjustable
    12. Total Posts Count for selected label is displayed at bottom - Unique!
    13. Customizable into different layouts using CSS thanks to different nodal IDs. - Unique!

    Why Use Recent Posts Gadget?

    By using Recent Posts Gadgets you can showcase latest posts from different labels to give extra exposure to your blog posts. It also helps you to increase pageviews and ultimately improve blog revenue. You can display posts from a specific label or you can simply display recent posts that just got published recently on your blog. You can display this gadget either on your homepage or your sidebar.

    Search engine visitors who land on your blog would love to see what are the latest posts published on your blog through this gadget on your sidebar instead of going to the homepage. Thus bringing you more pageviews.

    We have used AJAX to display several recent posts gadgets on homepage of COPmo template.

    Install Recent Posts Gadget By Label on your Blog

    Follow these easy steps to install it on your blogspot blog:

    1. Go To Blogger > Template
    2. Backup your template'
    3. Click "Edit HTML"
    4. Search </head> and Paste the following CSS code just above </head>:


      <link href='//netdna.bootstrapcdn.com/font-awesome/4.3.0/css/font-awesome.min.css' rel='stylesheet'/>
      <link href='http://fonts.googleapis.com/css?family=Oswald' rel='stylesheet' type='text/css'/>

      <style>
      /*------Recent Posts Gadget By STCnetwork.org--------*/
      .mbtlist {list-style-type:none;overflow:hidden; margin: 10px 0px!important; width:300px; padding:0px!important;}
      .mbtlist li {margin:0px auto 10px auto; clear:both; color:#666; font-family:helvetica; font-size:12px; border-bottom:1px solid #eee; overflow:hidden; position:relative}
      .mbtlist li a { color:#666; text-decoration:none; }
      .mbtlist i{color:#999; padding-right:5px; }
      .mbtlist .iline{line-height:2em; margin-top:3px;}
      .mbtlist .icontent{line-height:1.5em; margin-top:5px;}
      .mbtlist div span{margin:0 5px 0 0; display:inline-block;font-weight: normal; }
      .mbtlist .mbttitle {font-family:oswald; font-size:13px; color:#666; font-weight:normal; text-decoration:none;}
      .mbtlist .mbttitle:hover, .mbtlist .itotal a:hover  {color:#333; text-decoration:none;}
      .mbtlist .iedit a{text-decoration:none; color:#999; cursor:pointer}
      .mbtlist .iedit:before, .mbtlist .iauthor:before, .mbtlist .itag:before, .mbtlist .icomments:before, .mbtlist .idate:before, .mbtlist .itotal span:before{font-family:fontAwesome; position:relative; padding-right:8px; color:#999;}
      .mbtlist .iauthorpic{width: 17px;height: 17px;border-radius: 50%;
      float: none; display: inline-block; margin:0px 0px 0px 0px; padding-right:3px; position:relative; top:3px;}
      .mbtlist .itag{    color: #fff;position: absolute;left: 7px;top: 8px;display: inline-block;font-size: 11px;width: 130px; height:22px;    overflow: hidden;}
      .mbtlist .itag a{background:#000;background:rgba(0,0,0,0.7);text-decoration:none;color:#fff;padding:4px 5px;text-transform:capitalize;line-height: 2em;font-family: arial;
          font-size: 11px;border:1px solid #333;}
      .mbtlist .itag a:hover{background:#222; color:#eee; text-decoration:none;}
      .iFeatured{overflow:hidden;position:relative;float:left;margin:0 5px 10px 0;padding:0;}
      .iFeatured a {background: url(https://blogger.googleusercontent.com/img/b/R29vZ2xl/AVvXsEiWk0tVMLfqT3Qtn8_UKX8pPlBB2k8zW-sAKD1ziDpeeOPVj7lYAunh-OYAUfjnYJb0sjOPAy_JIAneND0fZjKWBB5asnxby-FY58rCyKsOY9uruqOnPXKrAYSS4ZkVWFqmF0kNZ6LldxQ/s100/mbt-bg1.png) 0 0;padding: 7px 7px 8px 7px;display: block;}
      .iFeatured img{width:135px;height:80px;-moz-transition:all .3s;-webkit-transition:all .3s;transition:all .3s;     border-radius: 2px;}
      .iFeatured:hover img{ opacity:1;   -moz-transform:scale(1.4);-webkit-transform:scale(1.4);transform:scale(1.4)}
      .mbtlist .icomments a{color:#0080ff; font-family: arial;font-size:12px;}
      .mbtlist .icomments a:hover{text-decoration:underline}
      .mbtlist .icomments:before {content:'\f086'; padding:0px 3px 0px 7px; color:#84DB06;}
      .mbtlist .idate:before {content:'\f073';padding-right:3px}
      .mbtlist .iedit:before {content:'\f040';}
      .mbtlist .imore {font-size:16px; font-weight:bold; text-decoration:none; color:#666;}
      .mbtlist .itotal {color:#333;  padding:5px 0px; }
      .mbtlist .itotal a {font-family:oswald, arial; font-size:12px; font-weight:normal; color:#0080ff; text-decoration:none}
      .mbtlist .itotal span:before {content:'\f07c';}
      .mbtlist .itotal span font {padding:0px 3px; color:#333; font-family:georgia; font-size:15px; font-weight:bold}
      </style>

      Make these customizations:

      • To change link color edit #0080ff
      • To change comment icon color edit #84DB06
    5. Next Go To Blogger > Layout
    6. Choose HTML/JavaScript Widget
    7. Paste the following code inside it:

    <script type="text/javascript">

    //#################### Default Settings
    var ListBlogLink = "http://mybloggertricks.com";
    var ListCount = 3;
    var ListLabel = "SEO";
    var ChrCount = 45;
    var TitleCount = 66;
    var ImageSize = 200;
    var showcomments = "on";
    var showdate = "off";
    var showauthor = "on";
    var showthumbnail = "on";
    var showlabel = "on";
    var showcontent = "off";
    var showTotal = "on";

    //################ Function Start
    function mbtlist(json) {
    document.write('<ul class="mbtlist">');
    for (var i = 0; i < ListCount; i++)
    {

    //################### Variables Declared
    var listing= ListImage = ListUrl = ListTitle = ListImage = ListContent = ListConten = ListAuthor = ListTag = ListDate = ListUpdate = ListComments = thumbUrl = TotalPosts = sk = AuthorPic= ListMonth = Y = D = M = m = YY = DD = MM = mm = TT =  "";

    //################### Category
    if (json.feed.entry[i].category != null)
    {
    for (var k = 0; k < json.feed.entry[i].category.length; k++) {
    ListTag += "<a href='"+ListBlogLink+"/search/label/"+json.feed.entry[i].category[k].term+"'>"+json.feed.entry[i].category[k].term+"</a>";
    if(k < json.feed.entry[i].category.length-1)
    { ListTag += " ";}
    }}

    //################### URL
    for (var j = 0; j < json.feed.entry[i].link.length; j++) {
          if (json.feed.entry[i].link[j].rel == 'alternate') {
            break;
          }
        }
    ListUrl= "'" + json.feed.entry[i].link[j].href + "'";

    //################### Info
    TotalPosts = json.feed.openSearch$totalResults.$t;
    if (json.feed.entry[i].title!= null)
    {
    ListTitle= json.feed.entry[i].title.$t.substr(0, TitleCount);
    }
    if (json.feed.entry[i].thr$total)
    {
    ListComments= "<a href='"+json.feed.entry[i].link[j].href+"#comment-form'>"+json.feed.entry[i].thr$total.$t+"</a>";
    }
    ListAuthor= json.feed.entry[i].author[0].name.$t.split(" ");
    ListAuthor=ListAuthor.slice(0, 1).join(" ");

    AuthorPic = json.feed.entry[i].author[0].gd$image.src;
    //################### Content Check

    ListConten = json.feed.entry[i].content.$t;
    ListContent= ListConten.replace(/(<([^>]+)>)/ig,"").substring(0, ChrCount);

    //################### Date Format

    ListMonth= ["Jan", "Feb", "Mar", "Apr", "May", "Jun", "Jul", "Aug", "Sep", "Oct", "Nov", "Dec"];

    ListDate= json.feed.entry[i].published.$t.substring(0,10);

                             Y = ListDate.substring(0, 4);
                            m = ListDate.substring(5, 7);
                             D = ListDate.substring(8, 10);
                             M = ListMonth[parseInt(m - 1)];                       

    ListUpdate= json.feed.entry[i].updated.$t.substring(0, 16);

                             YY = ListUpdate.substring(0, 4);
                            mm = ListUpdate.substring(5, 7);
                             DD = ListUpdate.substring(8, 10);
                             TT = ListUpdate.substring(11, 16);
                             MM = ListMonth[parseInt(mm - 1)];   

    //################### Thumbnail Check
    // YouTube scan

    if (json.feed.entry[i].content.$t.match(/youtube\.com.*(\?v=|\/embed\/)(.{11})/) != null)
    {

        var youtube_id = json.feed.entry[i].content.$t.match(/youtube\.com.*(\?v=|\/embed\/)(.{11})/).pop();
       
        if (youtube_id.length == 11) {
            var ListImage = "'//img.youtube.com/vi/"+youtube_id+"/0.jpg'";
            }
    }

    else if (json.feed.entry[i].media$thumbnail)
    {
    thumbUrl = json.feed.entry[i].media$thumbnail.url;
    sk= thumbUrl.replace("/s72-c/","/s"+ImageSize+"/");
    ListImage= "'" + sk.replace("?imgmax=800","") + "'";
    }

    else if (json.feed.entry[i].content.$t.match(/src=(.+?[\.jpg|\.gif|\.png]")/) != null)
    {
    // Support For 3rd Party Images
    ListImage =  json.feed.entry[i].content.$t.match(/src=(.+?[\.jpg|\.gif|\.png]")/)[1];
    }

    else
    {
    ListImage= "'https://blogger.googleusercontent.com/img/b/R29vZ2xl/AVvXsEi8Xls_A_gbqigYi5YM8CxeGHF_OswaM4V8CRMpbl70LPgcOTzGh7OTONcWx3u_WQe3E3RzCPYnacLuxJ6wq9vHr6z_CwFtDUIjZXPXAM1L2p1hqDVHWR7gJBE70Hk8SW6Wrvt1aEeoveM/s200/Icon.png'";
    }
    //################### Printing List

    document.write( "<li class='node"+[i]+"' >");
    if (showthumbnail == 'on'){
    document.write("<div class='iFeatured'><a  href="
    + ListUrl+
      "><img src="
    +ListImage+
    "/></a></div>");
    }
    if (showlabel == 'on'){
    document.write("<span class='itag'>"
    +ListTag +
    "</span>");
    }
    document.write("<a class='mbttitle' href="
    + ListUrl+
    ">"
    + ListTitle+
    "</a><div class='iline'>");

    if (showauthor == 'on'){
    document.write("<span class='iauthor'><img class='iauthorpic' src='"+AuthorPic+"'/>"
    +ListAuthor+
    "</span>");
    }
    if (showcomments == 'on'){
    document.write("<span class='icomments'>"
    +ListComments +
    "</span> ");
    }

    if (showdate == 'on'){
    document.write("<span class='idate'>"
    + M +
    " "
    + D +
    "</span>");
    }

    if (showcontent == 'on'){
    document.write("<div class='icontent'>"
    +ListContent +
    "...</div> ");
    }
    document.write("</div></li>");

    }if (showTotal == 'on'){
    document.write("<div class='itotal'><span> <a href='"+ListBlogLink+"/search/label/"+ListLabel+"'>View all <font>"+TotalPosts+"</font> posts in  ?  " +ListLabel+" </a></span></div>");
    }
    document.write("</ul>");
    }

    document.write("<script src='"+ListBlogLink+"/feeds/posts/default/-/"+ListLabel+"?alt=json-in-script&callback=mbtlist'></"+"script>");
    </script>

    You can easily choose to show or hide an option using on/off Boolean values. Simple make these settings:

    • Replace http://mybloggertricks.com with your Blog URL.
    • Mention number of posts to display in ListCount = 3;
    • Replace SEO inside ListLabel = "SEO"; with your label/category for which you wish to display recent posts. Remember that labels are case sensitive. Therefore type it exactly as it is shown in your browser address bar. If your label is "blogging tips" and if you type it as "Blogging Tips" then it wont work. You must make sure that all letters are written in correct cases. 
    • Edit ChrCount = 45; to choose how many characters you wish to display in post description snippet/summary.
    • Edit TitleCount = 66; to choose post title length.
    • You can control the resolution or aspect ratio of thumbnails by editing ImageSize = 150; where the value 150 means that you want your images to be within 150 x 150 pixels in size. Make sure to keep this value close to the image size to ensure website load time is not effected a lot. Since our thumbnail images have a width of about 135px, therefore I have kept the resolution as 150, slightly higher to display images in slightly good resolution.
    • To show an element simply choose on and to hide it choose off. You apply these switch on/off values to these 7 variables: showcomments, showdate, showauthor, showthumbnail, showlabel, showcontent, showTotal 
    • If you want to show recent posts published on your blog and don't wish to display posts from a specific label then simply remove /-/"+ListLabel+" from the code above. Switch off showTotal and also replace ListLabel = "SEO";  with this ListLabel = "";

       8.    Click Save and you are all done!

    Full Third Party Thumbnail Support

    Our Recent Posts widget has the most robust coding algorithm which makes sure to use any available image from your post whether the image is hosted on your blogger Google album, Picasa or hosted somewhere else. It also has the built-in function to extract thumbnails from your YouTube video iframe. It will automatically display the YouTube thumbnail for a post where you may have embedded a YouTube video.  In case the post contains no image at all, it will display a default image of MBT as shown below:

    The image below shows recent posts for this blog.

    Recent Posts Gadget with Thirdy Party Image Support


    Different Ways to Customize Recent Posts Gadget

    By simply changing on/off values you can change the entire layout of the gadget. Let me show you some examples:

    1 Switching off showcontent and showdate will produce this look:

    Recent Posts Label Widget For  Blogger

    2 Switching off showcontent, showlabel and showcomments will produce this look:

    Display Recent Posts by label With Thumbnails in blogger

    3 Switching off showcontent, showthumbnail, showcomments and showlabel will produce this look:

    Simple List of Recent Posts With Avatars

    4 Switching off showthumbnail, showTotal and showlabel will produce this look:

    Recent Posts Gadget With Author Avatars

    5 Switching everything on and increasing the width of the class .mbtlist to 350px, will produce this layout:

    Blogger Recent Posts Gadget With Thumbnails


    6 Each "li" tag has its own class (such as .node0, .node1, .node2, etc.) that you can use to customize the look and appearance of each list. By changing these styles you can display recent posts in several interesting layouts such as:

    Vertical List of Recent Posts With Large Thumbnail at Top:

    Vertical List of Recent Posts Gadget With Animated Thumbnails

    Horizontal List of Recent Posts With Large Side Thumbnail:

    Horizontal List of Recent Posts Widget With Thumbnails

    This is the exact same technique that I used to design COPmo template.

    What is Next?

    Using the same logic as discussed several times in our JSON series and using the code above, we will create a list of random posts, related posts, sliders, carousels and news tickers. Stay tuned for lots of interesting tutorials. Know that we do not aim at only sharing fancy widgets, our true aim is educating our readers with the best knowledge so that each one of you could code his own gadgets and be the next big web developer.

    In our last posts on recent posts widget, we asked how can you modify the code to display posts via a specific label. To which Ehsan Qureshi gave the correct answer and as a result of which I give my token of thanks to him for particpating in the contest and winning a backlink for his blog "Tips Tricks Island". Do visit his blog and give him your feedback. =)

    Anyone who can suggest how to modify the above script to display random posts on each page load, will win the next PR5 free link. Your widget must fetch random posts from a blog JSON feed and then display that list. User must see different random posts list each time the page is refreshed. Share this post with your friends who are JSON or JavaScript enthusiast. 

    Do share your feedbacks and queries in the comments box below. Let me know if you need any help or assistance. Would love to help! =)

    Wednesday, 8 June 2016

    Hide or Remove Blogger Attribution Gadget - 2 Methods

    Remove Blogger Attribution GadgetThere are two standard ways to remove Blogger Attribution Gadget. The First one uses simple CSS to hide the text "Powered by Blogger", the second recommended method simply deletes the Attribution Gadget from your BlogSpot layout. We will discuss both in detail today.

    If you are new to Attribution Gadget, then it is the widget that blogger adds to your layout by default when you setup your blog. You can display your copyrights or credit links here. Unlike other widgets this gadget is locked by default and it has no "Remove" button that could help you remove the gadget from your layout.

    1. Hide "Powered by Blogger" Attribution Gadget

    Follow these steps to hide the attribution widget using CSS "display:none" property.

    1. Go To Blogger > Template
    2. Backup your Template
    3. Click Edit HTML
    4. Search for this code ]]></b:skin>
    5. Paste the following code above ]]></b:skin>

      #Attribution1{height:0;visibility:hidden;display:none}

    6. Save your template and you are done!

    You have successfully hide the blogspot attribution credit link from your blog footer. The browser will not display or show the attribution or credit links attached to your layout but the gadget DOM will still load in background.

    Blogger Attribution Gadget

    2. Remove 'Powered by Blogger' Attribution From Template

    To permanently remove or delete the attribution gadget from your template so that it may neither load nor display on your blogspot blog, then follow the steps below:

    1. Go To Blogger > Template
    2. Backup your Template
    3. Click Edit HTML
    4. From the "Jump to widget" section click on "Attribution1"

      Blogspot Attribution Gadget

    5. Delete the entire widget code that looks similar to the one shown in the image below, starting from <b:widget> and ending at </b:widget>:

      blogger Attribution widget

      If you expand the code, it looks similar to this one:

      <b:widget id='Attribution1' locked='true' title='' type='Attribution' visible='true'>
                          <b:includable id='main'>
              <b:if cond='data:feedbackSurveyLink'>
                <div class='mobile-survey-link' style='text-align: center;'>
                  <data:feedbackSurveyLink/>
                </div>
              </b:if>

              <div class='widget-content' style='text-align: center;'>
                <b:if cond='data:attribution != &quot;&quot;'>
                 <data:attribution/>
                </b:if>
              </div>

              <b:include name='quickedit'/>
            </b:includable>
      </b:widget>

    6. Delete and save your template. You are all done!

    You have now successfully delete the blogger attribution gadget. It won't display on your blog now and neither will it eat up your page load time by rendering in background.

    Need Help?

    This post was requested by many of you, though there are many alternatives already online but this second method is the easiest and most effective of all. Let me know if you need any further help. Post your questions below. Your feedback means a lot. Good day! =)

    Saturday, 4 June 2016

    Make $2000 a Month With STCnetwork's Affiliate Program

    STCnetwork Affiliate Program

    As promised we have shared our affiliate program details with everyone. STCnetwork has been developing quality products for over 7 years. STCnetwork is Pakistan's first registered company of Professional Bloggers and SEO consultants which pays regular Income Tax and has a permanent local office. We offer Web Services and Web Solutions to clients around the globe. We are group of tech-savvy computer engineers and programmers who wish to contribute to web through the knowledge that we have acquired over this long period of learning.

    So far all our services and products were offered for a selective group of sole proprietors but from 2016 we have decided to disclose some of our premium products  for everyone online at an affordable cost. We strongly believe that no business can sustain on its own without a helping hand. We surely believe in affiliate marketing and the immense sale support provided by affiliates who spend as much efforts in publicizing products as we spend in developing these digital commodities.

    It's now time to invite you all to become our business partners by promoting our products and services to your friends, colleagues and targeted audience.  All Information regarding the program has been explained in the affiliate page where you can join the system for free and start making a lucrative income online without spending a penny.

    Products and Services that we have in queue include:

    • Android Mobile App Development
    • WordPress SEO + SMO
    • Blogger SEO + SMO
    • Blogger Templates
    • Web hosting and DNS Setup
    • Plugins and Widgets
    • Graphics + Vectors + Logo Design
    • Eccomerce Setup

    Without wasting any further time, lets head straight to the Affiliate page for full details:


    Our program can be joined by anyone whether or not owning a bank account or PayPal account. The system is based on a 20% revenue share on each sale and has the power to make you up to $2000 within a month.

    Monday, 30 May 2016

    COPmo: Best Responsive Blogger Template [HQ]

    COPmo is the first multi purpose responsive BlogSpot template that offers unlimited color schemes, RTL layouts, SEO support and tons of widgets.

    COPmo responsive blogger template

    After 5 years of waiting we have finally decided to release our premium blogger templates, plugins and widgets. Internet is flooded today with blogger templates but what is missing is a clean code, SEO friendly layout and a robust XHTML structure that could meet search engines' ranking criteria. To fill these missing gems, STCnetwork's team of professional developers and SEO consultants have stepped ahead to take blogger to the next level. Presenting our first multipurpose template for blogspot blogging platform, entitled as "COPmo"

    Introducing COPmo

    COPmo stands for "Customized, Optimized and Monetized by default".

    It is the simplest definition for a fully functional, code extendable and dynamic theme that is both user friendly and SEO friendly. COPmo is the first advanced magazine responsive BlogSpot template that offers unlimited color schemes, responsive fluid layouts, easy customization options, SEO support, and tons of widgets & plugins. It is exclusively built for non-techy users, one-click install, simple drag and drop!

    COPmo template is best suited for categories such as:

    • Lifestyle,
    • Fashion,
    • News,
    • Technology,
    • Clothing,
    • Movie,
    • eBooks,
    • Games,
    • Diary,
    • Music

    Lets see all its features in a unique illustrative way.

    COPmo Features

    COPmo is made by default SEO friendly to meet best SEO practices to develop a robust structure that provides a smooth experience to search robots and social media networks. All Important SEO plugins are built-in and extra care is taken to make the core content easy to crawl and index. It meets all important search engine ranking criteria and makes sure you rank well in Google SERPs. Same SEO that is applied to MBT blog has been implemented to COPmo.

    COPmo magazine responsive blogger template

    Tons of premium plugins have already been added inside the layout to make your blogging hobby even more worthwhile. From helping you build Email lists to formatting your posts in a professional way, almost every widget and web element has been included.

    COPmo also supports multiple comment plugins be that Facebook, Disqus, Google+ or Blogger default commenting system.

    COPmo Features

    COPmo is a multilingual template which has separate themes for Left-To-Right languages and also for Right-To-Left languages such as Arabic, Hebrew, Urdu, Thaana etc. All international languages are supported, may it be LTR or RTL.

    Even the sharing buttons have been changed to the RTL language. The Blogger and Facebook comment systems can also be changed in your local RTL language.

    facebook in local language

    Multilingual Blogger Template

    Download COPmo
    Created March 5, 2016
    Last Update June 6, 2016
    Download Size 3.86MB
    High Resolution Yes
    Widget Ready Yes
    Technology Used XHTML, AJAX, CSS3, HTML5, jQuery, JavaScript
    Compatible Browsers IE9, IE10, IE11, Firefox, Safari, Opera, Chrome, Edge
    Software Version Google Blogger 1.0
    Files Included XML, HTML, CSS, JS, PNG, JPEG
    Template Types XML Blogger Template, Static HTML ThemeNEW 
    Columns 2
    Text Direction LTR, RTL
    Category Technology, Diary, Lifestyle, Fashion, Clothing, News, Movie, eBooks, Games, Music
    Documentation Well Documented (126 Pages)
    Layout Mobile Responsive

    Whether your visitors are iPad lovers or smartphone addicts, COPmo is extremely fluid and flexible in design and adapts just perfectly to all device screen sizes be it a Laptop, Desktop PC, Tablet or a Smartphone.

    COPmo is unlike a normal responsive template, it is ultra modern in design which you can experience if you test its responsive behavior in different devices. It is extremely fast loading and loads instantly on mobile devices thanks to the use of Mobile conditional tags unlike display-none which is not a recommended approach. Several breakpoints are used to make sure your design does not crash at all, thus providing an awesome UI experience.

    Mobile Responsive Blogger Template -COPmo

    You can display your posts by label/category in different layout boxes. You can choose to display a horizontal list of recent posts on homepage or vertical list. You can display posts inside a carousel, slider or even inside gallery grid. You can display them with thumbnails or without thumbnails. Full options are supported. Every layout box is given a name for simplicity.

    For videos, most of our clients asked for a method through which they could display thumbnails for all video network sites not necessarily YouTube. Keeping that in mind we integrated a custom method which will help you easily display thumbnails of your choice for any video iframe you want.

    Layout Boxes For Blogspot template - COPmo

    COPmo can easily be customized with a click of a button thanks to the built-in functionality of Blogger Template Designer which works just perfect with this template. You can change fonts and colors through simple checkboxes and drag/drop system. You can add any background you like to your template using template designer.

    Furthermore you can also add overlay and patterns to your background to control its darkness or brightness, an option that is rarely seen in blogspot templates i.e. Multi Layered Background. Observe the background difference in demo of COPmo1,2,3.  Everything is automated!

    Blogger template with Unlimited Color Schemes

    Keeping search engine penalties in mind, all efforts are made to make sure your entire structure offers a smooth crawling experience to search robots and meet all major SE ranking metrics. You can now focus on your content and let COPmo handle the SEO part!

    SEO friendly Blogspot template

    Ever wondered that a blogger template could have a well written guide document of over 160 pages? This shows our dedication towards work and sincerity towards our clients. The document itself is a complete offline website in itself.

    The document is written in an interactive way with easy explanation, navigation and engaging guides.  All four important parts of installation, customization, optimization and monetization are covered in detail. You can read it anytime, anywhere!

    Blogger Template Documentation

    COPmo is coded only for serious bloggers who have a passion to make a lucrative income online and establish their online empire. It's a complete toolkit for people who wish to take their blogging hobby to the next level.

    If you liked COPmo, please do not forget to share it with your friends using the social sharing buttons to your left.

    Share COPmo Responsive Blogspot Template

    Download COPmo

    You can pick one or multiple services based on your needs. Click "ADD TO CART" button and then proceed to checkout using the "CHECKOUT" button. We accept payments via PayPal only. Local and international clients will be provided with Bank Account Details upon request. Payments are made via SendOwl's secured and trusted gateway system.

    Note:

    Buying the Template is mandatory. Installation and SEO services are optional. Installation service does not include the template. Template must be dowbloaded. After downloading the template file, extract the compressed contents using WinRAR or WinZIP software.

    SERVICES PRICE shopping cart
    Blogger XML File + Template File
    + Lifetime Free Consultancy 
       *Must Buy

    Details

    + Exclusive Forum Access
    + Template Updates
    + Non-commercial License
    $69.00 ADD TO CART
    Installation Services + Setup & Installation
    + Customization Support
    + 24/7 Customer Service
    + Whatsapp Instant Help
    $99.00 ADD TO CART
    SEO services + SEO
    + SMO

    Details

    + Template debugging,
    + Dynamic Sitemaps Submission
    + Robots.txt & Meta Tags
    + SEO Plugins Installation
    + AdSense Optimization
    + Fixing Structured Data Errors
    + Settings for URL Parameters
    + Schema Tags Integration
    (FB OpenGraph,Twitter Cards,G+ tags)
    + Rich Snippets (star ratings*)
    + Jumbo Share Plugins
    + Sharing buttons Optimization
    + Rectifying your SEO Mistakes
    + Access to 13 Content Writing Secrets
    $150.00 ADD TO CART
    CHECKOUT

    We are a Registered Brand

    We are not a fly-by-night group of tech enthusiasts but a registered company holding National Income Tax Number (4166783-2). For further details please visit www.STCnetwork.org.

    STCnetwork Team

    STCnetwork products such as templates are not cloned, stolen designs or a $20 scrap. All our products are professionally developed, manually crafted and well maintained by a dedicated team of SEO consultants and programmers.

    Creative Commons License

    All our products are licensed under "Creative Commons Attribution-NonCommercial-NoDerivatives 4.0 International License". COPmo must not be used for commercial purpose. We do not allow anyone to resell or redistribute our products without permission.

    STCnetwork Team


    24/7 Customer Service

    24/7 customer service We offer lifetime consultancy and online help. Our Clients get free technical help via Whatsapp/Skype/Email/Forum. After purchasing any of our services, we will keep in touch with you for as long as you need us. No extra charges are taken.

    If you have any query related to the post above, please feel free to post your comments below. Wishing you all a safe, healthy and successful blogging career!

    Tuesday, 17 May 2016

    Which is Best WP Themes Club? TeslaThemes Vs Themeisle

    TeslaThemes Vs Themeisle

    There are a number of new and old premium WP theme clubs these days. Likewise, many people or blogger who own several websites also prefer good theme club that will result in getting quality themes for all of their sites. However, things can get a little confusing when people try to decide which WP theme club to join. The customer will always look towards quality, unique and responsive WordPress themes.

    On the other hand, many new WordPress theme providers such as Thrivethemes, StudioPress, Tesla Themes, Mythemeshop, Themeisle and more are offering tons of features for their premium customers. Among these two new up comers are rocking and they are probably the TeslaThemes and Themeisle.

    This article takes a look at these two theme clubs with the goal of helping you by comparing major features, TeslaThemes Vs Themeisle :)

    Before getting started, let me tell about the factors which you need to consider from any WordPress theme clubs.

    Followed by,
    • Professional Quality themes
    • Quality Support
    • Regular Theme updates
    • Pricing Structure
    And in this post, I�m going to compare TeslaThemes Vs Themeisle on these factors major factors from design to price along with their notable features. Without any introductions let�s check out the comparison section!
    Read more �

    Saturday, 14 May 2016

    Alexa Rank Dropping Fast in April 2016 - [Case Study]

    What caused the Alexa Rank Drop in 2016

    Since the start of 2016, webmasters across the web have experienced a massive drop in their Alexa Ranks. The drop in Alexa's traffic ranking drastically increased during February, March and April (2016). Websites around the globe have lost Alexa Rank within a month despite the same traffic, unique hits and pageviews. Alexa rank of websites which are under 100,000 (100K)  is still dropping fast. Their seems to be a wave of extreme anger among bloggers who worked day and night, trying their best to improve the monetary value of their sites but all their efforts went in vain. Despite knowing the fact that SEO agencies and web marketers rarely consider Alexa as a reliable or trustworthy metric to measure a website's traffic but sadly Alexa ranking is still hugely popular and some sponsors still regard it as the magic-stick for judging a site's popularity.

    Webmasters are giving different reasons for this latest Alexa rank drop which effected global traffic rank data, however our private research has lead us towards one such factor that could answer all our questions. I hope you will find this comprehensive case study useful and meaningful.

    Websites Which Saw a Drop in Alexa Rank

    Before I could give a reason lets look at some of the most significant drops in Alexa Ranks of corporate sites and blogs.

    Mashable

    If you observe carefully you will notice that mashable blog's Alexa started declining from March 2016 onwards, with slight ups and downs in-between but the overall trend is downwards. Mashable lost its rank by 46 points difference. Which is surely a bigger dent for a site of such traffic volume.

    mashable lost Alexa Rank

    TechCrunch

    TechCrunch's Alexa Rank started declining from the start of 2016 and it got worst during Feb-April. It went down by a rank of 178 points. Currently holding a rank of 738 and still continue to see a drop.

    techcrunch Alexa Rank drop

    Facebook

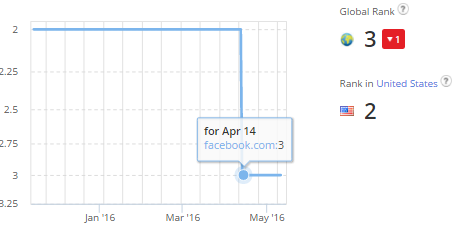
    Facebook has seen a steep fall in its Alexa Ranking. Surprisingly Facebook lost its second position in Alexa Traffic Rank data and is pushed down to number 3 by YouTube.com. Google being number#1 at present.

    Do you really think people have started visiting YouTube more than Facebook? 

    Facebook Alexa Rank drop

    LifeHacker

    LifeHacker lost their Alexa rank during March and April by a total of 36 points.

    Lifehacker Alexa Rank drop

    Blogger

    Google's Blogging platform, blogspot has seen a bigger dent of 8 points compared to WordPress.com (not self hosted wordpress) which lost its position by only 2 points. Blogger's current Alexa rank is 78. So blogger users are not alone in this painful situation!

    Blogger alexa rank drop

    WordPress.org

    Self hosted WordPress has seen a massive drop in ranking. Going down from a rank of 200 to 285 during February and April (3 months cycle). Wordpress lost its position by a total of 47 points and still dropping. 

    Wordpress Alexa Rank Drop

    eHow

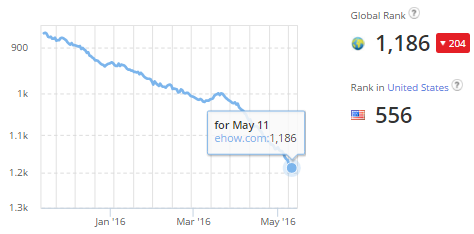
    ehow saw a massive fall in rank of about 204 points, landing it at an Alexa Rank of 1,186 which continues to drop till this date.

    eHow Alexa Rank drop

    eBay

    Bad luck started for ebay since the start of 2016. It climbed down from an Alexa Rank of 16 during January to a Rank of 25 in May. A lose of 9 points in total.

    eBay Alexa Rank drop

    Twitter

    Twitter saw a massive dip in its Alexa Rank on February 22, which indicates that the fall in Alexa traffic data actually started from Feb onwards as opposed to the official statement that marks April. Twitter is currently the 10th most visited website as per the doubtful Alexa Traffic Rank data.

    Twitter Alexa Rank drop

    Alibaba

    Alibaba lost its Alexa Rank by a total of 10 points.

    Alibaba Alexa Rank drop

    Alexa

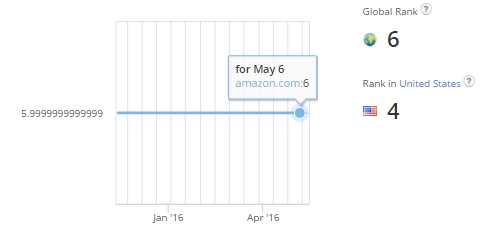
    Alexa was at least slightly unbiased in not favoring its official site. Alexa's site itself lost its rank during March and April as indicated by the chart below.  Although strangely Amazon.com's alexa rank is unchanged. Ebay and Alibaba suffered so badly but strangely Amazon is untouched! This raises questions on the accountability of Alexa team.

    Official Alexa website lost its Alexa Rank

    Amazon Alexa Rank unchanged


    Websites Which Saw a Rise in Alexa Rank

    When you are loosing on one side, someone else is winning on another side. This is law of nature as long as the results are not artificially manipulated. I could share a long list of websites which experienced a rise in their Alexa traffic ranking but for simplicity lets discuss the giant ones only.

    MSN

    Microsoft has really benefited from the current Alexa panel update since the start of 2016. It went from number#23 in global traffic ranking to number#13. A rise of 10 points in total. Which means a lot for a corporate site.

    msn Alexa Rank Rise

    YouTube

    YouTube has been fortunate enough to have pushed down Facebook from its position and attained position#2 on Alexa's  Global Traffic rank data. All this happening during April. What caused it, we will it discuss shortly.

    YouTube Alexa Rank Rise

    I was honestly not believing this change in YouTube's ranking unless I researched to see if YouTube has really started receiving more traffic than facebook. To my amazement these were the results from SEMRush. Indeed SEMrush's show estimated reports but they are almost close to accurate when comparing corporate sites.

    Facebook's current estimated organic search traffic is 631 Millions per month while YouTube is receiving a crazy traffic of over 804 Millions per month as per SEMRush's analysis.

     Facebook Monthly Traffic

    YouTube Monthly Traffic

    But wait! That was organic traffic from Google.com to each of these sites, it does not include direct traffic or referral traffic! Of course Google being more inclined towards YouTube (Since Youtube is a Google product) will display it more in search results compared to any other social media network for search queries. I have seen this biased approach of Google and they certainly favor YouTube more in search results, compared to Facebook videos.

    With that being said, how can one ignore the direct traffic and referral traffic to Facebook? Which is certainly beyond anyone's expectation. Most internet users certainly have a Facebook account if not a YouTube account. I am leaving that on you to decide whether Alexa's new ranking is correct or not.

    Instagram

    Instagram saw a big jump of 2 points.Instagram Alexa Rank Increased

    Whatsapp

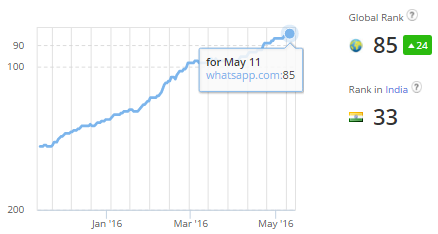
    Though Facebook went down in ranking but its product 'whatsapp" enjoyed a rise in alexa ranking of 24 points.

    Whatsapp Alexa Rank Increased


    Why Is Alexa Rank Dropping So Fast For All Sites Globally?

    On April 4, 2016, Alexa team published a blog post informing about the increase in the size of Alexa's Global Traffic Panel. They mentioned that one of the ways they calculate the metrics is by using a data panel, which is a sample of global Internet traffic, made up of millions of people worldwide. The bigger the sample, the better the estimate. This is where everything got worst!

    Alexa Rank Drops due to Increase in Global Traffic Panel

    They claimed:

    A more robust panel with greater global coverage means we can offer you more accurate rankings, estimated traffic metrics, and actionable recommendations.

    What surprised me was the word "Increases Again" in the blog title, which means this is not the first time Alexa has expanded their data panel, it must have happened before too. But none of us have experienced such a worst drop ever in the history of internet! I mean literally how can you expect your Alexa rank to drop by 10,000 points over a month despite the same organic traffic and frequency of updates?

    Indeed I am aware that the Alexa Traffic Rank is not only based on traffic of a website, but it takes into account the traffic to all sites and ranks sites relative to each other.  Which means that our site is ranked relative to other sites, changes in traffic to other sites will certainly affect our site�s rank.

    But have your competitors increased so much in competition compared to you that you were pushed down by 5K-10K points within a month?? Never has this happened before. Traffic relativity was never above 1000 points or 500 points for a month. Websites which were not updated frequently would lose their rank slightly on daily basis with a difference of 10-100 points, but the moment you would update your site, Alexa rank would improve back the other day with a significant rise. I saw no such behavior during the last 3 months. Alexa kept on dropping despite updating our websites and working hard on organic traffic.

    I left a comment on their blog, to which I did not receive any reply so I tried contacting the Alexa team via Twitter and this is what they had to say:

    Their tweet linked to a page which made it clear that all our doubts were correct: Source:

    In April 2016 we had a significant increase in the size of our data panel, which is why you might see changes in your site's ranks around that time.

    I have shown you enough screenshots to prove that websites were effected since the start of 2016 and that the actual drop occurred between Feb, March and April.

    With that being said, it has now become clear that Alexa is still experimenting with its traffic data and has not matured enough to keep consistency in its analysis reports. It takes a lot of efforts to improve your social rankings and traffic ranking and as a blogger I truly sympathize with people who have lost their hard earned traffic rank.

    Alexa Is Not Reliable and Is Easily Cheated

    After this terrible update, I personally will no longer consider Alexa as a reliable and consistent source for traffic monitoring.

    Who can give a guarantee that if you improve your Alexa rank again after months of hard efforts, you wont have to face this massive drop if Alexa decides to increase the size of their data panel AGAIN!

    Previously the steep fall in Alexa rankings was often caused due to Safari, Chrome or Firefox browsers not supporting the Alexa toolbar. Alexa's browser plugins or extensions were often incompatible with latest browser versions. Webmasters were the only ones to suffer, never Alexa! 

    Alexa Rank drops due to browser plugins

    SEO agencies rarely place trust in Alexa rank due to the fact that it can be easily manipulated manually. Due to the simplicity of cheating Alexa, and the availability of the software to do it, people are beginning to doubt Alexa�s purpose and reliability.

    Using web-based or standalone software programs like RankBoostup, one can easily induce thousands or tens of thousands of fake hits per day. This is done through thousands of proxies to generate fake hits for a particular website. It has become a running business for some where some agencies even offer premium packages to help you improve your Alexa rank within a month through fake hits.

    Unlike Google PageRank which keeps in mind 100's of metrics while deciding the popularity rank, Alexa estimates rank of sites based on the data it collects from its official Alexa toolbar or from manual submission of sites to their directory. All traffic to a site where the user is not using Alexa toolbar is not considered while ranking the site. Suppose if you receive a million hits daily but if your users have not installed Alexa toolbar on their browsers, then all this 'M' hits will go wasted! Which is one reason why Alexa rank is bogus, waste of time and can not be trusted while checking a site's traffic rank. 

    Some of my clients have 10x more traffic than mbt, but they are still ranked at 200K while MBT was ranked at 10K+. This is because since we often write about web development tutorials, SEO and blogging so our targeted audience is often web marketers, webmasters or content writers who are techy and have Alexa toolbar installed on their browsers. But since my clients write on lifestyle and fashion, their targeted audience does not need to have Alexa Toolbar installed. Indeed Alexa gives wrong traffic estimates by not including the users into account who do not use the alexa toolbar.

    Alexa Gives Wrong Traffic Estimates

    Alexa�s simple, traffic counting system has suffered badly from an insurgence of clever programmers who have succeeded in artificially manipulating the rankings and thus left the Alexa ranking system suffering from a potential authority crisis.

    Alexa confirms that it can be cheated and that they try hard to remove any attempts of artificial manipulation.

    Why is Alexa Rank Still so Popular?

    The simplest reason is the ugly reality that Alexa was surely considered as a trustworthy source for judging a site's popularity back in 1996-2010. Alexa was the leading provider of free, global web metrics. You could search Alexa to discover the most successful sites on the web by keyword, category, or country. All this happened because it was the pioneer in this field and had no major competitors as it has now. Now people have more reliable sources and alternatives to Alexa to estimate a website's popularity like Follow.net, Compete, QuantCast, SEMRush tools, ahrefs, moz tools, similarweb and so on.

    Alexa is in the web market since 1996, therefore the web is saturated with its info and since it is backed by Amazon.com, it always remained in limelight. Alexa had no competitors before 2005 like its has now, as a result of which people wrote millions of articles in its favor and build several SEO plugins where they included Alexa API to display site rank. This has kept Alexa still alive online.

    Web marketers have also stopped considering Alexa which can be evident when BuySellAds stopped displaying Alexa Rank in their market listing. BSA being the biggest banner advertisement network.

    Alexa still matters for some bloggers and publishers today due to the fact that some sponsors who are not very tech-savvy still check a site's Alexa rank while placing direct ads or while requesting a product review. Due to this monetary value of Alexa, bloggers have no choice but to make sure their Alexa rank keeps rising.

    Alexa is dead for people with common sense

    Alexa is already dead for people with common sense and understanding of traffic metrics but it will remain alive online for those who just happened to discover the world of SEO.

    Did you lose Alexa Rank in 2016?

    Have you lost Alexa Rank despite getting more traffic? If yes then please share your insights with us and tell us how many points did you lost within a month?

    What are your views on the case study above and how has this steep fall in Alexa rankings effected your blogging career and online business. Would love to learn from your experiences.