Showing posts with label Webmaster Tools. Show all posts

Saturday, 14 May 2016

Alexa Rank Dropping Fast in April 2016 - [Case Study]

What caused the Alexa Rank Drop in 2016

Since the start of 2016, webmasters across the web have experienced a massive drop in their Alexa Ranks. The drop in Alexa's traffic ranking drastically increased during February, March and April (2016). Websites around the globe have lost Alexa Rank within a month despite the same traffic, unique hits and pageviews. Alexa rank of websites which are under 100,000 (100K)  is still dropping fast. Their seems to be a wave of extreme anger among bloggers who worked day and night, trying their best to improve the monetary value of their sites but all their efforts went in vain. Despite knowing the fact that SEO agencies and web marketers rarely consider Alexa as a reliable or trustworthy metric to measure a website's traffic but sadly Alexa ranking is still hugely popular and some sponsors still regard it as the magic-stick for judging a site's popularity.

Webmasters are giving different reasons for this latest Alexa rank drop which effected global traffic rank data, however our private research has lead us towards one such factor that could answer all our questions. I hope you will find this comprehensive case study useful and meaningful.

Websites Which Saw a Drop in Alexa Rank

Before I could give a reason lets look at some of the most significant drops in Alexa Ranks of corporate sites and blogs.

Mashable

If you observe carefully you will notice that mashable blog's Alexa started declining from March 2016 onwards, with slight ups and downs in-between but the overall trend is downwards. Mashable lost its rank by 46 points difference. Which is surely a bigger dent for a site of such traffic volume.

mashable lost Alexa Rank

TechCrunch

TechCrunch's Alexa Rank started declining from the start of 2016 and it got worst during Feb-April. It went down by a rank of 178 points. Currently holding a rank of 738 and still continue to see a drop.

techcrunch Alexa Rank drop

Facebook

Facebook has seen a steep fall in its Alexa Ranking. Surprisingly Facebook lost its second position in Alexa Traffic Rank data and is pushed down to number 3 by YouTube.com. Google being number#1 at present.

Do you really think people have started visiting YouTube more than Facebook? 
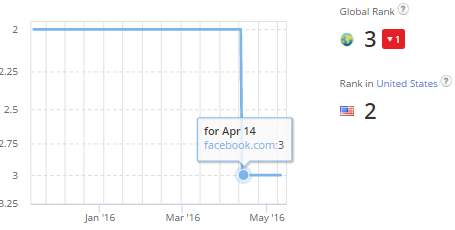
Facebook Alexa Rank drop

LifeHacker

LifeHacker lost their Alexa rank during March and April by a total of 36 points.

Lifehacker Alexa Rank drop

Blogger

Google's Blogging platform, blogspot has seen a bigger dent of 8 points compared to WordPress.com (not self hosted wordpress) which lost its position by only 2 points. Blogger's current Alexa rank is 78. So blogger users are not alone in this painful situation!

Blogger alexa rank drop

WordPress.org

Self hosted WordPress has seen a massive drop in ranking. Going down from a rank of 200 to 285 during February and April (3 months cycle). Wordpress lost its position by a total of 47 points and still dropping. 

Wordpress Alexa Rank Drop

eHow

ehow saw a massive fall in rank of about 204 points, landing it at an Alexa Rank of 1,186 which continues to drop till this date.
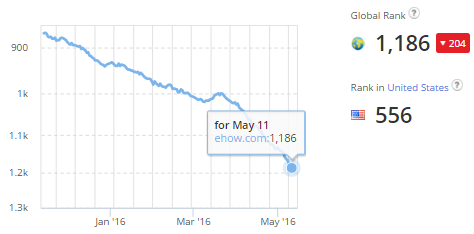
eHow Alexa Rank drop

eBay

Bad luck started for ebay since the start of 2016. It climbed down from an Alexa Rank of 16 during January to a Rank of 25 in May. A lose of 9 points in total.

eBay Alexa Rank drop

Twitter

Twitter saw a massive dip in its Alexa Rank on February 22, which indicates that the fall in Alexa traffic data actually started from Feb onwards as opposed to the official statement that marks April. Twitter is currently the 10th most visited website as per the doubtful Alexa Traffic Rank data.

Twitter Alexa Rank drop

Alibaba

Alibaba lost its Alexa Rank by a total of 10 points.

Alibaba Alexa Rank drop

Alexa

Alexa was at least slightly unbiased in not favoring its official site. Alexa's site itself lost its rank during March and April as indicated by the chart below.  Although strangely Amazon.com's alexa rank is unchanged. Ebay and Alibaba suffered so badly but strangely Amazon is untouched! This raises questions on the accountability of Alexa team.

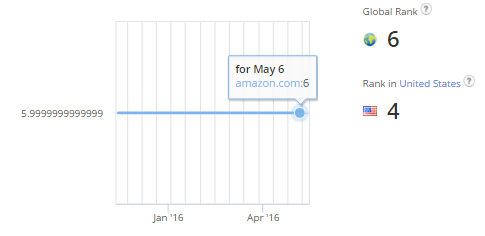
Official Alexa website lost its Alexa Rank

Amazon Alexa Rank unchanged


Websites Which Saw a Rise in Alexa Rank

When you are loosing on one side, someone else is winning on another side. This is law of nature as long as the results are not artificially manipulated. I could share a long list of websites which experienced a rise in their Alexa traffic ranking but for simplicity lets discuss the giant ones only.

MSN

Microsoft has really benefited from the current Alexa panel update since the start of 2016. It went from number#23 in global traffic ranking to number#13. A rise of 10 points in total. Which means a lot for a corporate site.

msn Alexa Rank Rise

YouTube

YouTube has been fortunate enough to have pushed down Facebook from its position and attained position#2 on Alexa's  Global Traffic rank data. All this happening during April. What caused it, we will it discuss shortly.

YouTube Alexa Rank Rise

I was honestly not believing this change in YouTube's ranking unless I researched to see if YouTube has really started receiving more traffic than facebook. To my amazement these were the results from SEMRush. Indeed SEMrush's show estimated reports but they are almost close to accurate when comparing corporate sites.

Facebook's current estimated organic search traffic is 631 Millions per month while YouTube is receiving a crazy traffic of over 804 Millions per month as per SEMRush's analysis.

 Facebook Monthly Traffic

YouTube Monthly Traffic

But wait! That was organic traffic from Google.com to each of these sites, it does not include direct traffic or referral traffic! Of course Google being more inclined towards YouTube (Since Youtube is a Google product) will display it more in search results compared to any other social media network for search queries. I have seen this biased approach of Google and they certainly favor YouTube more in search results, compared to Facebook videos.

With that being said, how can one ignore the direct traffic and referral traffic to Facebook? Which is certainly beyond anyone's expectation. Most internet users certainly have a Facebook account if not a YouTube account. I am leaving that on you to decide whether Alexa's new ranking is correct or not.

Instagram

Instagram saw a big jump of 2 points.Instagram Alexa Rank Increased

Whatsapp

Though Facebook went down in ranking but its product 'whatsapp" enjoyed a rise in alexa ranking of 24 points.
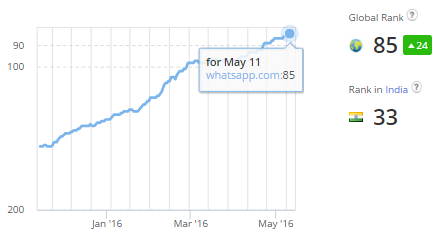
Whatsapp Alexa Rank Increased


Why Is Alexa Rank Dropping So Fast For All Sites Globally?

On April 4, 2016, Alexa team published a blog post informing about the increase in the size of Alexa's Global Traffic Panel. They mentioned that one of the ways they calculate the metrics is by using a data panel, which is a sample of global Internet traffic, made up of millions of people worldwide. The bigger the sample, the better the estimate. This is where everything got worst!

Alexa Rank Drops due to Increase in Global Traffic Panel

They claimed:

A more robust panel with greater global coverage means we can offer you more accurate rankings, estimated traffic metrics, and actionable recommendations.

What surprised me was the word "Increases Again" in the blog title, which means this is not the first time Alexa has expanded their data panel, it must have happened before too. But none of us have experienced such a worst drop ever in the history of internet! I mean literally how can you expect your Alexa rank to drop by 10,000 points over a month despite the same organic traffic and frequency of updates?

Indeed I am aware that the Alexa Traffic Rank is not only based on traffic of a website, but it takes into account the traffic to all sites and ranks sites relative to each other.  Which means that our site is ranked relative to other sites, changes in traffic to other sites will certainly affect our site�s rank.

But have your competitors increased so much in competition compared to you that you were pushed down by 5K-10K points within a month?? Never has this happened before. Traffic relativity was never above 1000 points or 500 points for a month. Websites which were not updated frequently would lose their rank slightly on daily basis with a difference of 10-100 points, but the moment you would update your site, Alexa rank would improve back the other day with a significant rise. I saw no such behavior during the last 3 months. Alexa kept on dropping despite updating our websites and working hard on organic traffic.

I left a comment on their blog, to which I did not receive any reply so I tried contacting the Alexa team via Twitter and this is what they had to say:

Their tweet linked to a page which made it clear that all our doubts were correct: Source:

In April 2016 we had a significant increase in the size of our data panel, which is why you might see changes in your site's ranks around that time.

I have shown you enough screenshots to prove that websites were effected since the start of 2016 and that the actual drop occurred between Feb, March and April.

With that being said, it has now become clear that Alexa is still experimenting with its traffic data and has not matured enough to keep consistency in its analysis reports. It takes a lot of efforts to improve your social rankings and traffic ranking and as a blogger I truly sympathize with people who have lost their hard earned traffic rank.

Alexa Is Not Reliable and Is Easily Cheated

After this terrible update, I personally will no longer consider Alexa as a reliable and consistent source for traffic monitoring.

Who can give a guarantee that if you improve your Alexa rank again after months of hard efforts, you wont have to face this massive drop if Alexa decides to increase the size of their data panel AGAIN!

Previously the steep fall in Alexa rankings was often caused due to Safari, Chrome or Firefox browsers not supporting the Alexa toolbar. Alexa's browser plugins or extensions were often incompatible with latest browser versions. Webmasters were the only ones to suffer, never Alexa! 

Alexa Rank drops due to browser plugins

SEO agencies rarely place trust in Alexa rank due to the fact that it can be easily manipulated manually. Due to the simplicity of cheating Alexa, and the availability of the software to do it, people are beginning to doubt Alexa�s purpose and reliability.

Using web-based or standalone software programs like RankBoostup, one can easily induce thousands or tens of thousands of fake hits per day. This is done through thousands of proxies to generate fake hits for a particular website. It has become a running business for some where some agencies even offer premium packages to help you improve your Alexa rank within a month through fake hits.

Unlike Google PageRank which keeps in mind 100's of metrics while deciding the popularity rank, Alexa estimates rank of sites based on the data it collects from its official Alexa toolbar or from manual submission of sites to their directory. All traffic to a site where the user is not using Alexa toolbar is not considered while ranking the site. Suppose if you receive a million hits daily but if your users have not installed Alexa toolbar on their browsers, then all this 'M' hits will go wasted! Which is one reason why Alexa rank is bogus, waste of time and can not be trusted while checking a site's traffic rank. 

Some of my clients have 10x more traffic than mbt, but they are still ranked at 200K while MBT was ranked at 10K+. This is because since we often write about web development tutorials, SEO and blogging so our targeted audience is often web marketers, webmasters or content writers who are techy and have Alexa toolbar installed on their browsers. But since my clients write on lifestyle and fashion, their targeted audience does not need to have Alexa Toolbar installed. Indeed Alexa gives wrong traffic estimates by not including the users into account who do not use the alexa toolbar.

Alexa Gives Wrong Traffic Estimates

Alexa�s simple, traffic counting system has suffered badly from an insurgence of clever programmers who have succeeded in artificially manipulating the rankings and thus left the Alexa ranking system suffering from a potential authority crisis.

Alexa confirms that it can be cheated and that they try hard to remove any attempts of artificial manipulation.

Why is Alexa Rank Still so Popular?

The simplest reason is the ugly reality that Alexa was surely considered as a trustworthy source for judging a site's popularity back in 1996-2010. Alexa was the leading provider of free, global web metrics. You could search Alexa to discover the most successful sites on the web by keyword, category, or country. All this happened because it was the pioneer in this field and had no major competitors as it has now. Now people have more reliable sources and alternatives to Alexa to estimate a website's popularity like Follow.net, Compete, QuantCast, SEMRush tools, ahrefs, moz tools, similarweb and so on.

Alexa is in the web market since 1996, therefore the web is saturated with its info and since it is backed by Amazon.com, it always remained in limelight. Alexa had no competitors before 2005 like its has now, as a result of which people wrote millions of articles in its favor and build several SEO plugins where they included Alexa API to display site rank. This has kept Alexa still alive online.

Web marketers have also stopped considering Alexa which can be evident when BuySellAds stopped displaying Alexa Rank in their market listing. BSA being the biggest banner advertisement network.

Alexa still matters for some bloggers and publishers today due to the fact that some sponsors who are not very tech-savvy still check a site's Alexa rank while placing direct ads or while requesting a product review. Due to this monetary value of Alexa, bloggers have no choice but to make sure their Alexa rank keeps rising.

Alexa is dead for people with common sense

Alexa is already dead for people with common sense and understanding of traffic metrics but it will remain alive online for those who just happened to discover the world of SEO.

Did you lose Alexa Rank in 2016?

Have you lost Alexa Rank despite getting more traffic? If yes then please share your insights with us and tell us how many points did you lost within a month?

What are your views on the case study above and how has this steep fall in Alexa rankings effected your blogging career and online business. Would love to learn from your experiences.

Tuesday, 4 August 2015

Create mobile-friendly websites in just a few clicks with uKit!


uKit is an advanced website builder that lets you create business websites with a simple drag and drop interface. A complete framework with excellent 24/7 customer service and support


Design Mobile Responsive WebsitesTechnology is developing rapidly and so is the usage complexity with several new Web tools and Mobile apps. Since more and more internet users are turning into webmasters and publishers, the need for an easy-to-use and drag-and-drop website builder is the biggest demand today. Not everyone is well versed with the technical side of designing and developing a website and not anyone can afford the expensive costs of hiring a web developer.  For people who lack coding skills, we recently came across a Web application called uKit, that really impressed us a lot. The website code that uKit generates is semantic, standards-compliant and highly optimized for SEO. It lets you choose templates from several themes, you can edit and customize your website by simply moving elements around and publish it within seconds. No headache of Coding, Webhosting or Optimization is involved. uKit is so far the simplest solution for Small Startup Businesses to kick start their online business dreams by focusing only on their clients/customers without wasting precious time on website development. It lets you create a mobile friendly and responsive website within seconds without any coding skills required.

The video below explains it all:


What Makes ukit unique?

uKit became available to the public in May 2015, offering a free 14 days initial trial, which gives you the opportunity to fully enjoy the system's capabilities before applying for a premium package. If you have any questions or need fast assistance you can directly contact their Technical Support. They also provide Live Customer Support inside the Admin Panel of your Website, and its only thing that outstands them from others. It's surely not a Fly-by-night company but managed and marketed by a corporate firm with an amazing customer service.

They also have a Official Blog where they keep the community informed of recent updates and backstage news.

No business should be trusted unless it has an active customer support or offers a free trial. You can test uKit for free for almost half a month before you could decide to finally upgrade with just $4. This again is a prove of their credibility and the reason which forced us to recommend them to all our readers.

15 days free trial 

Wide Choice of Designs & Design Categories

Appearance matters a lot and we have honestly rarely seen such a comprehensive collection of website designs that we found here.

Partial List of Categories are:

  • Emcee for showmen, event hosts and entertainers;
  • Music for singers, bands and other music-related websites;
  • Construction for businesses providing building and renovation services;
  • Nail Design for nail salons and individual nail artists.
  • Exhibitions,
  • Fashion Model,
  • Tattoo Artist,
  • Flower Shop.
  • Several Designs added weekly!

When you are choosing a design in the Dashboard Wizard, you can click on the Preview button to browse all pages of the design, see how it looks on desktops and mobile devices, and decide whether it suits your needs or not.

Choose a Design theme

If you would like to test a certain design more thoroughly, you can also select it and proceed to website editing.

Test Designs

The number of websites per account is unlimited, and you can experiment with designs as much as you need.

Simple Drag and Drop

For non-techy people, what can be more pleasing than the drag-n-drop feature which lets you to add highly advanced web widgets like Gallery or slider using only your mouse cursor. I really liked this feature because modern portfolio websites or ecommerce sites look great when the landing page has a welcome slider.

Drag and Drop Widgets

Build your Online Store in seconds!

The built-in Business tools like content let you add amazing functions in your website. You can sell products on your website using the ECWID Shopping cart option

Eccomerce tools

you can also collect customer feedback using the Reviews plugin tool and do much more!

Customer Reviews Tool

Strong Backup system

ukit Backup Archive

Unlike Wordpress and Blogger CMS, uKit provides a much better Support for Automatic and Manual Backup. You can manually save your changes before making a new customization. You can then access it anytime through the backup archive. The Automatic Backup function is direct access to the saved copies. It allows you to replicate your site in its previous or earlier states in case you decide that the current one is for some reason not the ultimate one.

What are your Views?

We will keep on sharing such valuable resources to help our community as much as possible with the most trusted, industry-standard tools and applications that may make your online journey even more worthwhile.

Let us know buddies, which feature of uKit inspired you and what are your views on using an automated CMS system like the one we shared today. Is it worth wasting hours on web development or is it much better to invest that extra time in developing your business and Client base and let a tool like Ukit handle all the technical side?

Do share your precious views with us :)

Monday, 1 July 2013

Add Twitter Cards to Blogger Correctly

twitter cards for bloggerMost of you asked how do we add a "View/Hide Summary" link below our tweets. If you click the summary link it will expand and show the post description snippet, along with a thumbnail image, Page title and twitter account attribution. We achieved it by integrating "Twitter Summary Cards" with Blogger. Twitter card is not a new name because they were introduced last year and the reason we never talked about it was due to unavailability of custom XML tags in blogger code library. The image thumbnail tag provided by blogger is of small resolution i.e. 72 x 72 pixels and unfortunately Twitter still has problems fetching the thumbnail correctly. This made it difficult to implement twitter cards for blogger.

The thumbnail displays fine on Twitter testing page but fails to appear on twitter page. Somehow we at least succeeded in fixing the problem with embedded tweets as you will see in demo.  Due to low resolution thumbnail sizes we can not install meta tags for Large Image Summary Card in Blogger but we can surely add Summary Card that works fine with small resolution images. We termed today's tutorial "correct" because most of the  methods that we found so far were not well wrapped in with conditional statements and this made the Template Header full of a large clutter of META Tags which is not good for SEO of any site. The same mistake is seen for OpenGraph Tags which I will be covering in another tutorial. Lets first read a little theory before jumping at the tutorial.

To see the demo visit our twitter page: @MyBloggerTricks

Below is a live demo for an embedded tweet:

Difference between OpenGraph Tags and Twitter Cards?

We honestly find it completely meaningless when twitter introduced beta version of these new tags in 2012 because we already had Facebook OpenGraph Tags that are widely used even today and works just fine in fetching the right Thumbnail, Description and title. OpenGraph tags are used even by GooglePlus to fetch required data and twitter also used it. Now twitter has started a whole new crap that I hope may not encourage every new social media network to come up with their own custom meta tags. I just hope Google does not follow this trend. Else we will be forced to add bulk of meta tags for each giant online. Twitter cards are surely a bit different and creative but fundamentally speaking they serve the exact same purpose as OpenGraph tags do which were introduced by Facebook.

Following is the list of six twitter cards being introduced by twitter in order to display user content in a more friendly way on Twitter accounts.

  1. Summary Card: Default card, including a title, description, thumbnail, and Twitter account attribution.
  2. Large Image Summary Card: Similar to a Summary Card, but Features bigger size images.
  3. Photo Card: A Tweet sized photo card.
  4. Gallery Card: Displays a collection of photos.
  5. App Card: Displays application profile.
  6. Player Card: A Tweet sized video/audio/media player card. You can now watch YouTube videos live on twitter! Probably the best card for podcast blogs. Instead of summary link you will see View/Hide Media link here.
  7. Product Card: It represents product content in a more better way.

Why this Method is Correct?

We are utilizing dynamic conditional statements available in blogger that checks for a selected data and displays the content only when the required condition is met. The code shared below will check for a Homepage logo and also Post thumbnail based on right condition. The thumbnail data variable does not work for index page but works only for item pages. As a result if you specify the following data type for thumbnail:

data:blog.postImageThumbnailUrl

then Twitter will not display a summary card for homepage but it will for item/post pages. In order to fix this problem, we have set careful conditions, which work just fine and also produces a compressed code.

Further instead of manually adding Title and description for homepage, we have used variables that automatically does the work.

Install Twitter Cards on blogger

STEP#1

Follow these easy steps.

  1. Go To Blogger > Template
  2. Backup your template
  3. click Edit HTML
  4. Paste the following Meta tags anywhere below <head>


<!-- Twitter Cards For Blogger by MBT -->

<meta content='summary' name='twitter:card'/>
<meta content='@mybloggertricks' name='twitter:site'/>
<meta content='@mybloggertricks' name='twitter:creator'/>

<b:if cond='data:blog.pageType == &quot;index&quot;'>
<meta expr:content='data:blog.url' name='twitter:url'/>
<meta expr:content='data:blog.pageTitle' name='twitter:title'/>
<b:else/>
<meta expr:content='data:blog.homepageUrl' name='twitter:url'/>
<meta expr:content='data:blog.pageName' name='twitter:title'/>
</b:if>

<b:if cond='data:blog.metaDescription != &quot;&quot;'>
<meta expr:content='data:blog.metaDescription' name='twitter:description'/>
</b:if>

<b:if cond='data:blog.postImageThumbnailUrl'>
<meta expr:content='data:blog.postImageThumbnailUrl' name='twitter:image'/>
<b:else/>
<meta content='YOUR-BLOG-LOGO' name='twitter:image'/>
</b:if>
<meta expr:content='data:blog.homepageUrl' name='twitter:domain'/>

Make these changes:

  • Replace mybloggertricks with your twitter username for blog profile
  • You can replace mybloggertricks with either your personal twitter profile or your blog profile. I chose blog profile. For Multi author blogs like in wordpress you can choose to show author twitter profile for each twitter card.
  • Replace YOUR-BLOG-LOGO with your Logo Link

    5. Save your template and you are half done!

STEP#2

The final step is to verify your twitter card settings. It is really easy, just follow these steps:

  1. Open Google Chrome or Safari (Twitter cards work on webkit browsers only not Firefox)
  2. Go to Twitter Card Validator
  3. Double Click Summary on the popup window
  4. Click the Validate and Apply  tab
  5. To see you have added the code correctly just enter your homepage link inside the box and hit go.

twitter card validation

    6.  Do the same for a post Page. Select any post (which contains at least one image and search description) from your blog and test it to see it also gives the right post title, thumbnail and description. If you get a red error for twitter:description , then probably you have not added Post description. Just don't worry about it because I will tell you in next step on how to fix that.

    7. You will see a red link that says that your site is not approved, simply click it and fill up the form to submit your request for Twitter card approval.

Twitter would say that they would send you an email but they really don't do that. At least I have not received any email for our three blogs. They get approved automatically within 48 hours. Once you see summary link below all posts know that you are all set up!

Requirements:

There are two requirements for twitter cards to work properly in Blogger:

1. Always add Search Description for Posts

If you don't know how to do it or if you don't have the "search option" inside blogger post editor then you can simply optimize your blog and add the required code by following this tutorial.

2. One Image inside posts

In order for twitter to display the thumbnail, you must make sure to add at least one image inside your posts. This image can be uploaded anywhere you want. There is no requirement that it must be uploaded through blogger editor only or on picasa web albums. All that is required is an image inside a post and nothing else.

Need help?

This tutorial is made as easy and informative as possible. If you still faced any problems, then don't troubleshoot yourself and let us know for any help needed.

Free Tip: Wordpress users can install JM Twitter Cards  for any framework, be that genesis or thesis.

Peace and blessings dear buddies :)

Friday, 28 June 2013

6 SEO Reasons Why you Should Stop Using Zemanta

stop using zemantaRecently in Feb 2013 Blogger integrated Zemanta with Blogspot blogs. Zemanta is indeed a great editorial plugin that helps you to write blog posts easily but unfortunately all such automated blogging tools does not help you to write well Optimized Blog posts that could protect you from the latest Google Penguin 2.0 Penalty! Penguin 2.0 is written especially to kill spam and unnatural links.  Zemanta blogging Plugin as you will discover later in this post could badly impact the inbound and outbound link balance of your entire blog, if you are not well versed with SEO link attributes. 
 
If you are new to zemanta then you must first read this post:
Following are the four important reasons why we think you should temporarily stop using zemanta to produce blog posts unless zemanta promises to improve their API:

1. Too Many external Image links

Zemanta has add-on and extensions for all major browsers like Firefox, Chrome, Internet Explorer and safari. Zemanta Plugin adds two links to the images. One inside the caption and one to the image itself. New bloggers who are not well versed with SEO pitfalls of these links often don't bother removing the caption and unlinking the image, considering it to be ethical to give credits to the rightful owner of the image.
This causes a serious imbalance between your internal and external links causing a serious loss to site wide PageRank. 

2. Loss of Image Search Traffic:


You won't get traffic from Image Search because your images wont load from your server but the site you linked. In short all these images that you add through zemanta are not uploaded on your image folder, so you are simply destroying your Image Search traffic.

3. Increase in 404 Errors:

Zemanta image links could return a 404 not found crawling errors in your webmaster tools if the images are deleted by the original owner. These images are uploaded on external servers. Suppose you added an image to your blog post which is stored on Flickr. But what if that image is deleted some months later by the Flickr account holder? The image wont display and would return a 404 error to the search crawler.This would cause a serious increase in crawling errors inside your webmasters account.

4. Increase in server errors: 

zemanta suggests images mostly from its users blogs, Wikipedia or Flickr. If too many requests are sent for an image, then the website whose image is linked could possibly exceed its bandwidth limit and could go down. Most sites often don't allow external sites to directly use their Image Links and often limit the accessibility. If the user has not put such a restriction on images and you are using his image on your blog then it is acceptable but what if next month he puts the restriction? All your images would be gone - destroying both your readership and SEO reputation.

5. Misleading nofollow Option

Now here is a funny thing. If you click on Preferences Tab inside your zemanta account and look at the bottom of page under the sub-tab Look. You will see the following description for nofollow link attribute.

zemanta nofollow option

If you carefully see, its written rel="link_nofollow". I wonder when did this new attribute got introduced? At least I have never heard of it on any forum! I would request the Zemanta Developer to edit this line and change it to rel="nofollow" instead. This is the right way to write it.
The problem with this option is that if you activate it then it will nofollow all links on your post no matter whether they are external or internal! If you nofollow an internal link you are simply confusing the robot with content inside your very own blog and stopping the robot from crawling your internal pages. Further this option adds nofollow everywhere but not to the image links which again is surprising.
If you don't activate it then it will pass your PageRank juice to all external sites that appear under the related posts sections unless you manually nofollow them.
Therefore I would advise never to use this option because it is poorly scripted.
Isn't this option misleading for users who are not well versed with SEO and just clicks this option thinking it may nofollow external links only?

6. In-Text Links irrelevancy

The in-Text Links option gives you the ability to automatically link phrases to related sites. But most often the in-Text links suggestions consist of root domain URLs only. Zemanta mostly gives link suggestions which point to homepages only and not the relevant page except for wikipedia. So if you are talking about a Facebook Plugin, it wont gives suggestions to the plugins page but would instead point to Facebook.com
So if you are simply throwing external links without natural relevancy you are simply making your blog prepared for a delicious punch by Penguin Penalty!

Do you use Zemanta?

We tried to be as precise and clear as possible and mentioned all possible pitfalls of using this utility on your Blogger, Wordpress or TypePad blog. We love zemanta API ourselves and we would love it even more if these SEO points are kept in mind by the team and some serious updates are rolled out to ensure that people who use zemanta may stay safe and protected from Search Engine Algorithmic updates and may not lose precious organic traffic by blindly using the tool. They can also publish some tutorials to educate their users with the SEO guidelines and better optimized use of the tool. Amazingly they just posted about Penguin update themselves on their blog but shared no tips to their users on how to better use the plugin!
How long have you been using zemanta and what experiences would you like to share with us?
Stay safe and keep your SEO plug on always. Peace and blessings buddies :)
Note: We don't share reasons without proves and have no personal offence towards any Online Business. We simply educate our readers with Search Engine requirements, policies and help them remain safe and protected. This post should be taken as a positive criticism, which if Zemanta team try to correct could change our views later.

Wednesday, 19 June 2013

AdSense Publisher Scorecard: Best Tips & Practices

Adsense Scorecard optimization tipsAfter an interesting Hangout with AdSense Folks on 18th June at Google+, Susan Wojcicki announced about an interesting new feature called Publisher Scorecard that has been added to all AdSense accounts and the scorecard summary chart can be seen under the Home Tab. Scorecard is a tool that gives greater insights to Publishers to compare how well their Ad settings, Website load time and content is performing compared to other Publishers using AdSense as the contextual Ad network. It displays a summary of three important categories which includes Revenue Optimization, Site Health and Google+ button Integration. Each category is scored on a scale of 1-5 blue dots that indicate your performance rank or level. In today's tutorial we will learn every basic detail of this great scoring tool and will learn how to optimize our websites and blogs to increase the overall AdSense earning. Lets jump straight to this fun ride and make better money with AdSense!

What are the Scorecard Categories?

Adsense scorecard categories
Above is a screenshot of my AdSense Account. You can clearly see the three important bolded categories which are further divided into sub categories:
1. Revenue Optimization:
By Revenue Optimization we mean improving anything that increases your overall Page CTR and RPM value and boost your earning. We received two 2/5 blue dots here and a yellow icon that indicates that this section needs improvement. It can be optimized by making three major improvements and that are:
 
(a) Using Recommended Ad formats
These recommended formats are often 336x280, 300x250, 728x90 or 160x600. If you are running any Ad formats other than these then please upgrade them immediately.
 
How to Improve it?
To improve this section use recommended ad formats that I mentioned above and you must keep your Ads above the fold. I would suggest to keep a 336X280 Text/Image Ad just below Blog Post tiles and a 728x90 big banner just below your blog header. Add a 160X600 skyscraper to your Sidebar.
Please make sure to keep your web design such that these ads may appear above the fold. The visitor must see the ads when your site loads without having to scroll down. Use the following App by Google to test if your ads are above the fold or not:
Adsense best Ad Locations
We recently developed a Plugin called AdSense Booster to add AdSense ads just above the excerpt/read more tag. This plugin was developed for blogger blogs. But you can get the same functionality even in wordpress by installing Quick AdSense Plugin.  I must tell you that our earnings increased by 40% after we installed this simple plugin which is now available to even blogger users and we are using the same plugin to  show a 468 X 60 Ad just below the opening paragraph. You can see it live in this post just below the first paragraph.
 
 
(b) Enabling both Text and Image Ads on this formats.
I would suggest that you must enable this if you haven't already done. AdSense bot knows best when to display Text or Media Ad based on the content on your site. If you are choosing just text ads or image ads then you are loosing the opportunity of an optimized Click through Rate.
 
How to Improve it?
Go To My Ads Tab inside your AdSense account and then click the "Edit ad Type" link below your Content Ad units. Choose the option Text & image/rich media ads as shown below:
 

text and image ads in adsense
Do this for all your AdSense for content Ad zones.

(c) Reduce Crawler Errors

This is one major section which people often underestimate and this returns in low earning. I always strongly recommend our clients to do a through validation of both their site HTML structure and robots.txt file. You must let the AdSense bot to crawl and scan your content the easiest way possible and don't block its way with Messy Fancy Scripts.
If you check our scorecard we received a green Tick which shows an  Excellent Score. To reduce crawler errors first make sure all Jquery scripts that you use are placed within the <head> and </head> tags. Clean up your site HTML structure and remove  any script that is increasing your site speed and causing the browser to crash.
Google has a list of crawlers for different tasks such as for detecting images, videos, smart phones or AdSense Ads. In order to make sure you allow AdSense Googlebot to crawl your site you must give it rights to do so by adding the following line in your robots.txt file:
 
User-agent: Mediapartners-Google
Disallow:


See our robots.txt file as an example.


Note: Blogger users have this added by default. Wordpress users may manually add this.


2.  Site Health


Here as usual Google expects you to improve your Page speed Performance. Matt Cutts did announce on April 2010  that Page Load time would be a deciding factor for websites to rank higher on SERPs. They went so far that they even introduced PageSpeed tools last year which helps you to reduce load time of your webpages. An interesting and complete tutorial is linked below:


Yes we score too bad here as we received a red alert. Which of course is justified because I love the blog to look professional and stand apart. Here we have never listened to Google because we tried our level best to reduce the load time but Google never seemed like getting satisfied! :p I guess we would need to remove some further widgets and images to cut down the Page Load time.

How to Improve it?


Here are some quick and proper ways to reduce load time:


  • Use CSS3 features to  create backgrounds, gradients, drop shadows and don't use Images. Create elements using CSS3 as much as you can.


  • Use small image patterns for backgrounds and scroll them vertically or horizontally instead of using large and big images


  • Use CSS Sprites to reduce http requests. You will find severa


  • Place all Javascript in one place and one file


  • Place all stylesheets in one linked file


  • Remove useless Plugins and Widgets


  • Never compress CSS nor JavaScript! Even I used to recommend this before but when we talk of site maintenance you will get confused figuring out the compressed code. So please never make a mess out of your code. Keep it well indented and structured.


3. Integrate Google+ Button on your sites


Well how can Google forget promoting their Social network. So yes you must make sure to add Google+ buttons on your site to ensure you get maximum number of +1 recommendations because believe it or not social sharing votes does count a lot.


How to Improve it?


Simply add a GooglePlus button inside your posts and your sidebar. Also create a Google+ Fan Page. Read the following delicious tutorial to get things going.


Scorecard Symbols and Indicators


Following are some interesting details about the various symbols used in your scorecard chart. You can find more help and details on scorecard at Google Groups


1. Following are the three important Scores symbols and their description


Score   Description
excellent scorecard Excellent! No need to make any changes to this category.
improvements needed - scorecard Improvements suggested. You are advised to make some further improvements to this item.
needs improvement - scorecard Needs improvement! You must or may take quick action to optimize this item


2. Following are some symbols that would appear after you make the suggested changes.


      Symbol

Meaning
increase in blue dots - scorecard This category�s score has increased by one or more blue dots up to four blue dots.
decrease in blue dots - scorecard This category�s score has drop down by one or more blue dots down to three blue dots.
item score improvement This item�s score has gone up from �Needs improvement� to �Improvements suggested�.
item score gone down This item�s score has gone down from �Improvements suggested� to �Needs improvement�.


Need Help?


I guess we covered every single tip and almost all best practices used to make sure you monetize your sites well and improve your CTR and RPM value. If there is anything we emphasize a lot to our clients after SEO then it's the site Design and then Monetization. Please give extra care to how appealing your site design is. You have the right to make it eye-catching by using all Fancy Jquery effects but please be assured that sometimes you need to sacrifice for the sake of a bigger gain. This is one reason why Wikipedia is so ugly yet so powerful.


It's time for some home work, we will do ours, you do yours!. Let me know for any help needed. Peace and blessings buddies. :)

Saturday, 16 March 2013

Can Someone Steal Ownership of your Site in Webmaster Tools?


Site ownership

For webmasters, verifying ownership of their website is very important, since it establishes an official connection between you and your website. It is one of the factors among many others that decides a site's trust. Every webmaster has to get his site verified in Google Webmaster Tools to help Google recognize ownership for that site, and provide some advanced tools to the webmaster. But there's one thing that might concern a few people regarding ownership. There are many blogs and websites where people who aren't the owners have access to the site's source code, at least the <body> part of a website. So what if someone adds a meta tag with the body tag and steals ownership of your website?


People who have rights to post on your blog, and even people who comment have some level of access to the body section of your website, since the content they create goes into the body tag.


Usually, website verification require you to add a meta tag to your site. This meta tag is provided by the service you're verifying from, and you, being a website owner, can add this meta tag to your site's source code (usually the head section) and get your website verified.


So what if people who don't own your site add a meta tag for website verification in the <body> section of your website?


As Google's Matt Cutts clarifies, Google only checks for meta tags embedded into the <head> tag of your website. And the head does NOT mean the header. The head contains all the definitions, stylings, rules, and so on. And it is where meta tags should be added. Meta tags with the body don't make much sense.


So as long as others are only editing your website's body section, you needn't worry about any attacks or verification attempts, should any be made. But if you're giving others access to your site's head section, then you should think again by granting such permissions.


If you found anything confusing, please do let me know. I'm here to help. Cheers :)

Thursday, 21 February 2013

Google Explains How To Use Search Queries in Webmaster Tools


Search Queries


Google Webmaster Tools is a great friend to bloggers and webmasters. It hosts a great many features, and provides a lot of help to both beginner, as well as advanced users. For example, the URL parameter customization tool helps optimize your URLs, you can use Google Webmaster Tools to get advanced index reporting, and so on. The list of features is long and distinguished. Have you ever wondered about what the Search Queries feature under 'Traffic' did in Webmaster Tools? You can use some of the information provided to improve your site. We'll talk about this Search Queries feature in today's post.


In a typical search engine environment, there are three phases. Crawling, Indexing, and Ranking. The ranking includes putting pages on top of search results etc. Search queries have more to do with ranking than anything else. Even though ranking is important, you must keep in mind that it isn't only part of the process. There are a lot of other factors too that contribute towards conversion. With that in mind, let's look at this video from Google, and then talk about Search Queries in Webmaster Tools as discussed by Google.


Search Queries terminology


For beginners, it is important that they know some of the basic terminology so often used in the field. A Query refers to a search word or term that the user enters in the search bar. If your website comes up in the search results visible to the user, then it counts as an Impression. If the user clicks on your site after seeing its impression, then it considered as a Click. Now you must have often heard about CTR, or Click-Through-Rate. This is the ratio of your Clicks versus your Impressions. A low CTR would mean that users see your website, but don't actually open it, since it's not appealing to them.


Another term often used is Qualified Traffic.This refers to the users who clicked on your website, and actually found your content useful. This could be shown by the number of conversions you are getting, such as ad-clicks, sign-ups, subscriptions, and so on.


Investigating Search queries


Search Queries


Understanding your audience


This should be the key focus of any business, online or otherwise. You can use Search Queries, and then go to Filter to see the breakdown of your audience. By default, the filter is set to 'the web'. If you click on it, you will see how your audience is divided. You can then use this information to tailor your content for specific audience. For example, if most of your audience is from the U.S, you could do a special feature that applies to people living there.


Common questions you could ask yourself while targeting your audience are; who is your audience? Where are they located? What age group are they? What are their interests? How do they browse the web? Does your content match up with the queries they enter?


Check your Top Queries


When you go to Search Queries, you'll see a tab labelled 'Top Queries'. Open it, and then Sort by Clicks. This is a nice little feature that will let you know what your top queries have been for a defined time period. You could then create more content based on those queries, and introduce new ones like them.


Another good approach for investigating queries would be to take a notice of the changes that occur to your queries over different periods of time. For example, some businesses might see an increase in traffic near holiday seasons. Currently, you can only see history for three months. We'd recommend you download your data every three months to keep track for longer periods of time.


If you sort your queries by CTR, you will be able to see where your website is making an impression on users, and where it isn't. A low CTR would mean you need to work on those specific queries, whereas a high CTR means you need to learn and apply from the better performing queries.


Checking your top pages


You also have a 'Top Pages' tab in Search Queries on your Webmaster Tools dashboard. You can apply sorts over here as well. Sorting by clicks will let you see what pages have gained traction, and which have stalled. A strategy can then be set up to improve upon the pages who have very few clicks.


With the top queries, we used sorting based on clicks and CTR. But with your top pages, sorting with clicks and impressions sounds more relevant. Now impressions might not always bring in clicks, but the user does go through their abstract, or at least looks at its heading. Pages with the most impressions are usually the highest ranked for certain search queries. So once you know what your most valuable pages are, you can pivot their potential, and use them to feature your other pages that re low ranked, but maintain quality and are related to the high-ranked pages.


Sounds reasonable? You can use these simple approaches to take your business out of the middle lane, and onto the fast one, because that is the aim of every business out there. If you liked these tips, then do share them with others. Also tell us what approaches you are using. All the best :)


Wednesday, 6 February 2013

URL Redirection for Demo and Download Links in Blogger

url redirection in bloggerLooks like every time we get a new project from university, we get a new idea to implement it on BlogSpot blogs. Last year we were given the task of developing a twitter clone social media network. We made extensive use of HTML Data-[content] attributes and this led us to create custom Iframes to redirect demo and download links in blogger. Most of twitter's user-interface objects are controlled using this parameter and jQuery built-in functions. We will use the exact same approach to control link redirection in blogger without the need for any web hosting account or complex web scripts. This Blogger plugin is indeed the first of its kind. We just hope this small effort proves useful for all Blogger users especially those who share download resources with their readers.

Update: Links will now also open in new tab. Problem fixed.


A special thanks to my classmate "Ahmed Nasir" who is a genius programmer without any doubts.

DEMO: Click the Demo and Download links and observe the URL in address bar.

Salahuddin Ayubi

Demo | Download

How it works?

Today's tutorial will help you to append all specified outgoing links next to your domain address by using dynamic string concatenation technique. The visitor would feel like he is visiting a new website but your domain URL will remain stick in the address bar.

This plugin will enclose the body layout of your blog with a custom stylesheet specified by the ID "MBT-REDIRECTION". We will then create two static pages. One for Demo page and one for download. Both these pages will contain an iframe tag with vacant source location. Using JavaScript we will inject a custom stylesheet that will cover the entire space between the two body tags. The JavaScript will also make sure no scroll bar appears in the window.

For the concatenation to work the link or button you create must include a Data-[content] attribute. Using Jquery we would pick the href location as string and then concatenate it next to the link of your Demo or download page.

With all that said, lets get to work. Kindly follow the easy steps below:

1. Create Demo and Download Pages

  1. Go To Blogger > Pages
  2. Create a Static Page with title Demo or any name you prefer
  3. Switch to its HTML view mode
  4. Replace the code inside it if any with the following code:

<div height="100%" id="iframe-container" width="100%">

<style>

body { padding: 0!important; background: none!important; }

#iframe-container { overflow: hidden; background: none!important; }

#frame { border: 0; }

</style>

<iframe frameborder="0" id="frame" src="" width="100%"> </iframe>

</div>

<script>
document.documentElement.style.overflow = 'hidden';  // firefox, chrome
document.body.scroll = "no"; // ie only
var query = window.location.search.substring(1);
query = query.replace("url=", "");
$('#frame').attr('src', query);
var str = $('#iframe-container').html();
$('#MBT-REDIRECTION').html(str);
$('iframe').height($(window).height());
</script>

  5.  Now setup up your blogger post editor settings. Click options and then under Line Breaks, choose "Use <br> tag" Hit Done.

post editor options

    6.  Save your page

   7. Now create another page with the title "Download". Repeat the exact same steps from Step#3 - Step#6

Note down the URL address of both these pages. We will use them later.

2. String Concatenation

Now we need to enclose the body tags and add an extra piece of jquery code inside the template that will do remaining half of the magic.

  1. Go To Blogger > Template
  2. Backup your template
  3. Click Edit HTML
  4. Search for <body>  or a similar by searching just <body
  5. Paste the following code just below it:

<div id='MBT-REDIRECTION'>

   6. Next find </body>

   7. Paste the following code just above it:


</div><!--MBT-REDIRECTION ENDS-->

    8. Now search for ]]></b:skin>

    9. Paste the following Jquery code just below it:

Update: Script updated

<script>

//<![CDATA[

$(document).ready(function () {
    $('[data-MBTdemo]').click(function (e) {
        e.preventDefault();
        var target = e.target || e.srcElement;
        if ($(target).attr('target') == "_blank") {
            window.open("http://www.mybloggertricks.com/p/demo.html?url=" + $(target).attr('href'), '_blank');
        } else {
            window.location = "http://www.mybloggertricks.com/p/demo.html?url=" + $(target).attr('href');
        }

    });


    $('[data-MBTdownload]').click(function (e) {
        e.preventDefault();
        var target = e.target || e.srcElement;
        if ($(target).attr('target') == "_blank") {
            window.open("http://www.mybloggertricks.com/p/download.html?url=" + $(target).attr('href'), '_blank');
        } else {
            window.location = "http://www.mybloggertricks.com/p/download.html?url=" + $(target).attr('href');
        }

    });

});

//]]>

</script>


  • Replace the orange highlighted code with the URL address of your Demo page.
  • Replace the green highlighted code with the URL address of your Download page.

      10.  Save your template and you are all done!


Now if you try visiting your demo and download pages you will find out a blank page with no content inside it. That's what our code does, injecting custom stylesheet by over riding the default template styles.

3. How to create Links?

Now when you have done all the development part of the tutorial, we come to a stage where we will learn to implement the functionality.

You will create links as you normally do and the only extra piece of information that you need to insert in them are the Data-Content attributes. This is how you need to do.

For Demo Link or Demo Button:

<a href="#" rel="nofollow" data-MBTdemo="true">DEMO</a>


For Download Link or Download Button:

<a href="#" rel="nofollow" data-MBTdownload="true">DOWNLOAD</a>

  • Replace the hash symbol (#) with your demo or download link


Update For Links opening in new tab

I have modified the code by using a conditional if statement that will open links in new tab if target="_blank" attribute is found else it will open the page in same window.

<a href="#" target="_blank"  rel="nofollow" data-MBTdownload="true">DOWNLOAD</a>

You can use redirect as many links per page as you want. The code is efficient enough to pick even an array of data-content attributes.  That simple!

You may now redirect any link inside your blog back to your domain address by giving a pro touch!  

Copyrights

The HTML code and all scripts in this tutorial are the sole property of STC Network. You may not sell the plugin nor affiliate the work to your brand. Developers are requested to link back to this page as the only favor in return if they wish to share the plugin with their audience.

Need help?

If you face any trouble while installing the plugin then please let us know. I just hope that this method of redirecting external links in blogger back to the root domain would help all those webmasters who share resources such as, ebooks, wallpapers, templates,. icons etc. You can even use it to redirect affiliate links! Please let us know if you would like further improvements in the code. Wish you a great blogging experience. Peace and blessings buddies :)