Sunday, 9 June 2013

Difference between Google PageRank and SEOMOZ Domain Authority


PageRank vs Domain Authority


Over the past few months, Google is continually being criticised for its frequent and infamous Pandas and Penguins. Surprisingly, people are increasingly ditching PageRank in favour of Moz (formerly SEEOMoz) Domain Authority, and the trend has been on the rise for quite some time now. So does that mean that PageRank's authority is being undermined? And what exactly is Domain Authority? More importantly, how do the two stack up against each other? In this post, we attempt to answer some of these questions.


Google PageRank


As most of you know by now, Google PageRank is a measure of a site's popularity on a scale of 0-10, with 10 being the highest. It mostly depends on the number of nofollow and dofollow backlinks on your blog, and it is one of the factors that effect your SERP (Search Engine Result Page) position.


Moz Domain Authority


Now the Domain Authority metric by Moz is a bit like PageRank in the sense that it is a domain-level rank. But it is more concerned with how a website will perform in search results. It is measured on a scale of 100, and is updated frequently - once or twice every month.


Differences between PageRank and Domain Authority


To get a better understanding of why people are trending more towards Domain Authority these days, let us look at the difference between the two rank metrics.


Frequency


Moz Domain Authority, at any given time, is usually more up-to-date than Google PageRank. Pr only gets updated quarterly - every three months. But DA changes once or twice every month. So even if a site has radically improved, its PR might not get updated for another couple of months, which is a lot of time.


Accuracy


Google PR is measured on a scale of 0-10, which I think is one of the biggest problems with it. Google rates itself as 9, so you can really only go from 0 to 8 (rarely 9). Since the gradation is so crude and abrupt, you can't tell if you're going up or down or staying at the same place when you get the same PR score two times in a row. It's like being only able to adjust your thermostat in degrees of 10. Imagine going from 20 degrees to directly 30 degrees. There's no middle ground, no way to tell apart two temperatures both in the 20s.


With Domain Authority, you get a much finer scale of 0-100. So you now get a hundred grades instead of just 10. So you can monitor your progress and trends in much greater resolution, or detail.


Depth


Google PageRank is broadly based on the number of nofollow and dofollow links and backlinks. But there's a lot of other things that Google doesn't disclose. So when you see a PR figure of, let's say 5, you don't get to know the breakdown of points, or in other words, you don't know what things contributed towards this score. So we can see a lot of opacity in Google PageRank.


Domain Authority, on the other hand, is more transparent, and it tells about your progress in areas like Linking Root Domains, Total Links, MozTrust, MozRank, and so on. This way, you get to know exactly where you are going wrong.


Importance


Google employees have this tendency to disregard the actual importance of PageRank. They always advise people not to put much stock into it, as it is only one of the 200 signals Google uses to rank pages on SERPs.


"We only update the PageRank displayed in Google Toolbar a few times a year; this is our respectful hint for you to worry less about PageRank, which is just one of over 200 signals that can affect how your site is crawled, indexed and ranked. PageRank is an easy metric to focus on, but just because it's easy doesn't mean it's useful for you as a site owner."


On the other hand, Moz Domain Authority is relatively gaining momentum, and the constant improvements are making it more and more accurate and reliable. Who knows, in the coming months, DA might actually become a lot more important than PR?


Effect on SERPs


Although Google PR might not be given as much importance as DA in terms of search ranking, Google PR still has some effect on the SERP, whereas DA does not. This is probably why people still go for PR.


Another reason why PageRank is so popular is that, it is measured by Google. There's a whole psychological effect related to it, and people automatically tend to trust it. PR has been around for so long that almost everyone now knows about it.


So what do you think about Domain Authority? Will it overtake PageRank, or is Google too big to let that happen? Leave us with your responses in the comments section below. And as always, feel free to ask any questions. Cheers :)

Saturday, 8 June 2013

Google Tips to Optimize International Websites


International Websites


Have you ever considered delivering your content for multiple regions and in multiple languages? More and more websites are going international (being made available in multiple languages) these days, and you can easily see why. The broader the audience, the better. And unless you have a region specific website, there's no reason why you should not go international. However, there's a lot more to it than just translation, as emphasised by these quick tips from Google for internationalization.


1. Change your markup instead of your style sheets


Learn where to use markup and where to use CSS for internationalization (shortened to i18n after the starting character i, and the 18 character spaces between the first and the last n). Things like language are inherent to the content present on page. So in this case, markup should be used for i18n. You can't always rely on CSS. So use attributes like lang and dir (for direction) with the html tag as shown below.


<html lang="en" dir="ltr">


Note: In some cases, i18n markup might not be supported by the markup language, as is the case with XML. In such cases, CSS may be used.


2. Use a single CSS file


When using different languages and directions (LTR or RTL), do not use a separate style sheet for each locale. Use a single CSS file, and bundle together existing CSS rules with their international counterparts. A single file makes it easier to maintain things, and only a single file needs to be loaded. Consider a scenario where the default CSS file loaded, but the international file failed to load. A single file approach would be better in that case.


3. Use [dir='rtl'] attribute selector


A language can either have an RTL (Right to Let) or LTR (Left to Right) directionality. RTL directionality requires different markup than LTR. So you can use the [dir='rtl'] attribute selector in this case. For example;


aside {   float: right;}[dir='rtl'] aside {   float: left;}


4. Look carefully at position properties


As in the example above, you often need to reverse or mirror the position properties for RTL and LTR languages. For example, what's aligned left in LTR should be aligned right in RTL. So you should look at all the position-related properties for LTR, and mirror them for RTL. These include margins, padding, text-align, float, clear, and so on. There are tools out there as well that do the job for you, such as CSSJanos .


5. Look closely at the details


Just like with CSS positioning properties, you might want to mirror some other details as well, such as box-shadow for images, text-shadow for text, arrows, background, markers, and so on. Same goes for JavaScript positioning and animations.


Another very important aspect is the fonts and font sizes. A font size for one language might seem adequate, but it may be too small for other languages. For example, Arabic texts usually need to be bigger than English texts because they're difficult to see in a smaller font.


So keep an eye out for details, and feel free to contact us if there's a problem. We'd love to help. Cheers :)

Friday, 7 June 2013

Make your Sites Google Friendly using Structured Data!


Structured Data


Have you ever wondered why or how the search results from sites like CNET or Google Play/iTunes look so different from search results for your own website? That happens because Google 'understands' these sites better than yours. This is not to say that your site doesn't meet the 'quality criteria', so to speak. Rather, it merely means that Google can identify and understand the structure of such sites, and can provide a precise yet comprehensive and accurate overview for them. You can do that too by structuring the data/content on your website, so that search engines know exactly what your site is about. Based on your structured data, Google can show appropriate information on Google Now or Knowledge Graph.


Imagine a review website where users write product reviews. This site should naturally be structurally different than a news blog, or a portfolio website, or a product brochure/showcase website, or a wiki. You wouldn't them all to be treated the same way in search results now, would you? Structured Data will help Google provide searchers with accurate and interactive information they can easily relate to. This will not only help your website's CTR by a large degree, it will also build up your 'SEO-optimization points', meaning that search engines will be more hospitable for your website.


To help you participate in structured data features, Google has just recently released two news tools, the Data Highlighter, and the Structured Data Markup Helper tool.


Data Highlighter


The Data Highlighter basically helps identify what sort of content you have on your site, and teaches Google the pattern of structured data about events on your website. You can now tell Google whether your site is among the following types listed.


  • Local Business

  • Products

  • Articles

  • Software Applications

  • Movies

  • TV Programs

  • Restaurants


By using the Data Highlighter, you won't have to modify the HTML of your existing page. Start by logging into Google Webmaster Tools, and then from the left sidebar, go to Optimization >> Data Highlighter. Then click on the button on the right that says Start Highlighting.


You will then be asked to enter a URL, and then choose its type from among the seven listed above. You can also choose to tag just that page, or other pages with the same consistent formatting too. The latter would be a good option for a blog, for example.


After this, you will see an overview of that page, and you will have to tag each part of the page with your mouse. You can, for example, specify the author, the publishing date, and the average rating for an article. Tagging options vary depending upon what option you chose (i.e. Article, Product etc).


The process will take a few minutes, at the end of which the content will be 'highlighted' automatically. 


Structured Data Markup Helper


As an alternative to the Data Highlighter where you let Google do the work for you, you can use the Structured Data Markup Helper tool to edit your HTML, and optimize your site using the markup generated by Google (for advanced users). 


It works in much the same way as Data Highlighter. You first have to tag various page elements with your mouse. Then, this tool will generate sample HTML code for you with microdata markup included. You can use this code as a reference for implementing structured data directly into your site's source code.


Using these tools, you can really stand out from the competition. You can tell Google exactly what your website is about, and we think these tools are a huge step forwards. What do you think about it? Leave your responses in the comments section below. And if you have questions, feel free to ask. Cheers :)

Thursday, 6 June 2013

How To show your Organization Logo On Google Search Results?


Organizational logos


To any company, organization, or corporation, a logo is a basic building block without which the building cannot hold. It helps with the instant public recognition of a brand, which is why a new start-up company isn't considered complete unless it has an official logo. The use of logos dates as far back as 2300 B.C, and the practice still remains with most businesses today. Make that "all businesses", because I can't think of any brand that does not have a logo. Companies need people to recognize them. Have you ever thought of associating an official logo with your brand? You might already have a logo, but how do you officially associate a logo with your official website, so that even search engines know what your logo is? Fortunately, schema.org markup for organizational logos allows you to do just that, and Google has very recently released support for it!


Using this markup, you can officially link your website to your logo icon, which will automatically get associated with your brand. Google will understand that this is your logo icon, and will use this information in search results.


Specifying a logo for your site


Suppose you have a website (www.yoursite.com). To associate a logo, you have to keep an image of that logo in a safe and secure place online, a place where you or others won't bother it. Ideally, it should be in the same place where you keep your website files (web hosting server). But you can put it in another accessible place as well, such as another server. But make sure you don't move the file around, so as not to change its URI.


You can use a multitude of web formats for your image files, such as .jpg, .bmp, .ico, .png etc. But .png is recommended, since it offers high quality with lossless compression (formats like .jpg are lossy - their quality deteriorates).


To point this logo image to Google's algorithms, you can use the following markup using visible on-page elements on their homepage.


<div itemscope itemtype="http://schema.org/Organization"> <a itemprop="url" href="http://www.example.com/">Home</a> <img itemprop="logo" src="http://www.example.com/logo.png" /></div>


Where www.yoursite.com is the URL of your site's homepage, and www.yoursite.com/logo.png is the direct URI of your logo image.


Why use logos?


Google's algorithms will automatically associate the image with your homepage, and this information will be used in search results - the logo image will be given preference over others in the Knowledge Graph, for example. It also helps with your authority, and in the future, we can expect more applications for this feature.


With this feature, you can also set up a single logo for multiple websites under the same brand/company. And since your logo has precedence, it will replace your Google Plus profile picture in search results. We at MBT aren't using this markup, because we're fine with our Google Plus profile picture. However, we will do it once we set up a company website for our network.


Got any questions? Feel free to ask in the comments section below. And stay tuned for more updates on how Google works. Cheers :)

Tuesday, 4 June 2013

Fancy Blogger Threaded Comments with Comment Counter!

blogger threaded commentsBlogger threaded comments are everywhere now and its time you redesign the style and format of your comments. A good blog commenting system helps to build a strong readership and help readers to engage more into discussion. Since 2009 we have been introducing various ways of customizing comment forms on blogger blogs. We introduced Facebook Comments Plugin, Customized BlogSpot comment Forms, then Blogger nested comments, Google+ comments and now finally a more appealing and advance version of BlogSpot threaded comments to make your blog stand out. You can see a practical demo of this feature on our blog. You will find a beautiful header with comment policy, total comment count and anchor link to comment form. The nested comments and parent comments are both styled differently. Author comments are styled using a  ribbon that hangs on top-right corner. 

Each comment is automatically counted using CSS3 counter-reset property. I will be sharing the exact stylesheet that we use at MBT as a gift to our readers. Lets start coding!

DEMO

Install Threaded Comments:

If you have not yet upgraded to threaded comments then kindly first follow this easy tutorial below and get back here:

Note: In the above tutorial skip the part where it says to Customize Threaded Comments.

Customize Your Comments Format!

Here we will override your default comment styles with our custom CSS code. We will customize almost everything from profile avatar images to reply and delete links. All I want from you is careful implementation of the easy steps below:

  1. Go To Blogger > Template
  2. Backup your template - You must keep a backup of your copy if incase you wanted to undo steps
  3. Search for this piece of code:

<b:includable id='threaded_comment_css'>

threaded comments CSS

   Click the highlighted region to expand its code. You will now need to replace all the CSS code inside <style>   and </style>   with the following styles:

  
/* Fancy Blogger Threaded Comments by MBT starts */                

.comment-thread ol {
                counter-reset: mbt-comments;
}
            .comment-thread li:before {
            content: &quot;\25C4&quot;counter(mbt-comments) &quot;\25BA&quot;;
            counter-increment: mbt-comments;
            font-size: 16px;
            position: relative;
            top: 100px;
            font-weight: bold;
            font-family: arial, georgia;
            color: rgb(199, 199, 199);
            left: -110px;
            padding: 4px 8px;

}
            .comment-thread ol ol {
            counter-reset: mbt-comments-sub;
              padding-top: 20px!important;
              margin-bottom: 25px;
}
            .comment-thread li li:before {
            content: counter(mbt-comments) &quot;.&quot; counter(mbt-comments-sub);
            counter-increment: mbt-comments-sub;
            font-size: 14px;
            position: relative;
            top: 100px;
                left: -80px;
}
                 
          .comments .comments-content .comment-thread ol ol {
                padding: 0px 10px 40px 40px;
                border: 1px solid #ddd;
                box-shadow: 3px 4px 9px rgb(218, 218, 218);
                margin-top: 10px;
                  }
                .comments .comments-content .comment-thread ol ol li {
                    margin-bottom: -40px;
}
                 
                  .comments {
                    clear: both;
                    margin-top: 10px;
                    margin-bottom: 0px;
                    line-height: 1em; border:0px !important;
                  }
                  .comments .comments-content {
                    font-size: 12px;
                    margin-bottom: 16px;
                    font-family: Verdana;
                    font-weight: normal;
                    text-align:left;
                    line-height: 1.4em;
                    width:88%; margin-left:70px;
                  }

                    .comment-form {
                    max-width: 100%;
                    clear: both;
}
                 
                  .comments .comments-content .comment-thread ol li {
                    margin-top: -30px;
}
                 
                 
                  .comments .comment .comment-actions a {
                 
                    cursor: pointer;
                    color: rgb(46, 46, 46);
                    padding: 2px 3px 2px 30px;
                    Position: RElative;
                    -moz-border-radius: 6px;
                    -webkit-border-radius: 6px;
                    border-radius: 6px;
                    font-family: &#39;Open Sans Condensed&#39;, sans-serif;
                    font-size: 12px;
                    font-weight: 700;
                    margin-right: 15px;
                    background: url(https://blogger.googleusercontent.com/img/b/R29vZ2xl/AVvXsEgRIW71R1XHaL6jm36Zl-F3Hk3ukKZ0IfV47p4G-6sRxsTz_w71BjDGkttYYiDc6zk3j1XTCGgDtKfMoX04yXF8yuSsRR3svT-si0m6hkFfE1DnegGOLbSspgUtU0_jQUsVMl184iHTHLCN/s1600/reply.png) no-repeat 9px 0px;
                    float:right;
                  }


                  .comments .comment .comment-actions a:hover {
                    text-decoration: underline;
                   
                  }
                  .comments .comments-content .comment-thread ol {
                    list-style-type: none;
                    padding: 0;
                    text-align: none;
                  }
                 
                  .comments .comments-content .comment-thread ol li {
                  border-bottom: 0px dashed rgb(196, 196, 196);
                    margin-bottom:25px
                  }
                 
                  .comments .comments-content .inline-thread {
                    padding: 0.5em 1em;
                  }
                  .comments .comments-content .comment-thread {
                    margin: 8px 0px;
                  }
                  .comments .comments-content .comment-thread:empty {
                    display: none;
                  }
                  .comments .comments-content .comment-replies {
                    margin-top: 1em;
                    margin-left: 40px;
                    font-size:12px;
                   
                  }
                  .comments .comments-content .comment {
                    margin-bottom:16px;
                    padding-bottom:8px;
                  }
                  .comments .comments-content .comment:first-child {
                    padding-top:16px;
                  }
                  .comments .comments-content .comment:last-child {
                    border:0px;
                    padding-bottom:0;
                  }
                  .comments .comments-content .comment-body {
                    position:relative;
                  }
                  .comments .comments-content .user {
                   
                    font-weight: 700;
                     font-size: 14px;
                    font-family: &#39;Open Sans Condensed&#39;, sans-serif;
                    color: #333!important;
                  }
               
                 
                  .comments .comments-content .icon.blog-author{
                    position: absolute;
                    top: 52px;
                    right: -36px;
                    margin: 5px 0px 0px 0px !important;
                    background: url(&quot;https://blogger.googleusercontent.com/img/b/R29vZ2xl/AVvXsEj0-9YWQU3JHs6h4sFV2-CRfIDuJVFUcw-TqAIbZ0hufIBLMHYs4sZzz70x8YFLXxS1Ybu0B683D4pco-YgHIVkzunt-nIUIdHXRXz52U41GMwaVeovq2UQ3rXRAu0KuP_b61kMncDznCsG/s320/aDMIN.png&quot;) no-repeat scroll 0% 0% transparent;
                    width: 90px !important;
                    height: 90px !important; }
                 
                 
                  .comments .comments-content .datetime, .comments .comments-content .datetime a {
                    margin:0px;
                    display: block;
                    line-height: 30px!important;
                    font: italic 11px georgia;
                    width:180px;
                  }
                 
                  .comments .comments-content .datetime a {
                    text-decoration:none;
                  }
                  .comments .comments-content .comment-header
                  {
                    margin:0 0 15px 10px;
                  }
                 
                  .comments .comments-content .comment-content {
                    margin: 0 0 10px -50px;
                    }
                 
                  .comment-header a {
                    color:#333;
                  }
                 
                  .comment-header a:hover {
                    color:#666;
                  }
                 
                 
                  .comments .comments-content .comment-content {
                    text-align:justify;
                    text-align: justify;
                    font-family: &#39;Open Sans Condensed&#39;, sans-serif;
                    font-size: 13px;
                    border: 1px solid #ddd;
                    padding: 20px;
                  }
                  .comments .comments-content .owner-actions {
                    position:absolute;
                    right:0;
                    top:0;
                  }
                  .comments .comments-replybox {
                    border: none;
                    height: 250px;
                    width: 100%;
                  }
                  .comments .comment-replybox-single {
                    margin-top: 5px;
                    margin-left: 48px;
                  }
                  .comments .comment-replybox-thread {
                    margin-top: 5px;
                  }
                  .comments .comments-content .loadmore a {
                    display: block;
                    padding: 10px 16px;
                    text-align: center;
                  }
                  .comments .thread-toggle {
                    cursor: pointer;
                    display: inline-block;
                  }
                  .comments .continue {
                    cursor: pointer;
                  }
                  .comments .continue a {
                    display: none;
                    padding: 0.5em;
                    font-weight: bold;
                  }
                  .comments .comments-content .loadmore {
                    cursor: pointer;
                    max-height: 3em;
                    margin-top: 3em;
                  }
                  .comments .comments-content .loadmore.loaded {
                    max-height: 0px;
                    opacity: 0;
                    overflow: hidden;
                  }
                  .comments .thread-chrome.thread-collapsed {
                    display: none;
                  }
                  .comments .thread-toggle {
                    display: inline-block;
                  }
                  .comments .thread-toggle .thread-arrow {
                    display: inline-block;
                    height: 6px;
                    width: 7px;
                    overflow: visible;
                    margin: 0.3em;
                    padding-right: 4px;
                  }
                  .comments .thread-expanded .thread-arrow {
                    background: url(&quot;data:image/png;base64,iVBORw0KGgoAAAANSUhEUgAAAAcAAAAHCAYAAADEUlfTAAAAG0lEQVR42mNgwAfKy8v/48I4FeA0AacVDFQBAP9wJkE/KhUMAAAAAElFTkSuQmCC&quot;) no-repeat scroll 0 0 transparent;
                  }
                  .comments .thread-collapsed .thread-arrow {
                    background: url(&quot;data:image/png;base64,iVBORw0KGgoAAAANSUhEUgAAAAcAAAAHCAYAAADEUlfTAAAAJUlEQVR42mNgAILy8vL/DLgASBKnApgkVgXIkhgKiNKJ005s4gDLbCZBiSxfygAAAABJRU5ErkJggg==&quot;) no-repeat scroll 0 0 transparent;
                  }
                  .comments .avatar-image-container {
                    float: left;
                    width: 36px;
                    max-height: 36px;
                    margin-top: 15px;
                    overflow: hidden;
                  }
                  .comments .avatar-image-container img {
                    width: 36px;
                     box-shadow: 2px 2px 0px rgba(0,0,0,0.13)
                  }
                  .comments .comment-block {
                    margin-left: 48px;
                    position: relative;
                  }
                 
                  .comments .comments-content .comment-replies {
                        margin-top: 3em;
                        margin-left: 40px;
                        font-size: 12px;
                            }
                 
                  .comments .comments-content .comment-replies a {
                    color: #333;
                        }

/* For Animating Comment Header*/

.trigger {
margin-top: 3px;
font-weight: bold;
color: #A1A1A1;
cursor: pointer;
float: right;
font-size: 12px;
margin-right: 10px;
}
.triggeractive {
color:rgb(255, 5, 5);
}
.toggle_container {
overflow: hidden;
clear: both;
font-size: 12px;
font-weight: normal;
line-height: 20px;
margin-top: 10px;
}


                  /* Responsive styles. */
                  @media screen and (max-device-width: 480px) {
                    .comments .comments-content .comment-replies {
                      margin-left: 0;
                    }
                  }

/* Fancy Blogger Threaded Comments by MBT  ENDS*/


Make these Customizations:

To be honest you will need to use browser inspector to fill up all the missing gaps in alignment and styling. Since every template is coded differently therefore there will be slight difference in how this Design appears on your blog. So use Chrome and its inspect element to perfect things.

  • The yellow highlighted parts represent the Hexadecimal code for the two arrows that surround the Comment Counter Number. You can change this if you know how to edit the content property else leave it default.
  • The brown highlighted code represents the icon next to reply and delete link. you can replace it with your own custom image link if you wish.
  • The green highlighted code represents the Admin Ribbon. You can change it also if you wish
  • Leave all other styles default because they will blend a light background very nicely unless your blog has a black background.


4. Next search for this #comments h4   and replace this CSS ID completely with this one:


#comments h4{

color: #4E555A;
font-size: 25px;
font-family: 'Open Sans Condensed', sans-serif!important;
line-height: 1.6em !important;
font-weight: bold;
margin: 20px 0 50px 0px;
padding: 5px 0 5px 55px;
background: url(https://blogger.googleusercontent.com/img/b/R29vZ2xl/AVvXsEh7lCigzzbi4ds9Ui-kJeJVe_jtdiSpN3XgcpvH7sMU5k3Paes7edO5km4dWjshdxSKMnS2Av2SGin7hTE3YKLQlDflVXwMVWwCB6bF2lpuRbqV7f6Ul6s-PvfEm2rnRVX9_YQWUwyvuhW_/s1600/mbt-postcomment.png) no-repeat 5px 10px;
text-shadow: 2px 2px 0px rgba(0, 0, 0, 0.13);
border: 2px dashed #DDD;
border-radius: 4px;

}

5.  Save your template and you are half done!

Design Comment Header

Comment Header with comment policy

Nested comments uses an iframe comment box which can't be customized unless we use JQuery. I therefore removed the message that appears at the top of comment box which display a message above the comment box. We used to add a message above form by going to Blogger > Posts and comments. I removed that option and introduced a much more flexible way of warning visitors about the comment policy.

How it works?

Do you guys remember the Expand/collapse functionality we created for hiding the comment box? We will utilize the exact same script here and create a toggle tab for comment policy.

Be careful here:

  1. Inside your template search for:

<b:if cond='data:post.numComments == 1'>

Now this code will appear a total 2 times inside your template, having the exact similar format as the code below:

Tip: this code will appear once inside <b:includable id='comments' var='post'> and the next time inside <b:includable id='threaded_comments' var='post'>

<h4>
                   <b:if cond='data:post.numComments == 1'>
                     1
                     <data:commentLabel/>
                     :
                     <b:else/>
                     <data:post.numComments/>
                     <data:commentLabelPlural/>
                     :
                   </b:if>


</h4>


If your code matches the exact code shown above then just above </h4> paste the following HTML:

<a href='#comment-form'>Post Yours!</a> <span class='trigger'>Read Comment Policy &#9660;</span>
<div class='toggle_container'>
<div class='block'>

<font style='color:rgb(255, 0, 0); font-weight:bold;'>PLEASE NOTE:</font>
 
  <br/>
<b><u>We have Zero Tolerance to Spam.</u></b>  Chessy Comments and Comments with <b>Links</b>  will be deleted immediately upon our review.

</div>
</div>

You can replace the entire yellow highlighted part with any message that you would like to display to your readers. You can add links, images, even a video message! anything you want to guide your visitors to avoid spam.


Make the Comment Header Animate:

When you click the comment Policy link, the Message slides down. When you click it back it collapses and hides the message. We will use Jquery slideToggle function to apply this effect. I have also included the Google link to "Open Sans condensed" font to style the fonts. Follow these steps:

  1. Paste the following code just above </head>

<script src='http://ajax.googleapis.com/ajax/libs/jquery/1/jquery.min.js' type='text/javascript'/>

<link href='http://fonts.googleapis.com/css?family=Open+Sans+Condensed' rel='stylesheet' type='text/css'/>

<script type='text/javascript'>


$(document).ready(function(){


    $(&quot;.toggle_container&quot;).hide();
 
    $(&quot;.trigger&quot;).click(function(){
        $(this).toggleClass(&quot;triggeractive&quot;).next().slideToggle(&quot;slow&quot;);
    });
 
});


</script>

Don't add the bolded code if you have already added JQuery library source link in your template.

  2.  Save your template and you are all done!

Need help?

Oh Of course! You may need a lot of help in customization but relax buddies, I am available for any help needed. I hope this new commenting Theme adds a new life to your blog and makes your blogging journey even more exciting. Please don't forget to spread this knowledge and share it with your friends and loved ones. May peace and mercy of God be on all of you! :)

Saturday, 1 June 2013

Create Accordion Widget in Blogger

Accordion Widget for bloggerUpdate: The Script  has been updated and it will work just perfect!

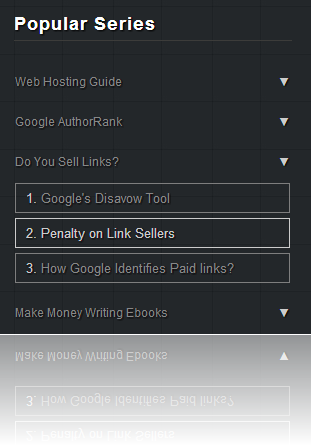
It is really important to organize your content and make certain sections of your blog to appear only when the visitor is interested in it. We are using an Accordion Widget that you can find at the footer of our blog in order to display a list of Popular Series. Its an effective way for us to display long list of links in a neat and clean way. I created this widget using  JQuery and the Easing Plugin. This Accordion widget is a modified version of the Fresh content Accordion released by Martin Angelov in 2009. We customized its stylesheet and edit some parts of the scripts to make it compatible with blogger blogs. It has a great Expand/Collapse Feature. This widget collapses and hides all content inside it by default but when user clicks it, the content is displayed by expanding that tab section. I am sure you would love to add this Fancy Accordion widget to your BlogSpot blogs.

Need Demo? Check the footer of our blog! Click Here

Design a Fancy Accordion For Blogger!

Just follow this step by step easy tutorial. You don't need to worry about browser compatibility issues because we have done all that work for you. The widget is compatible with all major browsers including IE8+.

Follow these steps:

  1. Go To Blogger > Template
  2. Backup your template
  3. Click Edit HTML
  4. Search for </head>
  5. Just above it paste the following code

<script src='http://ajax.googleapis.com/ajax/libs/jquery/1/jquery.min.js' type='text/javascript'></script>
<script>
//<![CDATA[
$(document).ready(function(){
/* This code is executed after the DOM has been completely loaded */
/* Changing thedefault easing effect - will affect the slideUp/slideDown methods: */
$.easing.def = "easeOutBounce";
/* Binding a click event handler to the links: */
$('li.button a').click(function(e){

/* Finding the drop down list that corresponds to the current section: */
var dropDown = $(this).parent().next();

/* Closing all other drop down sections, except the current one */
$('.dropdown1').not(dropDown).slideUp('slow');
dropDown.stop(false,true).slideToggle('slow');

/* Preventing the default event (which would be to navigate the browser to the link&#39;s address) */
e.preventDefault();
})

});
// t: current time, b: begInnIng value, c: change In value, d: duration
jQuery.easing['jswing'] = jQuery.easing['swing'];

jQuery.extend( jQuery.easing,
{
def: 'easeOutQuad',
swing: function (x, t, b, c, d) {
  //alert(jQuery.easing.default);
  return jQuery.easing[jQuery.easing.def](x, t, b, c, d);
},
easeInQuad: function (x, t, b, c, d) {
  return c*(t/=d)*t + b;
},
easeOutQuad: function (x, t, b, c, d) {
  return -c *(t/=d)*(t-2) + b;
},
easeInOutQuad: function (x, t, b, c, d) {
  if ((t/=d/2) < 1) return c/2*t*t + b;
  return -c/2 * ((--t)*(t-2) - 1) + b;
},
easeInCubic: function (x, t, b, c, d) {
  return c*(t/=d)*t*t + b;
},
easeOutCubic: function (x, t, b, c, d) {
  return c*((t=t/d-1)*t*t + 1) + b;
},
easeInOutCubic: function (x, t, b, c, d) {
  if ((t/=d/2) < 1) return c/2*t*t*t + b;
  return c/2*((t-=2)*t*t + 2) + b;
},
easeInQuart: function (x, t, b, c, d) {
  return c*(t/=d)*t*t*t + b;
},
easeOutQuart: function (x, t, b, c, d) {
  return -c * ((t=t/d-1)*t*t*t - 1) + b;
},
easeInOutQuart: function (x, t, b, c, d) {
  if ((t/=d/2) < 1) return c/2*t*t*t*t + b;
  return -c/2 * ((t-=2)*t*t*t - 2) + b;
},
easeInQuint: function (x, t, b, c, d) {
  return c*(t/=d)*t*t*t*t + b;
},
easeOutQuint: function (x, t, b, c, d) {
  return c*((t=t/d-1)*t*t*t*t + 1) + b;
},
easeInOutQuint: function (x, t, b, c, d) {
  if ((t/=d/2) < 1) return c/2*t*t*t*t*t + b;
  return c/2*((t-=2)*t*t*t*t + 2) + b;
},
easeInSine: function (x, t, b, c, d) {
  return -c * Math.cos(t/d * (Math.PI/2)) + c + b;
},
easeOutSine: function (x, t, b, c, d) {
  return c * Math.sin(t/d * (Math.PI/2)) + b;
},
easeInOutSine: function (x, t, b, c, d) {
  return -c/2 * (Math.cos(Math.PI*t/d) - 1) + b;
},
easeInExpo: function (x, t, b, c, d) {
  return (t==0) ? b : c * Math.pow(2, 10 * (t/d - 1)) + b;
},
easeOutExpo: function (x, t, b, c, d) {
  return (t==d) ? b+c : c * (-Math.pow(2, -10 * t/d) + 1) + b;
},
easeInOutExpo: function (x, t, b, c, d) {
  if (t==0) return b;
  if (t==d) return b+c;
  if ((t/=d/2) < 1) return c/2 * Math.pow(2, 10 * (t - 1)) + b;
  return c/2 * (-Math.pow(2, -10 * --t) + 2) + b;
},
easeInCirc: function (x, t, b, c, d) {
  return -c * (Math.sqrt(1 - (t/=d)*t) - 1) + b;
},
easeOutCirc: function (x, t, b, c, d) {
  return c * Math.sqrt(1 - (t=t/d-1)*t) + b;
},
easeInOutCirc: function (x, t, b, c, d) {
  if ((t/=d/2) < 1) return -c/2 * (Math.sqrt(1 - t*t) - 1) + b;
  return c/2 * (Math.sqrt(1 - (t-=2)*t) + 1) + b;
},
easeInElastic: function (x, t, b, c, d) {
  var s=1.70158;var p=0;var a=c;
  if (t==0) return b;  if ((t/=d)==1) return b+c;  if (!p) p=d*.3;
  if (a < Math.abs(c)) { a=c; var s=p/4; }
  else var s = p/(2*Math.PI) * Math.asin (c/a);
  return -(a*Math.pow(2,10*(t-=1)) * Math.sin( (t*d-s)*(2*Math.PI)/p )) + b;
},
easeOutElastic: function (x, t, b, c, d) {
  var s=1.70158;var p=0;var a=c;
  if (t==0) return b;  if ((t/=d)==1) return b+c;  if (!p) p=d*.3;
  if (a < Math.abs(c)) { a=c; var s=p/4; }
  else var s = p/(2*Math.PI) * Math.asin (c/a);
  return a*Math.pow(2,-10*t) * Math.sin( (t*d-s)*(2*Math.PI)/p ) + c + b;
},
easeInOutElastic: function (x, t, b, c, d) {
  var s=1.70158;var p=0;var a=c;
  if (t==0) return b;  if ((t/=d/2)==2) return b+c;  if (!p) p=d*(.3*1.5);
  if (a < Math.abs(c)) { a=c; var s=p/4; }
  else var s = p/(2*Math.PI) * Math.asin (c/a);
  if (t < 1) return -.5*(a*Math.pow(2,10*(t-=1)) * Math.sin( (t*d-s)*(2*Math.PI)/p )) + b;
  return a*Math.pow(2,-10*(t-=1)) * Math.sin( (t*d-s)*(2*Math.PI)/p )*.5 + c + b;
},
easeInBack: function (x, t, b, c, d, s) {
  if (s == undefined) s = 1.70158;
  return c*(t/=d)*t*((s+1)*t - s) + b;
},
easeOutBack: function (x, t, b, c, d, s) {
  if (s == undefined) s = 1.70158;
  return c*((t=t/d-1)*t*((s+1)*t + s) + 1) + b;
},
easeInOutBack: function (x, t, b, c, d, s) {
  if (s == undefined) s = 1.70158;
  if ((t/=d/2) < 1) return c/2*(t*t*(((s*=(1.525))+1)*t - s)) + b;
  return c/2*((t-=2)*t*(((s*=(1.525))+1)*t + s) + 2) + b;
},
easeInBounce: function (x, t, b, c, d) {
  return c - jQuery.easing.easeOutBounce (x, d-t, 0, c, d) + b;
},
easeOutBounce: function (x, t, b, c, d) {
  if ((t/=d) < (1/2.75)) {
   return c*(7.5625*t*t) + b;
  } else if (t < (2/2.75)) {
   return c*(7.5625*(t-=(1.5/2.75))*t + .75) + b;
  } else if (t < (2.5/2.75)) {
   return c*(7.5625*(t-=(2.25/2.75))*t + .9375) + b;
  } else {
   return c*(7.5625*(t-=(2.625/2.75))*t + .984375) + b;
  }
},
easeInOutBounce: function (x, t, b, c, d) {
  if (t < d/2) return jQuery.easing.easeInBounce (x, t*2, 0, c, d) * .5 + b;
  return jQuery.easing.easeOutBounce (x, t*2-d, 0, c, d) * .5 + c*.5 + b;
}
});
//]]>
</script>


Note: The yellow highlighted code is for producing the bouncing effect using the Easing Plugin. If you don't want too much animation then you can delete the yellow part of the code.


    6. Search for </b:skin>.  Click the black arrow to expand the code.

compressed blogger stylesheet

   7.  Paste the following CSS Styles just above </b:skin>


/*------ Accordion Widget by MBT  -----*/

ul.container{

    width:275px;
    margin:0 auto;
    padding:0px;
}


li.menu{

    padding:5px 0;
    width:100%;

}

li.button a{

    display:block;
    font-family: Arial, sans-serif,Helvetica;
    font-size:12px;
    overflow:hidden;
    padding:0px 0px 5px 0;
    position:relative;
    width:100%;
        text-transform:capitalize;
}

li.button a:hover{

    text-decoration:none!important;
}

li.button a span{
   
    right:0px;
        top:0px;
    position:absolute;
    color:#ccc;
    display:block;
}


.dropdown1{

    display:none;
    padding-top:5px;
    width:100%;
}

.dropdown1 li{


border:1px solid #7E7E7E;
    color:#CCCCCC;
    margin:5px 0;
    padding:4px 10px;
       
}

.dropdown1 li:hover {
border:1px solid #ccc;
text-decoration:none;
}


.dropdown1 li a:hover {
text-decoration:none;
}

Note: The look and colors of the links and fonts can be customized by editing the above the code. But the default colors would work fine with any dark footer except if your footer has white background.

   8.  Save your template and you are all done!

Add Accordion To Blogger Layout

Now you need to add your widget in the layout section and start making a list of your own popular series or any content that you wish to display inside it.

  1. Go to blogger > Layout
  2. Click Add a Gadget
  3. Choose HTML/JavaScript widget
  4. Paste the following HTML code inside it:

<ul class="container">


<!- TAB ONE -->


      <li class="menu">
     
          <ul>
            <li class="button"><a href="#" >ADD TAB TITLE HERE<span>?</span></a></li>             

            <li class="dropdown1">


                <ul>
<li>1. <a  href="ADD LINK HERE" >ADD LINK TEXT HERE</a></li>
<li>2. <a  href="ADD LINK HERE">ADD LINK TEXT HERE</a></li>

<li>3. <a href="ADD LINK HERE">ADD LINK TEXT HERE</a></li>

<li>5. <a href="ADD LINK HERE">ADD LINK TEXT HERE</a></li>

<li>4. <a href="ADD LINK HERE">ADD LINK TEXT HERE</a></li>

                </ul>
            </li>

          </ul>
         
      </li>


<!- TAB TWO -->


<li class="menu">
     
          <ul>
            <li class="button"><a href="#" >ADD TAB TITLE HERE<span>?</span></a></li>

            <li class="dropdown1">
                <ul>

<li>1. <a href="ADD LINK HERE" >ADD LINK TEXT HERE</a></li>
<li>2. <a href="ADD LINK HERE">ADD LINK TEXT HERE</a></li>

<li>3. <a href="ADD LINK HERE">ADD LINK TEXT HERE</a></li>

<li>5. <a href="ADD LINK HERE">ADD LINK TEXT HERE</a></li>

<li>4. <a href="ADD LINK HERE">ADD LINK TEXT HERE</a></li>


             </ul>
            </li>

          </ul>

      </li>


  </ul>

In the above code I created two tabs with 4 rows each.

  • Replace ADD TAB TITLE HERE with the name of the list title.
  • Replace ADD LINK HERE with your Link URL
  • Replace ADD LINK TEXT HERE with your anchor text


I don't think the above code needs further clarification. Every part is highlighted to make it more simple to be understood. If incase you wanted to add another tab then just add the following code above </ul>


<li class="menu">

<ul>
<li class="button"><a href="#" >ADD TAB TITLE HERE<span>?</span></a></li>

<li class="dropdown1">
<ul>

<li>1. <a href="ADD LINK HERE" >ADD LINK TEXT HERE</a></li>

</ul>
</li>

</ul>

</li>

To increase the number of rows simply keeping adding this line of code:

<li>1. <a href="ADD LINK HERE" >ADD LINK TEXT HERE</a></li>

  • Simply change 1 with the row number.

    5.  Click Save and you are all done!

Visit your blog to see it hanging just nicely on your blog sidebar. Click the tabs and play with your newly created Accordion widget. It's all yours now! :)

Need Help?

Most of your requested this tutorial and it is my habit to share everything that we apply to our blog in order to help you customize your blogs to the bets possible look. Please let me know if you needed any help. I just hope it helps you to effectively organize your blog even more. Peace and blessings dear brothers :)

Thursday, 30 May 2013

Popular Posts With Automatic Numbering - Bubbles!

Popular Posts Widget

When blogger released Popular Posts widget back in 2011, we leaked out its stylesheet so that you can customize it to blend it perfectly to your BlogSpot templates. Today we will learn how to display the list of popular posts using CSS3 auto increment property. You can style the numbers in variety of shapes, we styled them in square/rectangular and circular shape. you guys were the first to display threaded comments with Comment Counts and today you will again learn something more interesting. You can see a practical demo of this implementation on our sidebar. Lets add this effect to blogger in fairly easy steps using pure styles with no use of JavaScript.

Popular posts widget is an effective tool to increase your blog pageviews and engage readers more on your blog. It fetches and ranks posts based on most visited pages using your Google analytics data.

Add Popular Posts Widget

  1. Go to Blogger > Layout
  2. Click "Add a Gadget"
  3. Choose "Popular Posts"  from the list
  4. You will need to configure its settings as shown in the image below: uncheck "image thumbnail" and also "snippet"   Its better that you display at most 7-9 posts. Less is good and clean.


popular posts widget settings

       5.  Save it


Customize Popular Posts Plugin

Now you need to change the default styles and change its look to our desired design using Custom styles.

  1. Go To Blogger > Template
  2. Backup your Template
  3. Click Edit HTML
  4. Search for </b:skin>.  Click the black arrow to expand the code.

compressed blogger stylesheet

   5.  Paste the following Styles just above </b:skin>

/*--- MBT Popular Posts --- */
.popular-posts ul {
padding-left: 0px;
counter-reset: popcount;
}

.popular-posts ul li:before {
list-style-type: none;
margin-right: 15px;
padding: 0.3em 0.6em;
counter-increment: popcount;
content: counter(popcount);
font-size: 16px;
background: #292D30;
color: #ffffff;
position: relative;
font-weight: bold;
font-family: georgia;
float: left;
border: 2px solid #dddddd;
box-shadow: 1px 2px 9px #666666; }

.popular-posts ul li {
border-bottom: 1px dashed #dddddd;
}

.popular-posts ul li:hover {
border-bottom: 1px dashed #696969;
}

.popular-posts ul li a {
text-decoration:none; color:#5A5F63;
}


.popular-posts ul li a:hover {
text-decoration:none;
}

Customization:

  • To change the background color of the Square bubble edit #292D30
  • To change the text color of the bubble edit #ffffff
  • By default the shape of the bubble is Square. To change it to Circle simply add the following code just after box-shadow: 1px 2px 9px #666666;

border-radius:15px;


    6. Save your template and you are all done!

Visit your blog to see it working just perfectly.

If you would wish to add it inside a Multi Tab Widget just like we have done on our blog, then you can find several tutorials on our blog that were released years ago on Multi Tabs. Please read one below:


Need Help?

I just hope you would find this tutorial easy and yet exciting. Please let me know if you need any help. I just hope you continue adding more colors and flavors to your beautiful blogs. Wish you success and peace buddies. :)